
Dentrist Vendor Portal Manual
The vendor portal is the web application a dental lab uses every day in Dentrist. It follows a case from the moment a dentist sends it, through production on the bench, delivery, invoicing and payment, and posts every amount automatically to a full double-entry accounting system. The same portal adapts to whoever signs in: lab admins and staff, technicians, and the dentists who send cases to the lab.
This catalog walks through every screen of the vendor portal, step by step, with screenshots. The screenshots come from the Demo Lab EN demonstration lab, so the clients, orders and amounts you see are sample data. Each demo order uses one formula type across all of its units so the lists stay easy to read.
Contents
- 1. Introduction
- What the vendor portal does, who uses it, user roles, the life of an order
- 2. Getting started
- Signing in, the screen layout, language, theme, the guided tour
- 3. Dashboard
- 4. Orders
- Orders list, creating an order, the order page, status, phases, files and 3D viewer, conversation, change history, calendar
- 5. Clients and dentists
- Clients list, adding a client, client page, dentists, custom prices, wallet, account statement
- 6. Formulas, services and colors
- 7. Users and roles
- 8. Sales: invoices and payments
- 9. Expenses and suppliers
- Expenses, expense types, suppliers, supplier bills, technician settlements, salaries
- 10. Cash and bank
- 11. Accounting
- Chart of accounts, journal entries, fixed assets, period close, tax
- 12. Reports and insights
- Revenue, collection, transactions, financial statements, aging, lab costing, financial insights, inventory
- 13. Lab and platform settings
- 14. The dentist portal
- 15. The technician view
- Appendix A. Quick reference
- Common tasks, order statuses, default chart of accounts, glossary, troubleshooting
1. Introduction
1.1 What Dentrist does
Dentrist brings everything a dental lab does into one bilingual (English and Arabic) workspace:
- Lab management (LMS): orders, the FDI tooth chart, shades, production phases, technicians, couriers, files and 3D scans, delivery dates and a calendar.
- Client management (CRM): clinics, hospitals and partner labs, their dentists, special prices, prepaid wallets and account statements, plus a portal where dentists send and follow their own cases.
- Finance and accounting: invoices and payments, expenses, suppliers and bills, technician pay, salaries, cash and bank, inventory, tax, and a real ledger with a trial balance, profit and loss, balance sheet and cash flow.
1.2 Who uses the vendor portal
| Person | What they see |
|---|---|
| Lab admins and staff | The full lab menu: orders, clients, catalog, users, sales, expenses, cash and bank, accounting, reports and settings. Most of this catalog is about this view |
| Technicians, couriers and other staff roles | A reduced menu with the orders assigned to them (see 15. The technician view) |
| Dentists and clinic staff | The dentist portal: they send orders to the lab and follow their status, invoices, statement and wallet (see 14. The dentist portal) |
Everyone signs in at the same address; the menu adapts to the person who signs in. Labs join Dentrist from the Dentrist website, and the Dentrist team creates the lab and its first admin account.
1.3 User roles
Every person signs in with their own account. What they see in the menu, and what they can do on each page, depends on their role:
| Role | Typical person | Main access |
|---|---|---|
| Admin | Lab owner or manager | Everything in the lab portal, including settings, finance and users |
| Technician | Bench technician | Orders assigned to them, the calendar, phases and order chat |
| Courier | Delivery driver | Orders to deliver and their delivery status |
| Accountant | Internal or external accountant | Finance and accounting pages, mostly read-only |
| Designer | CAD designer | Orders and design files |
| Scanner | Scanning technician | Orders and scan uploads |
| Dentist | Dentist or clinic account | The dentist portal: their own orders, invoices, statement and wallet |
Admins can also build custom roles with exactly the permissions they need when the feature is enabled for the lab (see 7. Users and roles).
1.4 The life of an order
Every feature in Dentrist hangs off the order. A typical case moves like this:
- Order received. The lab creates the order, or the dentist sends it from the dentist portal. It starts as Requested.
- Production. The lab moves it to In Progress (or the lab's own production statuses), assigns technicians, and ticks production phases such as Model, Design and Finishing. At this point Dentrist records the production cost of each unit.
- Delivery. The order goes Out for Delivery. From the lab's billable status (usually Out for Delivery) the order amount is owed by the client and counts as revenue.
- Invoicing and payment. The order is added to an invoice, the client pays (cash, bank, transfer channel or wallet), and the order is Closed.
- Accounting. Each step posts a balanced journal entry, so the reports and financial statements are always up to date.
Tip: Which statuses exist, their order, which one is billable and which ones the dentist can see are all configured per lab by the Dentrist team. Ask Dentrist support through Support chat to change them.
2. Getting started
2.1 Signing in
Open the lab portal address you received and sign in with your email or username and password. Click the eye icon in the password field to show what you typed. The ع / EN button in the top corner switches the sign-in page between Arabic and English.

The sign-in page of the lab portal. Dentists use the same page.
If you forgot your password, click Forgot password? and follow the instructions. If your account has no email, the page shows how to contact your lab admin instead.
2.2 The screen layout
After signing in you land on your workspace. Every page has the same three areas:
- Sidebar (left). The main menu. Items with an arrow open a group of pages. The menu only shows the pages your role can use. Click the ☰ icon at the top to collapse or expand it.
- Top bar.
- EN / AR switch: changes the language of the whole system. Arabic switches the layout to right-to-left.
- Dark Mode switch: changes between light and dark theme.
- Bell: your notifications (for example, when someone mentions you in an order chat).
- Eye: shows or hides prices on screen. Useful when a client is looking at your screen.
- Your name: opens a menu with Profile, System tour and Log out.
- Page content (center). Most pages start with a header card (title, count and the main action buttons), then a Filters card, then the list or form.
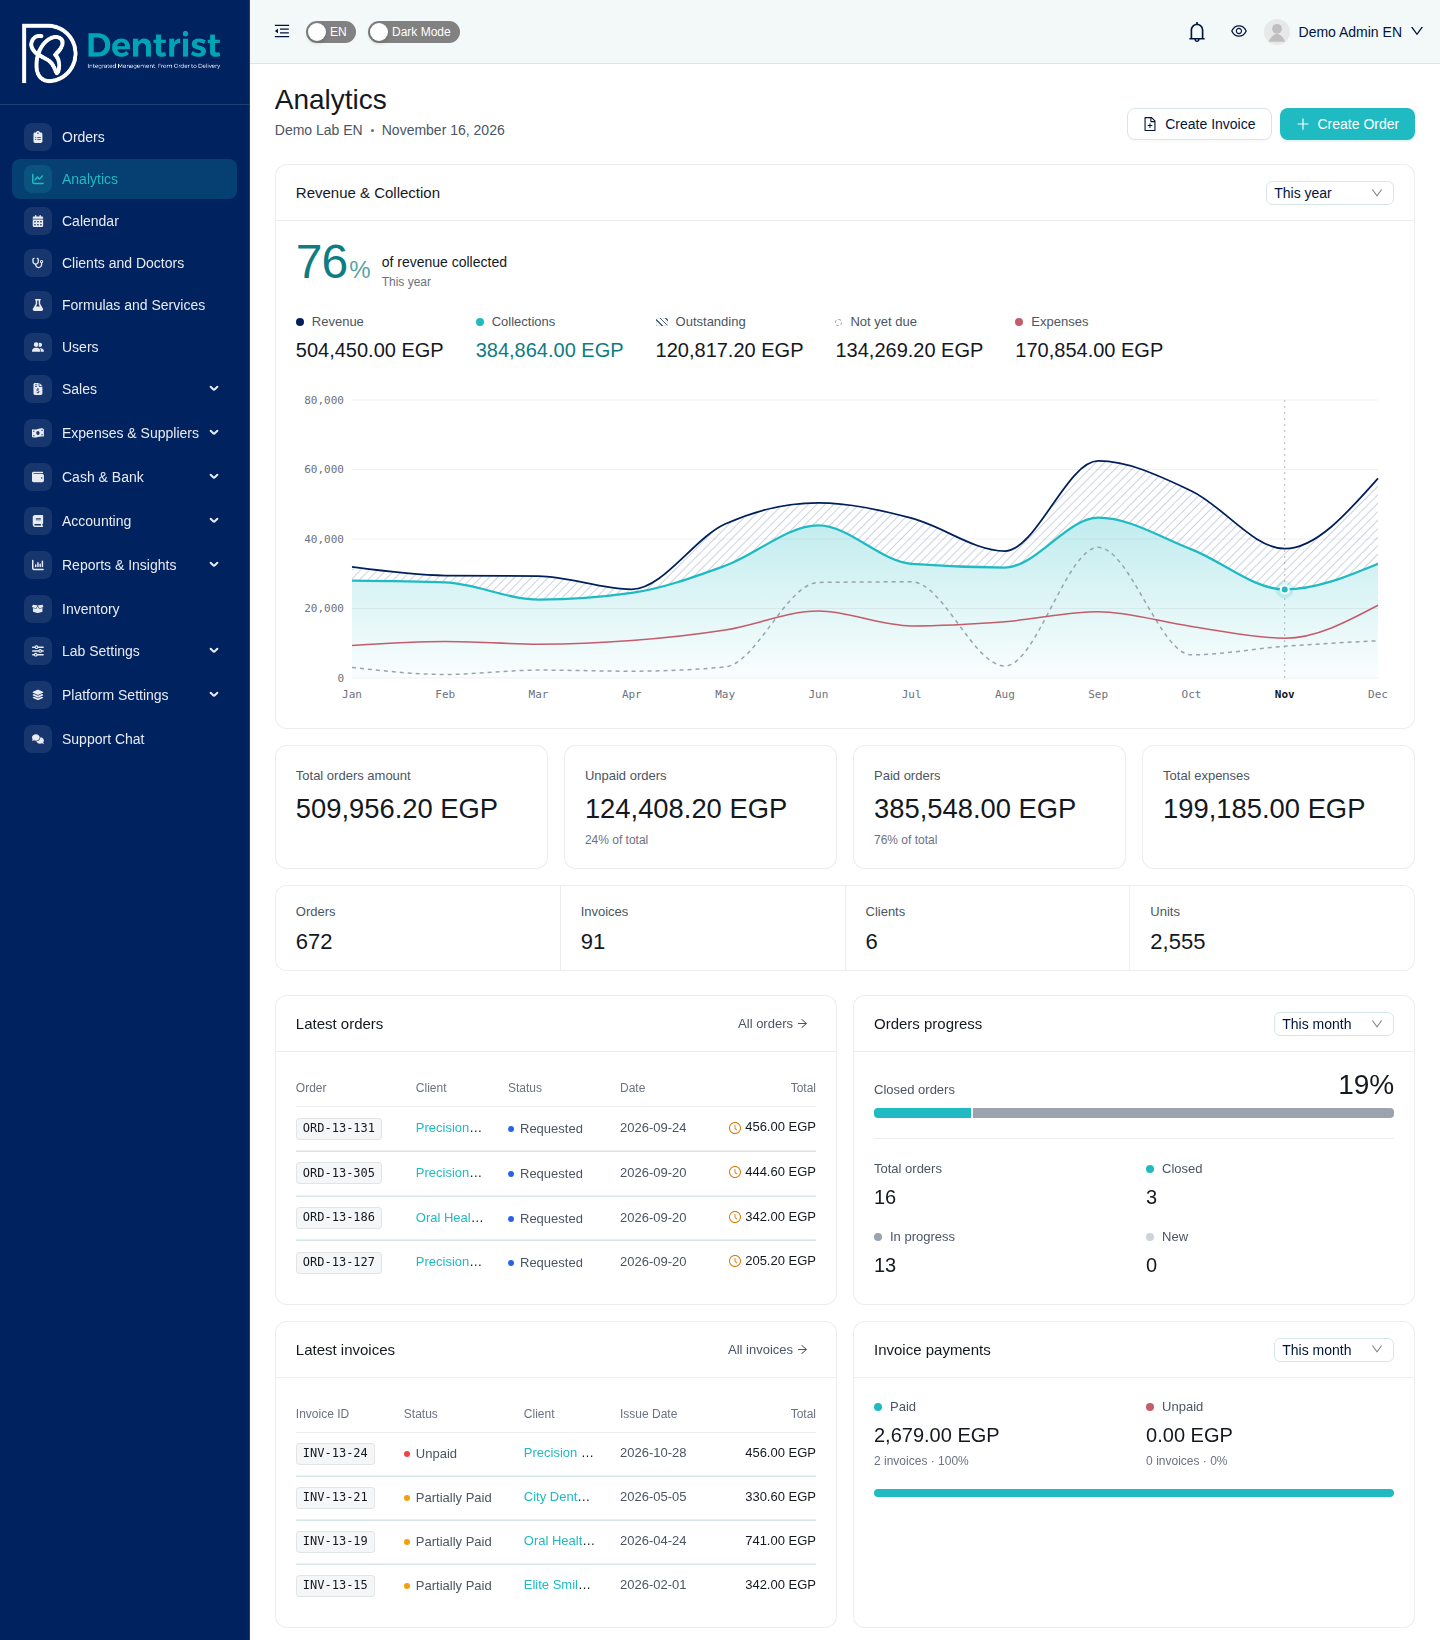
The lab portal: sidebar on the left, top bar with language, theme, notifications, price visibility and the user menu.
The full sidebar of a lab admin contains:
| Menu | What you find there |
|---|---|
| Orders | All orders, create order |
| Analytics | The dashboard |
| Calendar | Orders and invoices on a calendar |
| Clients and Doctors | Clinics, their dentists, prices, wallets and statements |
| Formulas and Services | The products and services you sell, with prices and costs |
| Users | Staff accounts and roles |
| Sales | Invoices, Discount Settings |
| Expenses and Suppliers | Expenses, Expense Types, Suppliers, Supplier Bills, Technician Settlements, Salaries |
| Cash and Bank | Cash and Bank accounts, Bank Reconciliation, Payment Settings |
| Accounting | Chart of Accounts, Journal Entries, Fixed Assets, Period Close, Tax |
| Reports and Insights | Revenue Report, Collection Report, Transactions, Financial Reports, Aging Reports, Lab Costing, Financial Insights |
| Inventory | Stock items, movements, stock counts and valuation |
| Lab Settings | Lab information, Delivery Settings, Vacations, Branches |
| Platform Settings | Colors, Activities, Notification Settings, Subscription |
| Support Chat | Chat with the Dentrist support team |
2.3 Language and theme
Dentrist is fully bilingual. Click EN / AR in the top bar to switch. Your choice is saved to your account, so the system opens in the same language next time, and emails and PDFs follow it.

The same dashboard in Arabic, with the right-to-left layout.
Click Dark Mode for a dark theme, which is easier on the eyes in a dim lab.
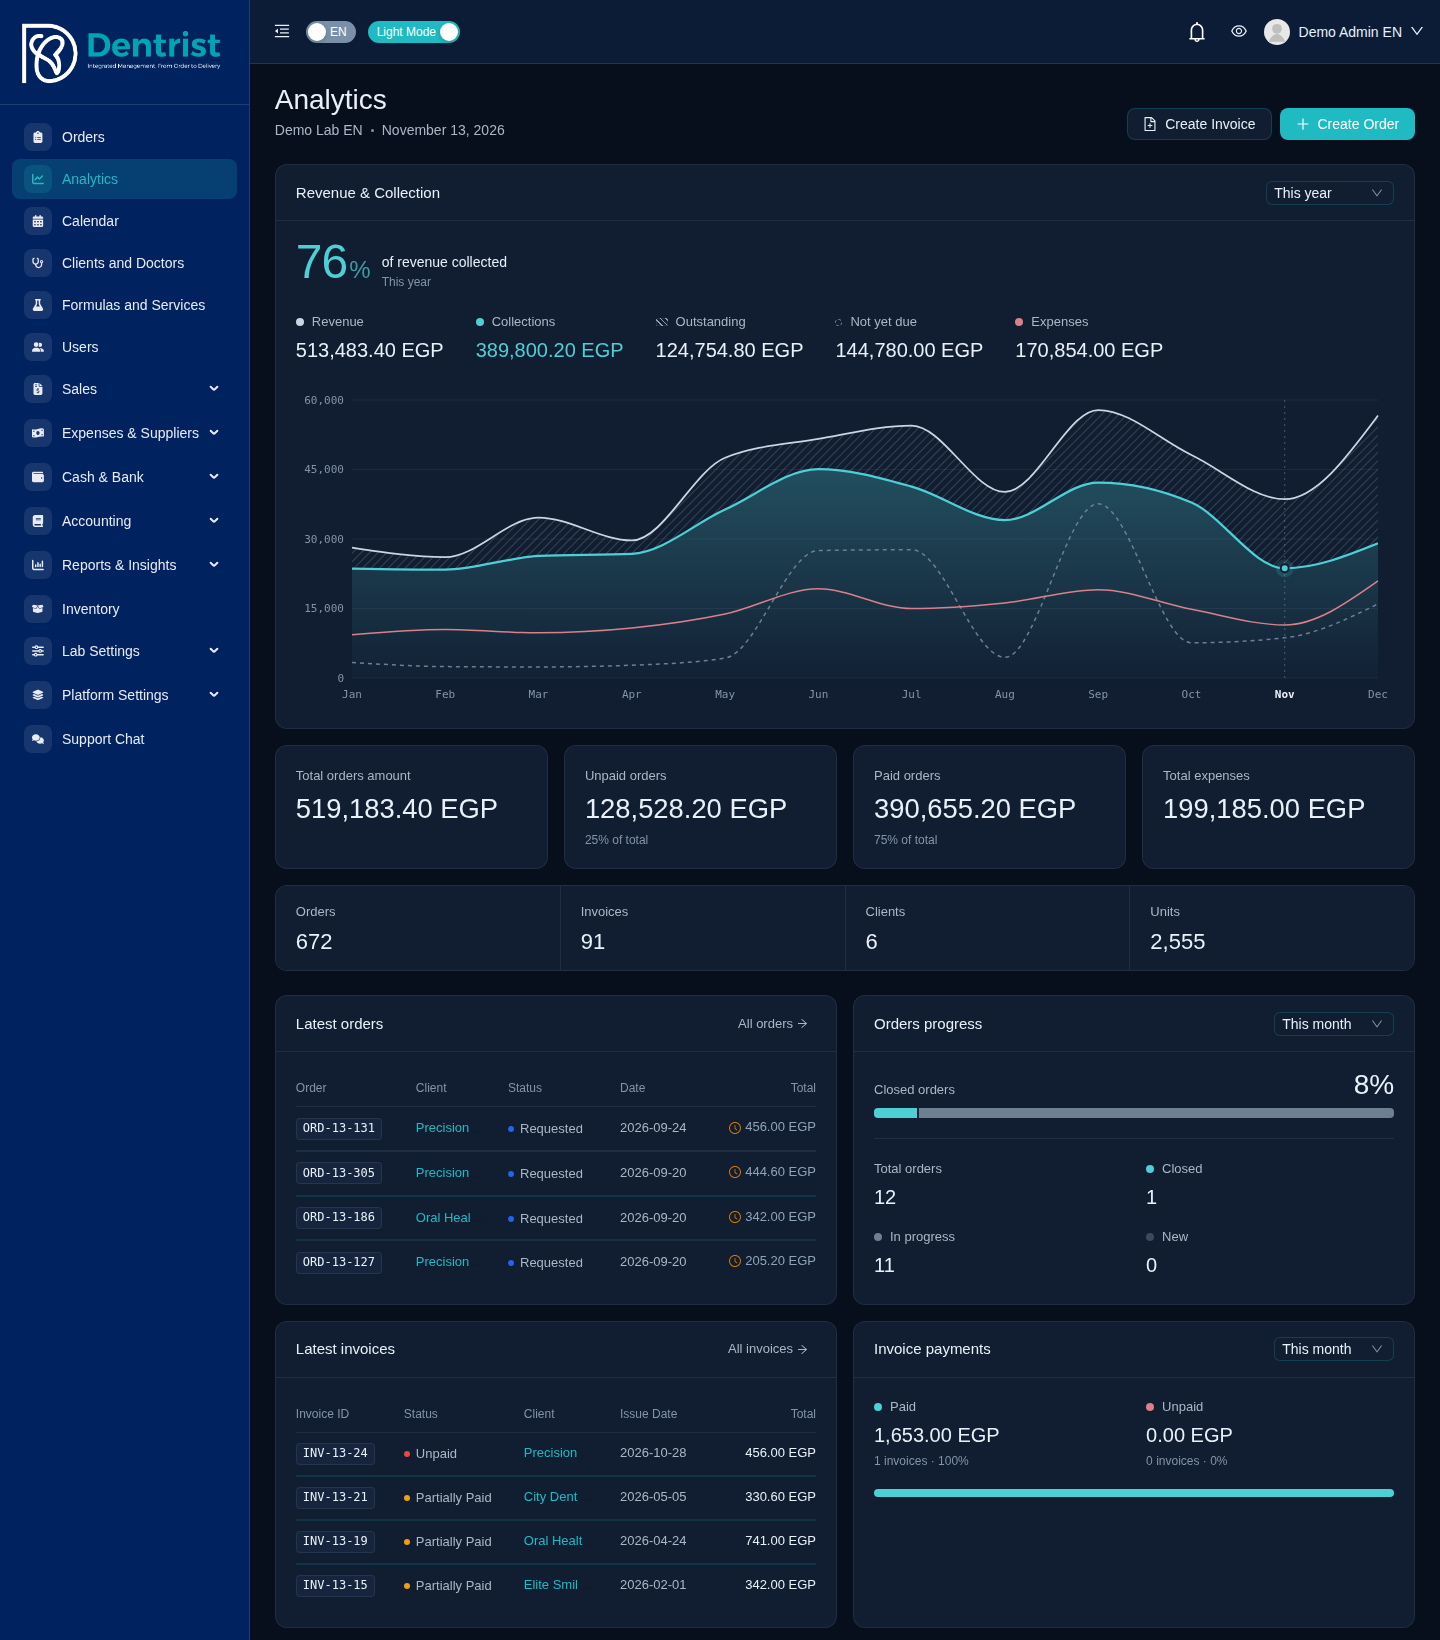
Dark mode.
2.4 The guided tour and your profile
The first time you sign in, a short guided tour introduces the main navigation, the language and theme controls, your account menu, the workspace and the system pages. You can skip it at any time and replay it later from your name in the top bar → System tour.
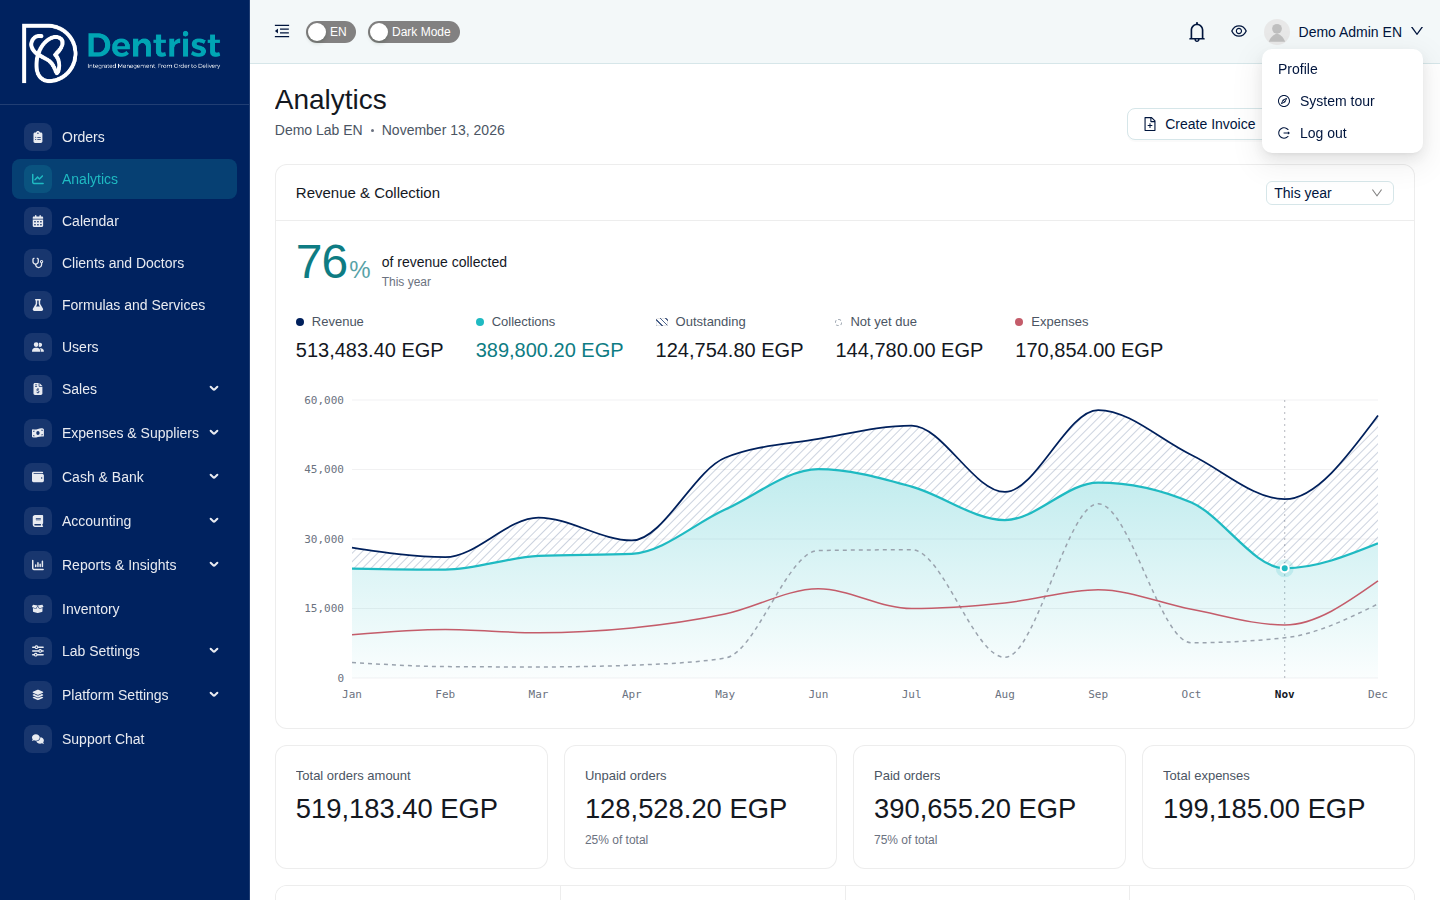
The user menu: Profile, System tour and Log out.
Profile shows your name, username, email, phone, WhatsApp, user type and lab. Use Edit to change your details and photo, and Change Password to set a new password.
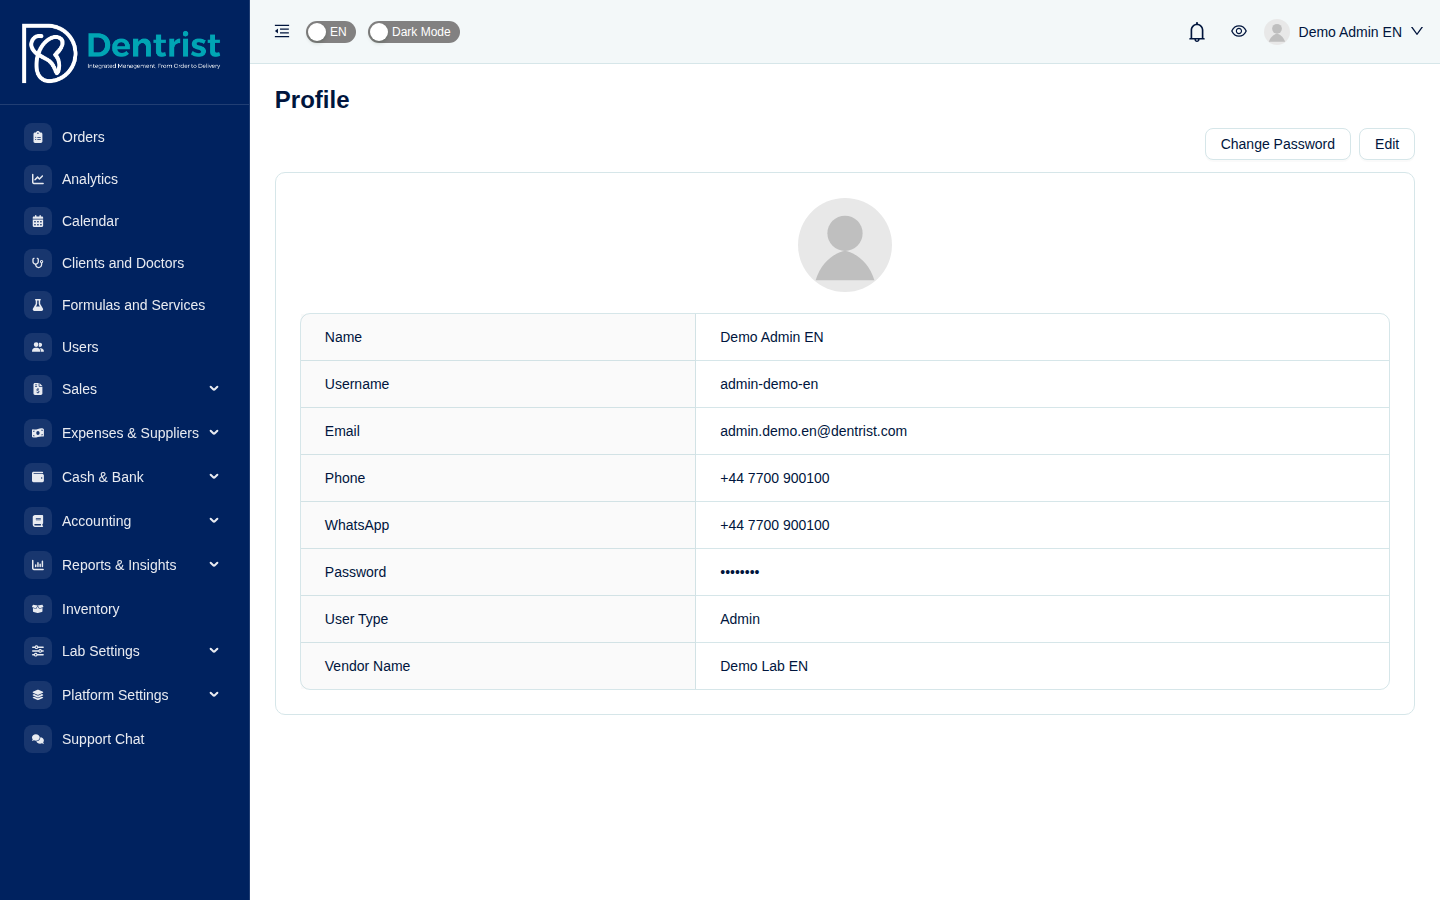
Your profile.
3. Dashboard
Menu: Analytics
The dashboard (the Analytics page) is the lab owner's control panel. It summarizes the lab's activity for the selected period. Use the period selector on each card (for example This year, This month or a custom range) to change it.
The dashboard: the Revenue and Collection chart with the collection rate, and the KPI cards below it.
What you see, from top to bottom:
- Header: the lab name, today's date and the Create Invoice and Create Order shortcuts.
- Revenue and Collection: the share of revenue already collected in the period (for example 76% of revenue collected), five totals and a month-by-month chart of them:
- Revenue: the amount of orders that became billable in the period.
- Collections: the money actually received.
- Outstanding: billable amounts not yet paid (the hatched area between the revenue and collection lines).
- Not yet due: orders still in production, not yet billable.
- Expenses: the lab's expenses in the period.
- KPI cards: total orders amount, unpaid and paid orders (with their share of the total) and total expenses, then the number of orders, invoices, clients and units.
- Further down:
- Latest orders and Latest invoices, with links to the full lists.
- Orders progress: the share of closed orders, and how many orders are closed, in progress or new in the period.
- Invoice payments: paid and unpaid invoice amounts in the period.
- Formula Types Profit: per formula type, the units sold, selling price, total, material, technician and additional costs, and net profit, by month or date range.
- The latest formula types, the formula types tracker, the most active clients and activity charts for clients, orders, invoices and expenses.

Lower part of the dashboard: latest orders and invoices, orders progress, invoice payments and formula type profit.
Note: The dashboard is an operational view. For the books of record (profit and loss, balance sheet), use 12.4 Financial reports.
4. Orders
Menu: Orders
4.1 The orders list
The orders list shows every case in the lab, newest first.

The orders list with status chips, filters and the table.
- Status chips at the top (All, Requested, In Progress, Out for Delivery, Closed, On Hold, Cancelled…) show how many orders are in each status. Click a chip to show only those orders.
- Filters: search by patient or order number, client, dentist, technician, courier, formula type, payment status, requested date range and paid date range. Tick Remakes only to list only remake orders. Your filters are remembered when you come back to the page. Reset Filters clears them.
- Table columns: order ID, dentist, patient, tooth positions, units count, formula types and shade, total amount, order status (click Jump to status to change it right from the list), requested date and actions.
- Bulk actions: tick several orders with the check boxes to change their status or perform other actions on all of them at once.
- Export downloads the list (with the current filters) to a file; Refresh reloads it.
4.2 Creating an order
Click Create Order (on the orders list, the dashboard banner or the header). The new order already has its order code (for example ORD-13-673).
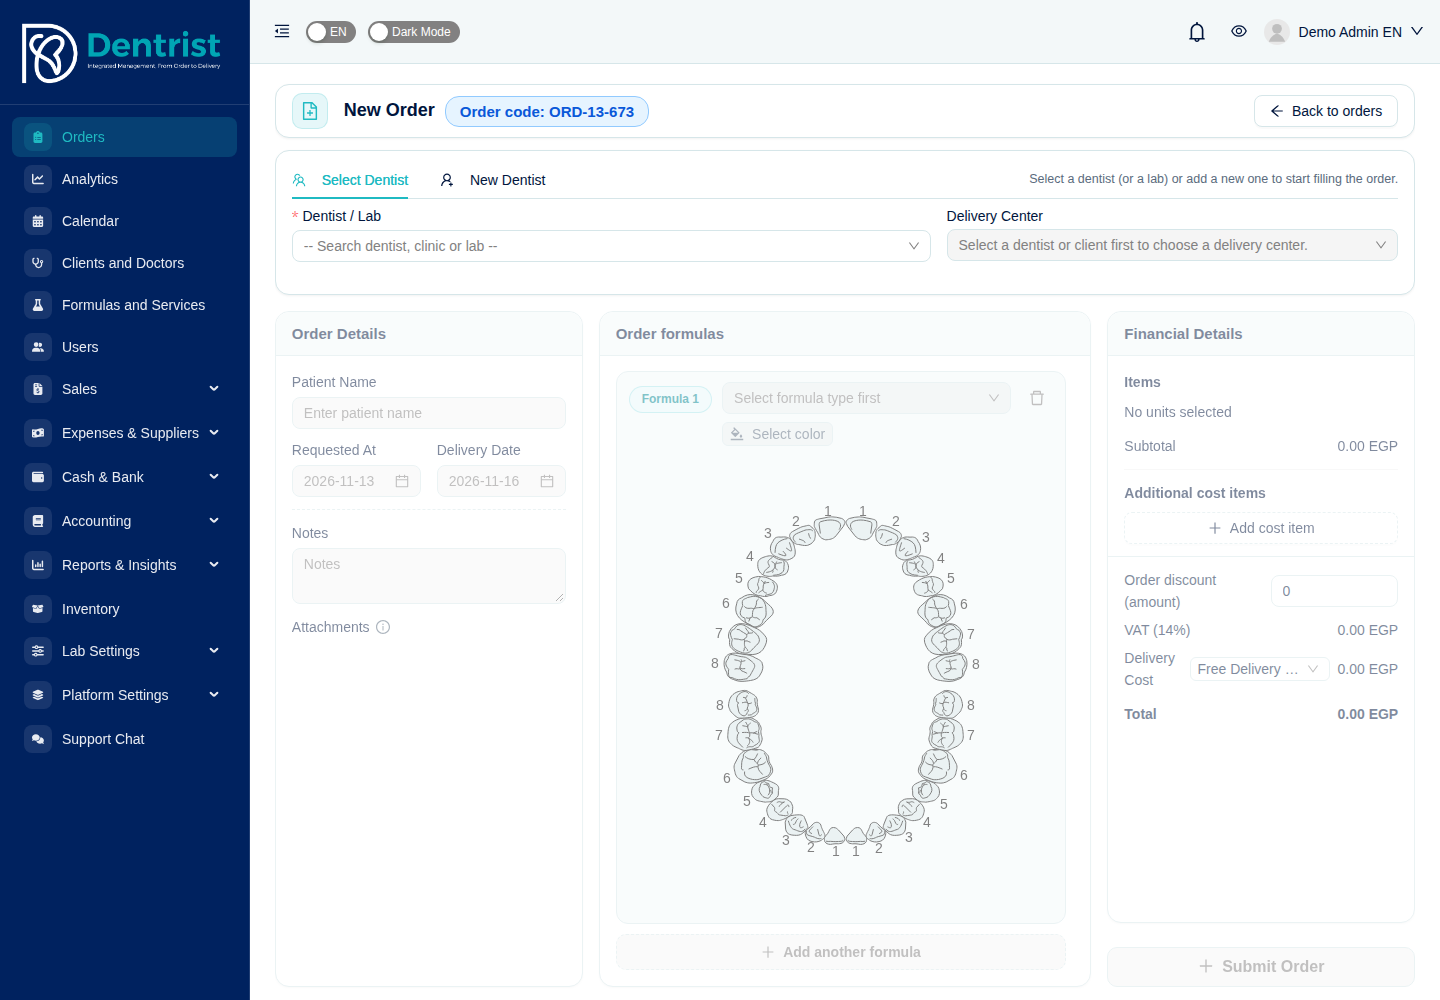
The create order form: who the order is for at the top, then order details, order formulas with the tooth chart, and the financial details. The rest of the form stays greyed out until you choose a dentist or lab.
Fill the form from top to bottom:
-
Who the order is for. The first card has two tabs:
- Select Dentist (the default). Open the Dentist / Lab list and type part of a dentist, clinic or lab name. The list has two groups: Dentists, shown as Dr. Name — Clinic, and Labs, for partner labs that send you work. The clients who order most appear first. Choosing a dentist fills in both the dentist and their clinic (the client who pays for the order), so there is no separate client field.
- New Dentist, for someone who is not in the system yet (see below).
Then choose the Delivery Center (where the case will be delivered). The list only shows the delivery centers of the selected clinic; Add new adds one on the spot.

The Dentist / Lab list: dentists with their clinic, then partner labs.
Ordering for a new dentist or lab. Open the New Dentist tab and choose Order from:
- Dentist: type the Dentist name and choose the Clinic. With New, the clinic takes the dentist's name while Same as dentist name is ticked; untick it to type a different name, and choose Clinic or Hospital. With Existing, pick one of your current clients.
- Lab: type the Lab name.
Nothing is saved yet. The dentist and the clinic (or the lab) are created together with the order when you click Submit Order, and the new dentist is then selected in the Select Dentist tab.

The New Dentist tab: a new dentist with a new clinic of the same name.
-
Order Details. Enter the Patient Name. Requested At defaults to today and Delivery Date is suggested from the lab's working days and vacations; change them if needed. Add Notes and Attachments (photos, scans, PDFs) if you have them.
-
Order formulas. For each product:
- Choose the formula type (for example Zircomax, Emax, PFM). The + button next to it adds a new formula type without leaving the order. If the chosen type has no selling price yet, Dentrist asks you to set one so the order is priced correctly.
- Click Select color and choose the shade (for example VITA A2).
- Click the teeth on the FDI tooth chart. Each selected tooth is one unit. Click a tooth again to remove it.
- Click Add another formula for a second product on the same case (for example crowns on the upper arch and a night guard).
-
Financial Details. This panel updates live as you work:
- Items: each formula with its unit price, number of units and formula price, and the Subtotal. Type a Price override to charge a different unit price for this order only.
- Additional cost items: click Add cost item for extras such as shade matching or a custom abutment, with a description and an amount.
- Order discount (amount): a discount on the whole order.
- VAT at your lab's rate, and the Delivery Cost from the chosen delivery type.
- Total: what the client will owe.
-
Click Submit Order. A confirmation appears with a link to open the new order.
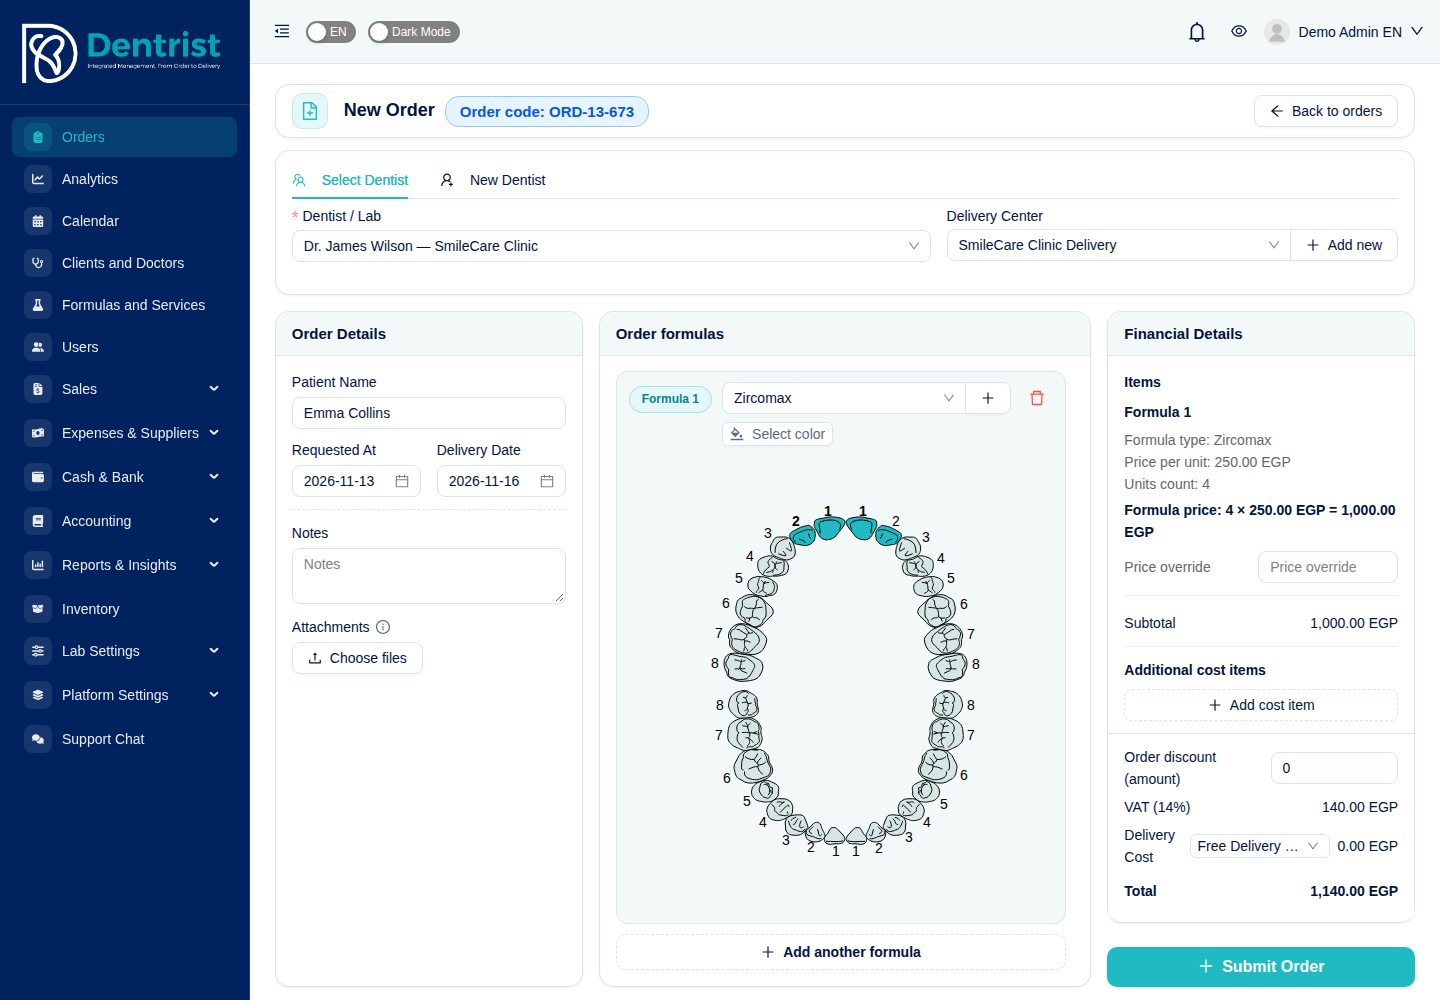
A filled order: Dr. James Wilson of SmileCare Clinic, four Zircomax units (teeth 12, 11, 21, 22) at 250 EGP, 14% VAT and free delivery, for a total of 1,140 EGP.
How the total is calculated: units × unit price, minus the order discount, plus additional cost items, gives the net amount. VAT is added on the net amount, then the delivery cost (delivery is not taxed). If the client has a custom price for the formula type, that price is used instead of the catalog price (see 5.5 Custom prices).
4.3 The order page
Click an order code anywhere in the system to open its page.

The order page: header actions, client and dentist, order details, formulas on the tooth chart, and the financial summary.
The header shows the order code, its status and whether it is already on an invoice (Not invoiced or the invoice code). Work Card, Copy link and Change history sit on the Client and Dentist card just below. The actions are:
| Button | What it does |
|---|---|
| Jump to status | Move the order to another status (see 4.4) |
| Create invoice | Create a new invoice from this order (only once the order is billable) |
| Attach to invoice | Add the order to an existing open invoice of the same client |
| Remake | Create a remake of this order, with a reason. Remakes are tracked for cost and quality reports |
| Cancel | Cancel the order |
| Edit | Change the order. Orders lock once they reach the billable status |
| Work Card | Print the job ticket that travels with the case on the bench |
| Copy link | Copy a public link to the order to share with the dentist |
| Change history | See every change made to the order (see 4.8) |
The cards below show:
- Client and Dentist: the client, dentist (or lab contact) and delivery center.
- Order Details: patient name, requested and delivery dates, and notes.
- Formulas on this order: each formula with its type, shade and the selected teeth highlighted on the chart. Switch between Upper arch and Lower arch when needed.
- Financial Details: the order summary with prices, VAT, delivery and total. A yellow note tells you when the order has not reached the billable status yet and is therefore not counted in revenue and client balances.
4.4 Changing the order status
The current status is shown next to the order code. Click Jump to status beside it (on the order page or in the orders list) and click the new status in the popup. The statuses offered, and their order, come from your lab's order status workflow.

The Jump to status popup lists the statuses the order can move to.
What happens automatically when the status changes:
- Leaving Requested (the case goes to the bench): Dentrist records the production costs of each unit (material, technician and additional costs from the formula type).
- Reaching the billable status (usually Out for Delivery): the order amount becomes owed by the client, counts in revenue and reports, appears in the client's account statement, can be invoiced, and is locked against editing.
- Moving back before the billable status reverses the revenue, and the order becomes editable again.
- Paid orders move to Closed when their invoice is fully paid.
- The dentist and anyone who chose to be notified receive a notification.
4.5 Production: technicians, courier and phases
Scroll down the order page to the Workflow and Operations and Phases cards.

Assign technicians and a courier, control what the client can do and see, and follow production phase by phase.
Workflow and Operations:
- Technicians: assign one or more technicians. They see the order in their own list and are paid for it through technician settlements.
- Courier: assign the courier who will deliver the case.
- Disable client edit: stop the dentist from editing the order from the dentist portal.
- Share workflow with client: let the dentist see the workflow and operations details in the portal.
Phases list the production steps of the case (for example Receipt of Primary Impression, Model, Design, Waxing, Casting, Finishing, Send for Trial Fitting). For each phase you can assign a technician and set a start and end date. Click Manage to add, remove or reorder phases. Turn on Share to let the dentist follow the phases from the portal.
4.6 Files and the 3D viewer
The File Management card stores everything related to the case: intraoral scans, STL, PLY and OBJ models, ZIP files, photos, videos and PDFs (up to 20 MB per file).

Drag and drop files into the upload area. Each file shows its upload date, size and progress.
- Upload: drag files onto the area or click it to choose files. You can upload a ZIP or several files at once.
- Search by file name or comment and filter by upload date.
- Download all downloads every file of the order.
- Click the eye icon to preview a file. 3D files (STL, PLY, OBJ) open in the built-in 3D viewer, where you can rotate, zoom and pan the model with the mouse. No CAD software is needed.

An intraoral scan opened in the 3D viewer.
4.7 Conversation
At the bottom of the order page, the Conversation card keeps all discussion about the case in one place, with two tabs:
- Internal (team): visible to your lab team only. Clients never see these messages.
- Client conversation: shared with the dentist, who sees it in the dentist portal.
Type @ followed by a name to mention a colleague or the dentist; they get a notification. You can attach files to messages. Press Ctrl+Enter to send.

The order conversation with internal and client tabs.
4.8 Change history
Every change to an order (status, units, prices, dates, assignments) is recorded. Click Change history on the order page to see who changed what and when, with the old and new values.

The change history of an order.
4.9 Calendar
Menu: Calendar
The calendar shows orders by requested date and delivery date, and optionally invoices by issue date and due date. Switch between Week, Month and Year views, and use the arrows or Today to move in time. Filter by client and dentist in the left panel. Weekends and lab vacations (see 13.3) are highlighted. Click any item to open it.

The calendar in month view: orange items are requested dates, blue items are delivery dates.
5. Clients and dentists
Menu: Clients and Doctors
A client is the clinic, hospital or partner lab that orders from you and pays you. Each client can have several dentists and delivery centers.
5.1 The clients list

All clients with their type, contacts, assigned dentists and delivery centers.
Search by name, email or phone, and filter by client type (Clinic, Hospital, Lab). Use Actions on a row to view, edit or delete a client. Export downloads the list.
5.2 Adding a client
Click Add Client and fill in the client's name, type, phone, WhatsApp, email and address. You can add the client's dentists and delivery centers right away or later from the client page.
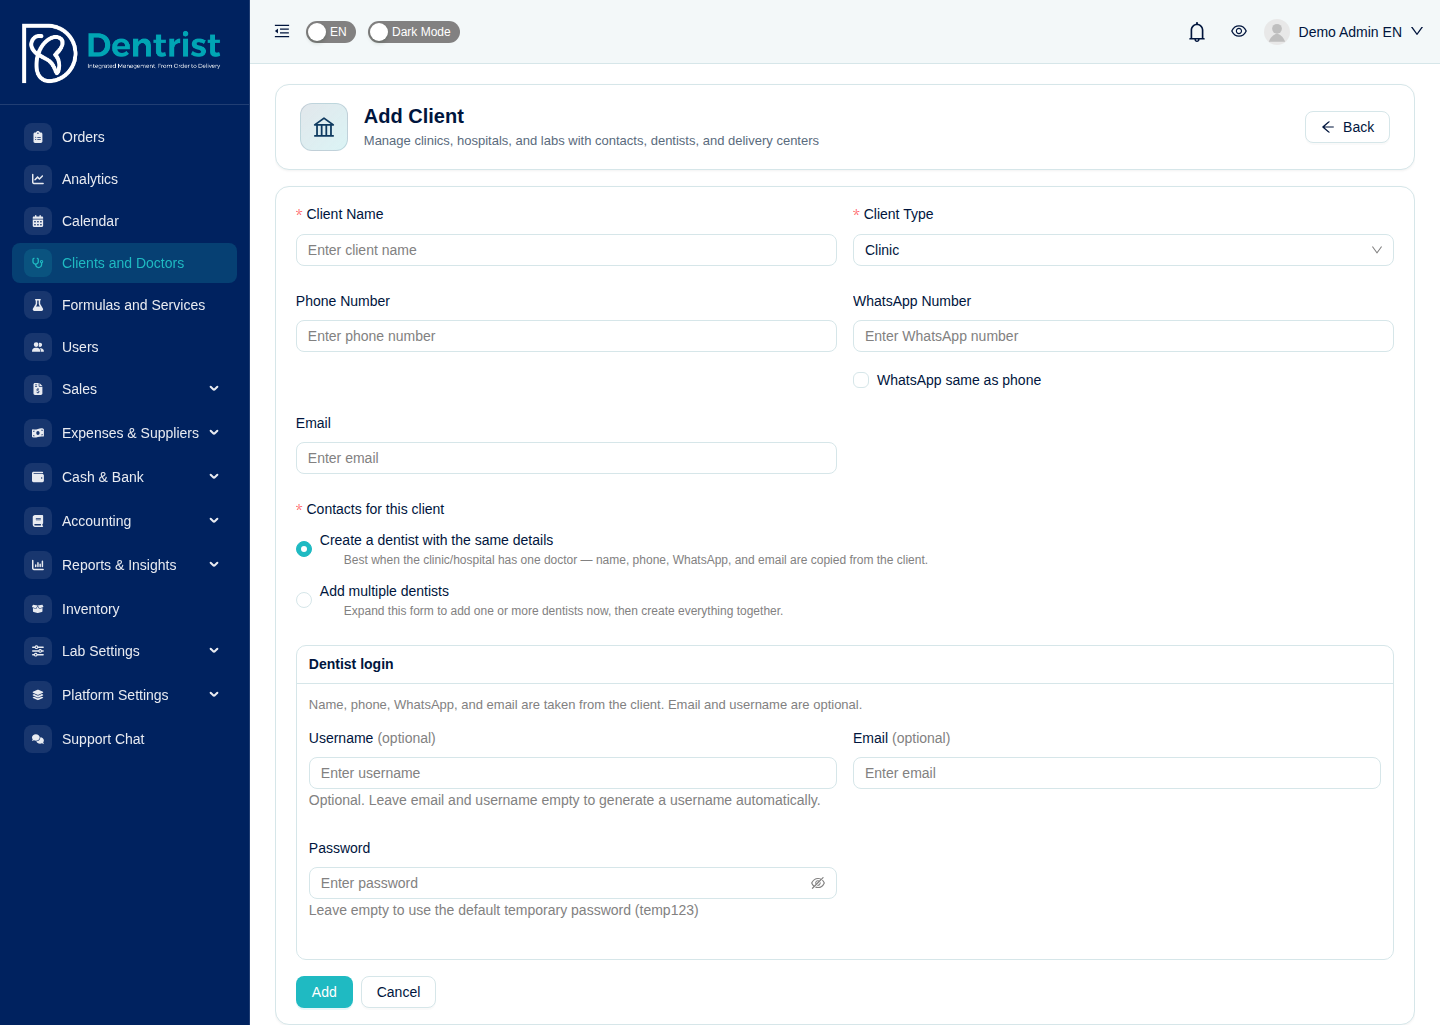
Adding a new client.
5.3 The client page
Click a client name to open its page. The header shows the client's contacts and the key figures: total orders amount, total paid, total outstanding, not-yet-due orders, number of orders and how many are paid and unpaid.

The client page, Overview tab, with the formula types this client orders most.
The tabs are:
| Tab | What it shows |
|---|---|
| Overview | Client details, totals and the formula types tracker |
| Orders | All the client's orders |
| Invoices | All the client's invoices |
| Account statement | Every billable order with its paid or due state and the balance |
| Dentists | The dentists who work for this client and their portal access |
| Custom prices | Special prices for this client |
| Wallet | Prepaid balance and its history |
| Delivery Centers | The addresses where cases are delivered |
5.4 Dentists and portal access
Open the Dentists tab to add a dentist to the client or edit one. Each dentist can receive an invitation to the dentist portal, where they can send orders and follow their cases (see 14. The dentist portal).
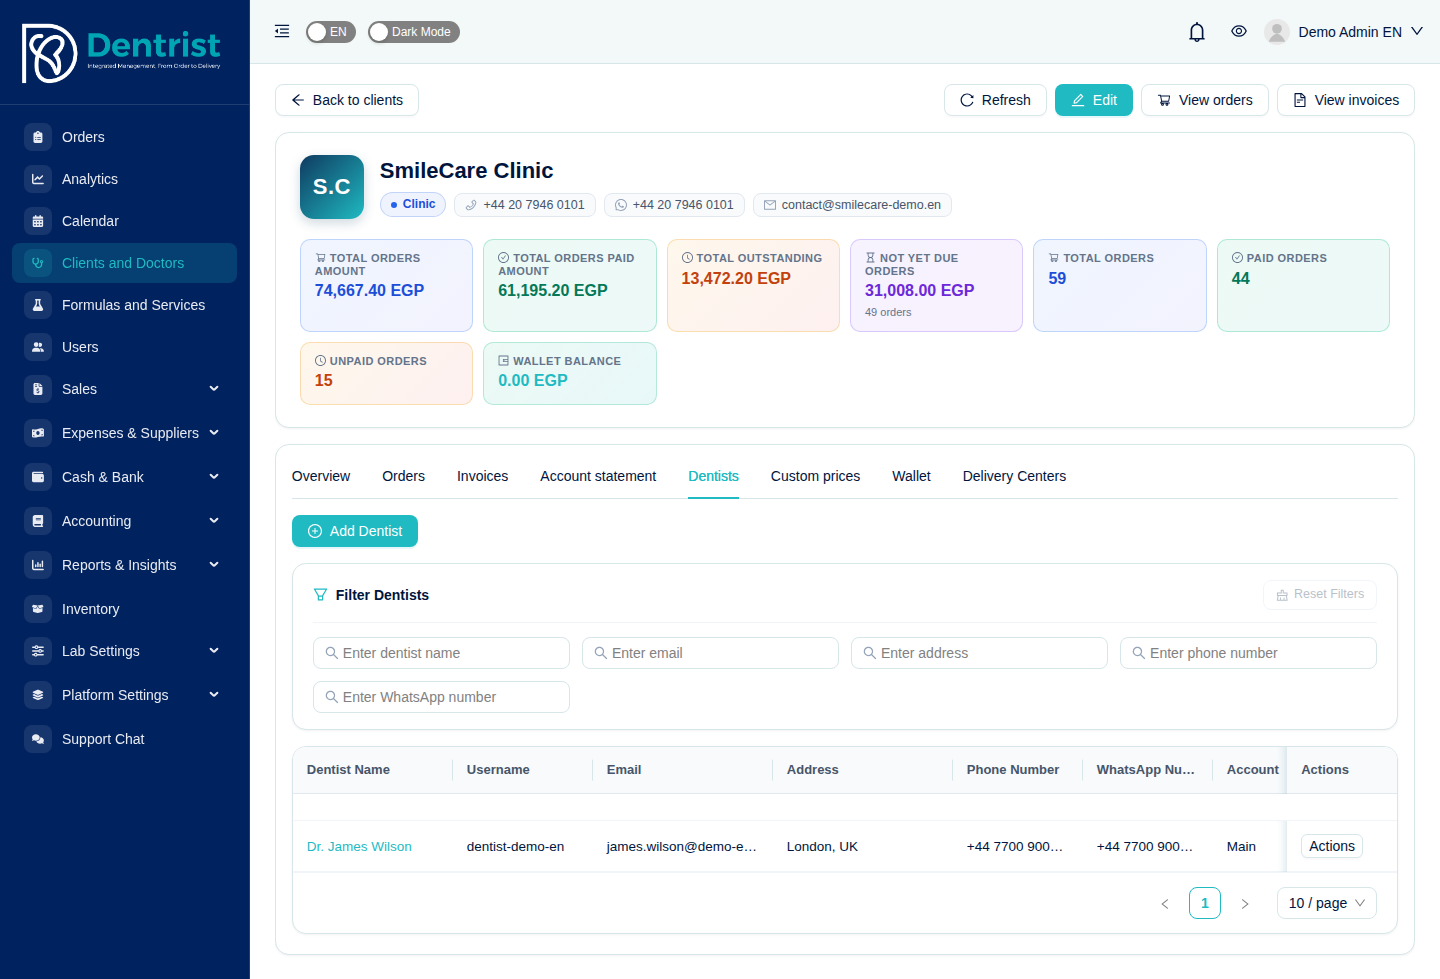
The dentists of a client.
5.5 Custom prices
Some clients get special prices. In the Custom prices tab, set a price for any formula type. New orders for this client use that price instead of the catalog price. Existing orders keep the price they were created with.
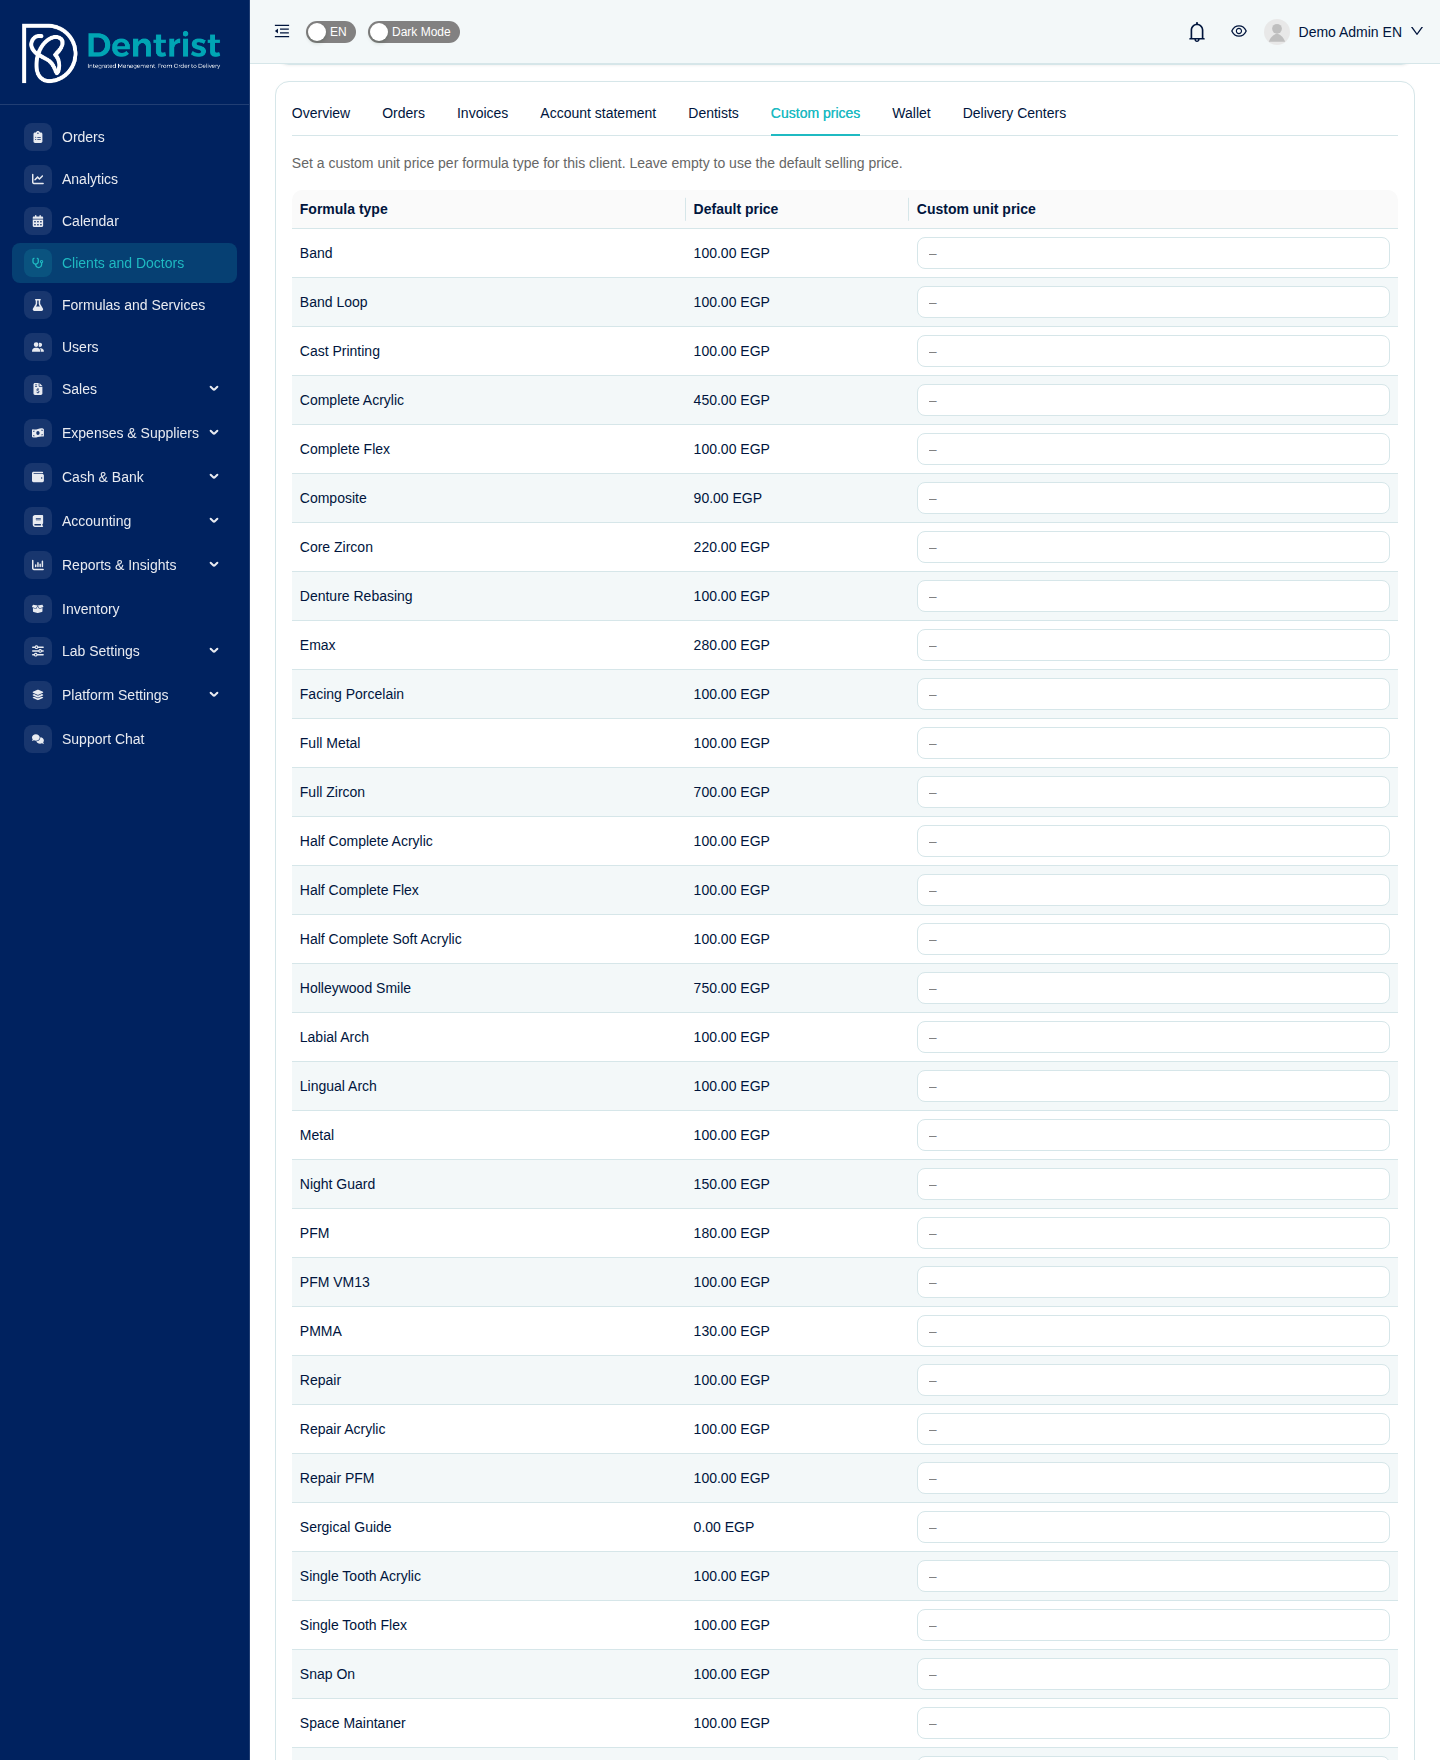
Special prices for one client.
5.6 Wallet (prepaid balance)
A client can pay in advance, for example for a package of cases. The Wallet tab shows the balance and history.
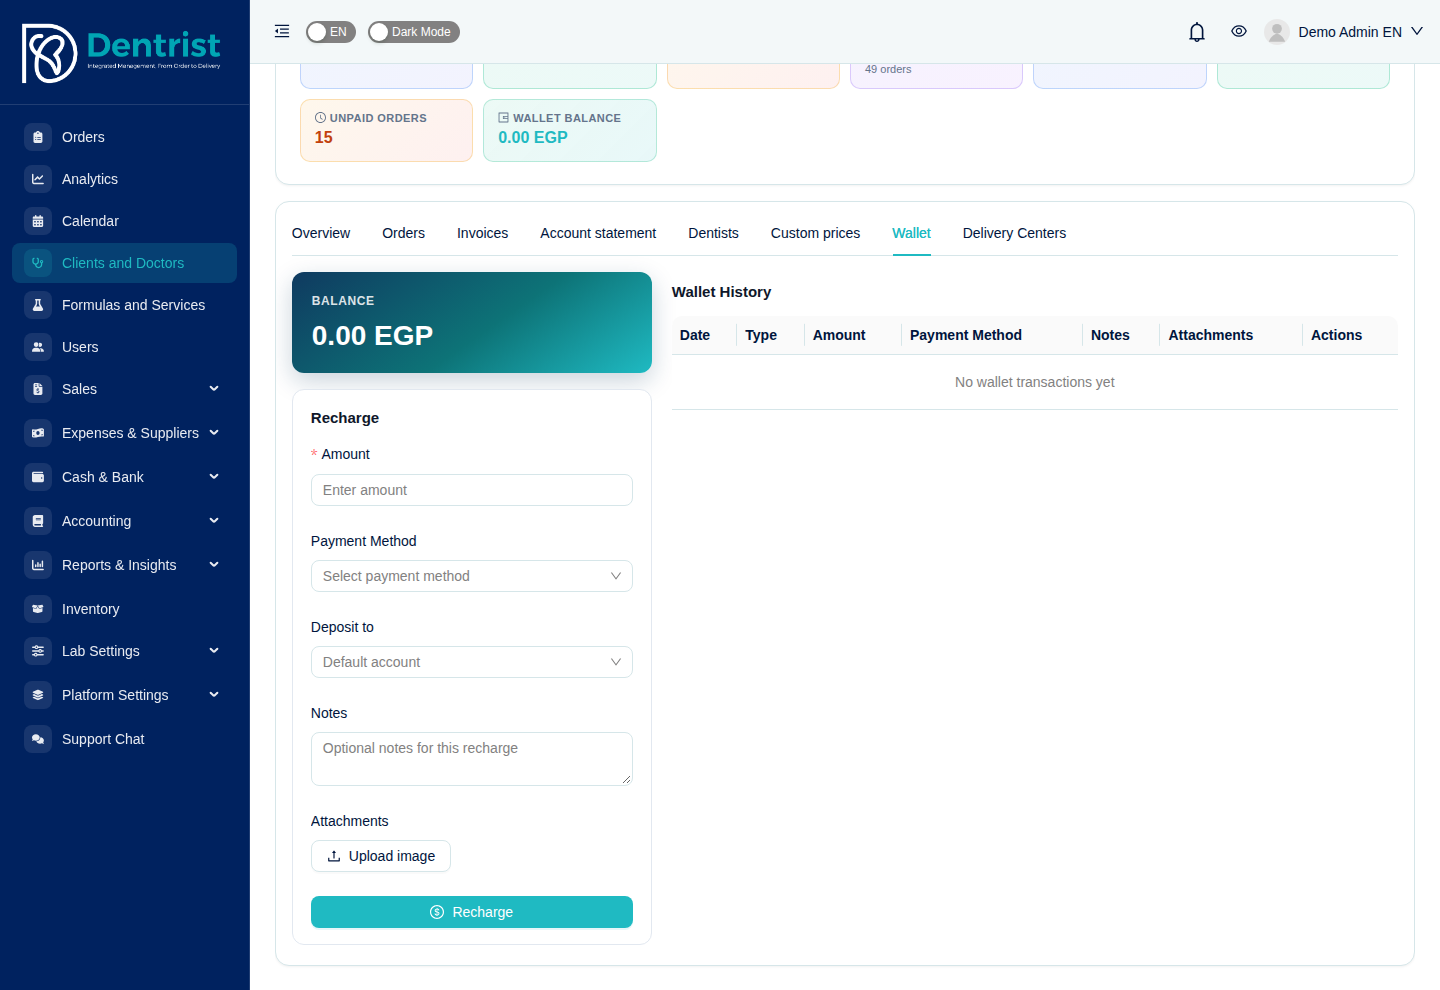
The client wallet.
- Recharge: add money to the wallet, with the payment method and the cash or bank account that received the money.
- The wallet can then be used as a payment method on the client's invoices.
- When an invoice is refunded, the paid amount goes back to the wallet.
- Revert cancels a recharge (admins only, and only if the balance is high enough).
Note: In accounting, wallet money is a liability (money you hold for the client), not income. It becomes income only when it pays for delivered work.
5.7 Account statement
The Account statement tab lists every billable order of the client with its amount and whether it is Paid or Due, plus the totals: due for the selected period, previous due amount and total client due amount. Filter by date range, dentist and status, and click Export to download it as CSV, Excel or PDF to send to the client.
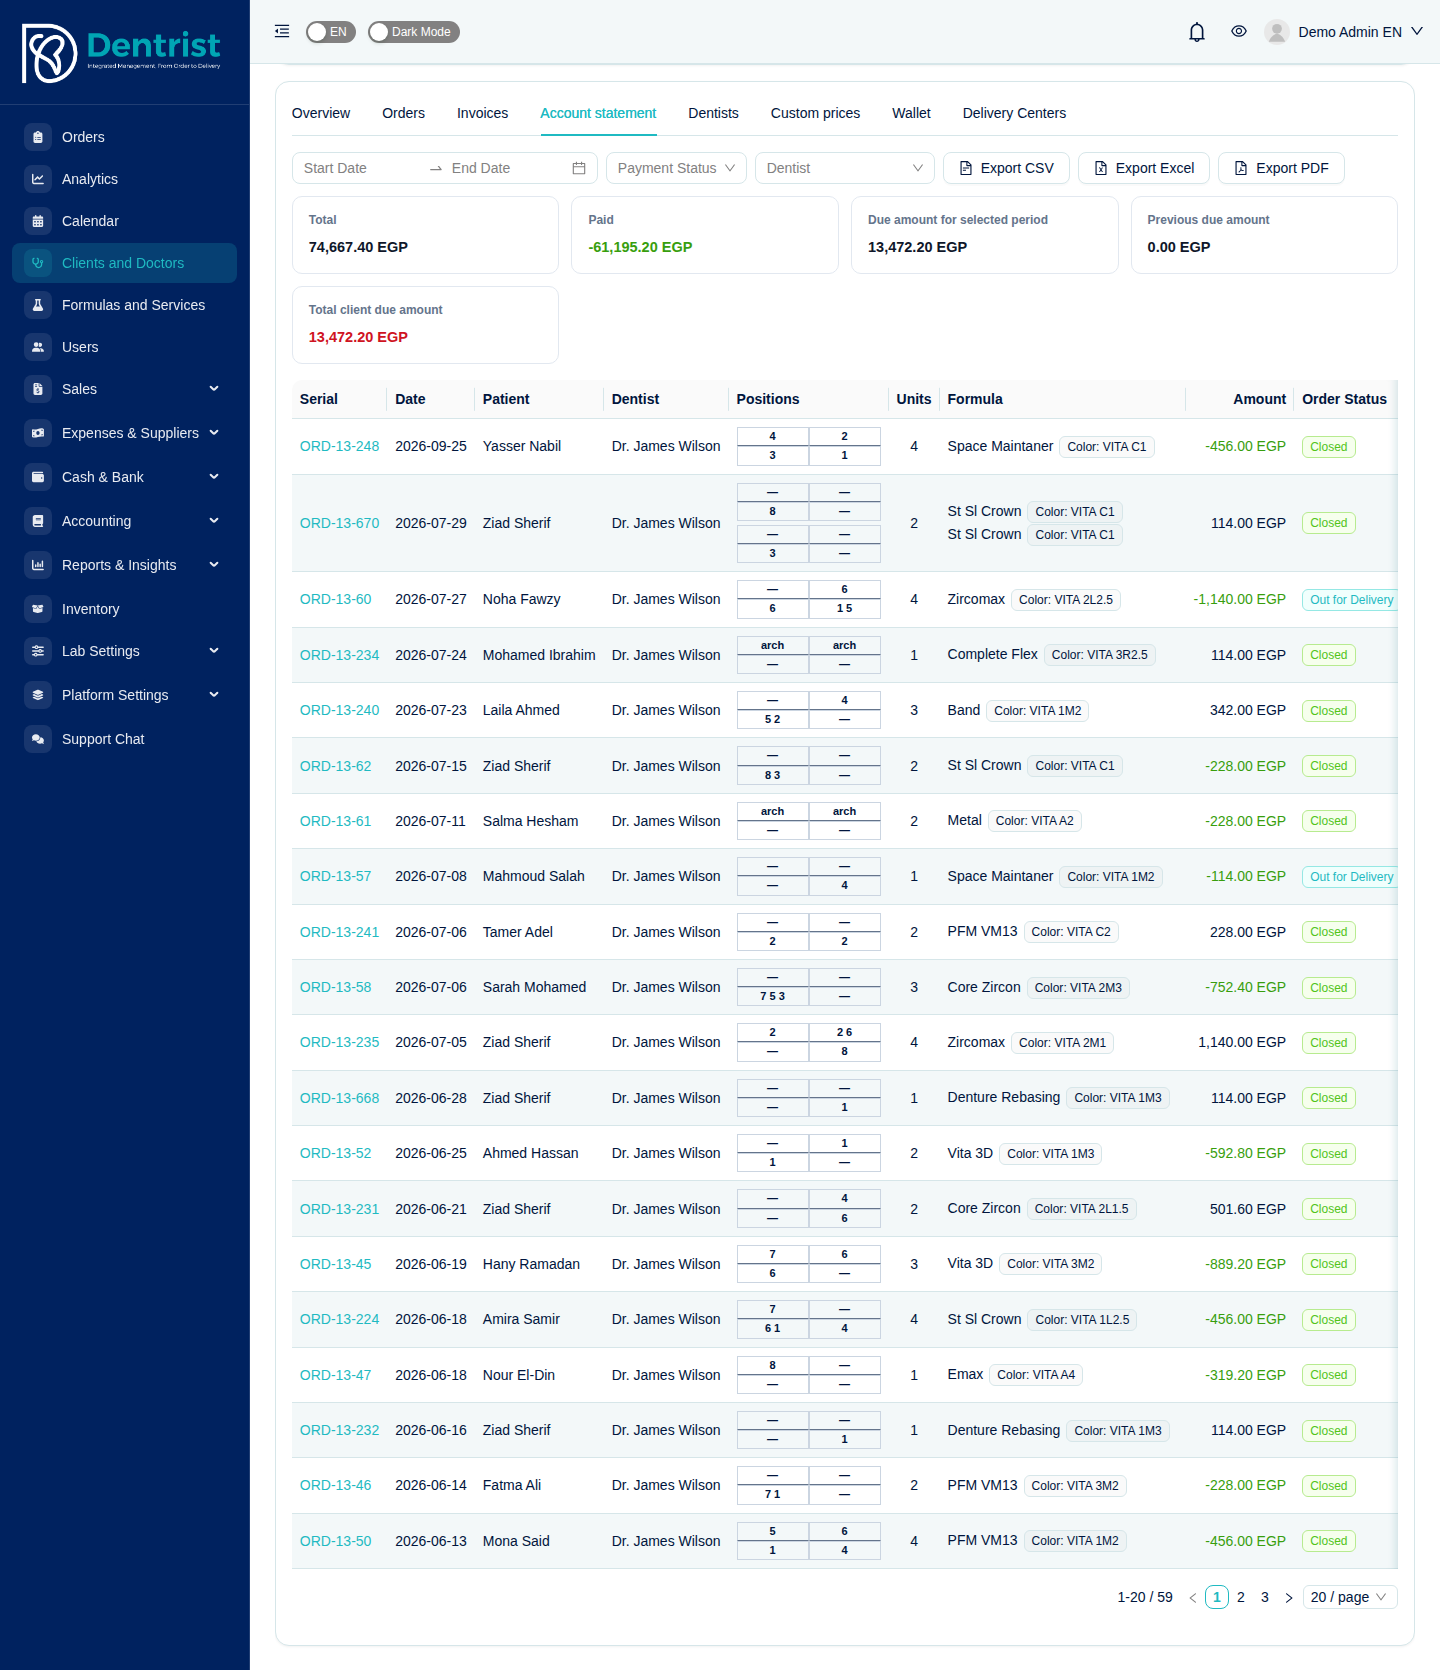
The client account statement.
6. Formulas, services and colors
6.1 Formula types
Menu: Formulas and Services
Formula types are the products and services you sell: zirconia crowns, Emax, PFM, dentures, night guards, repairs and so on.
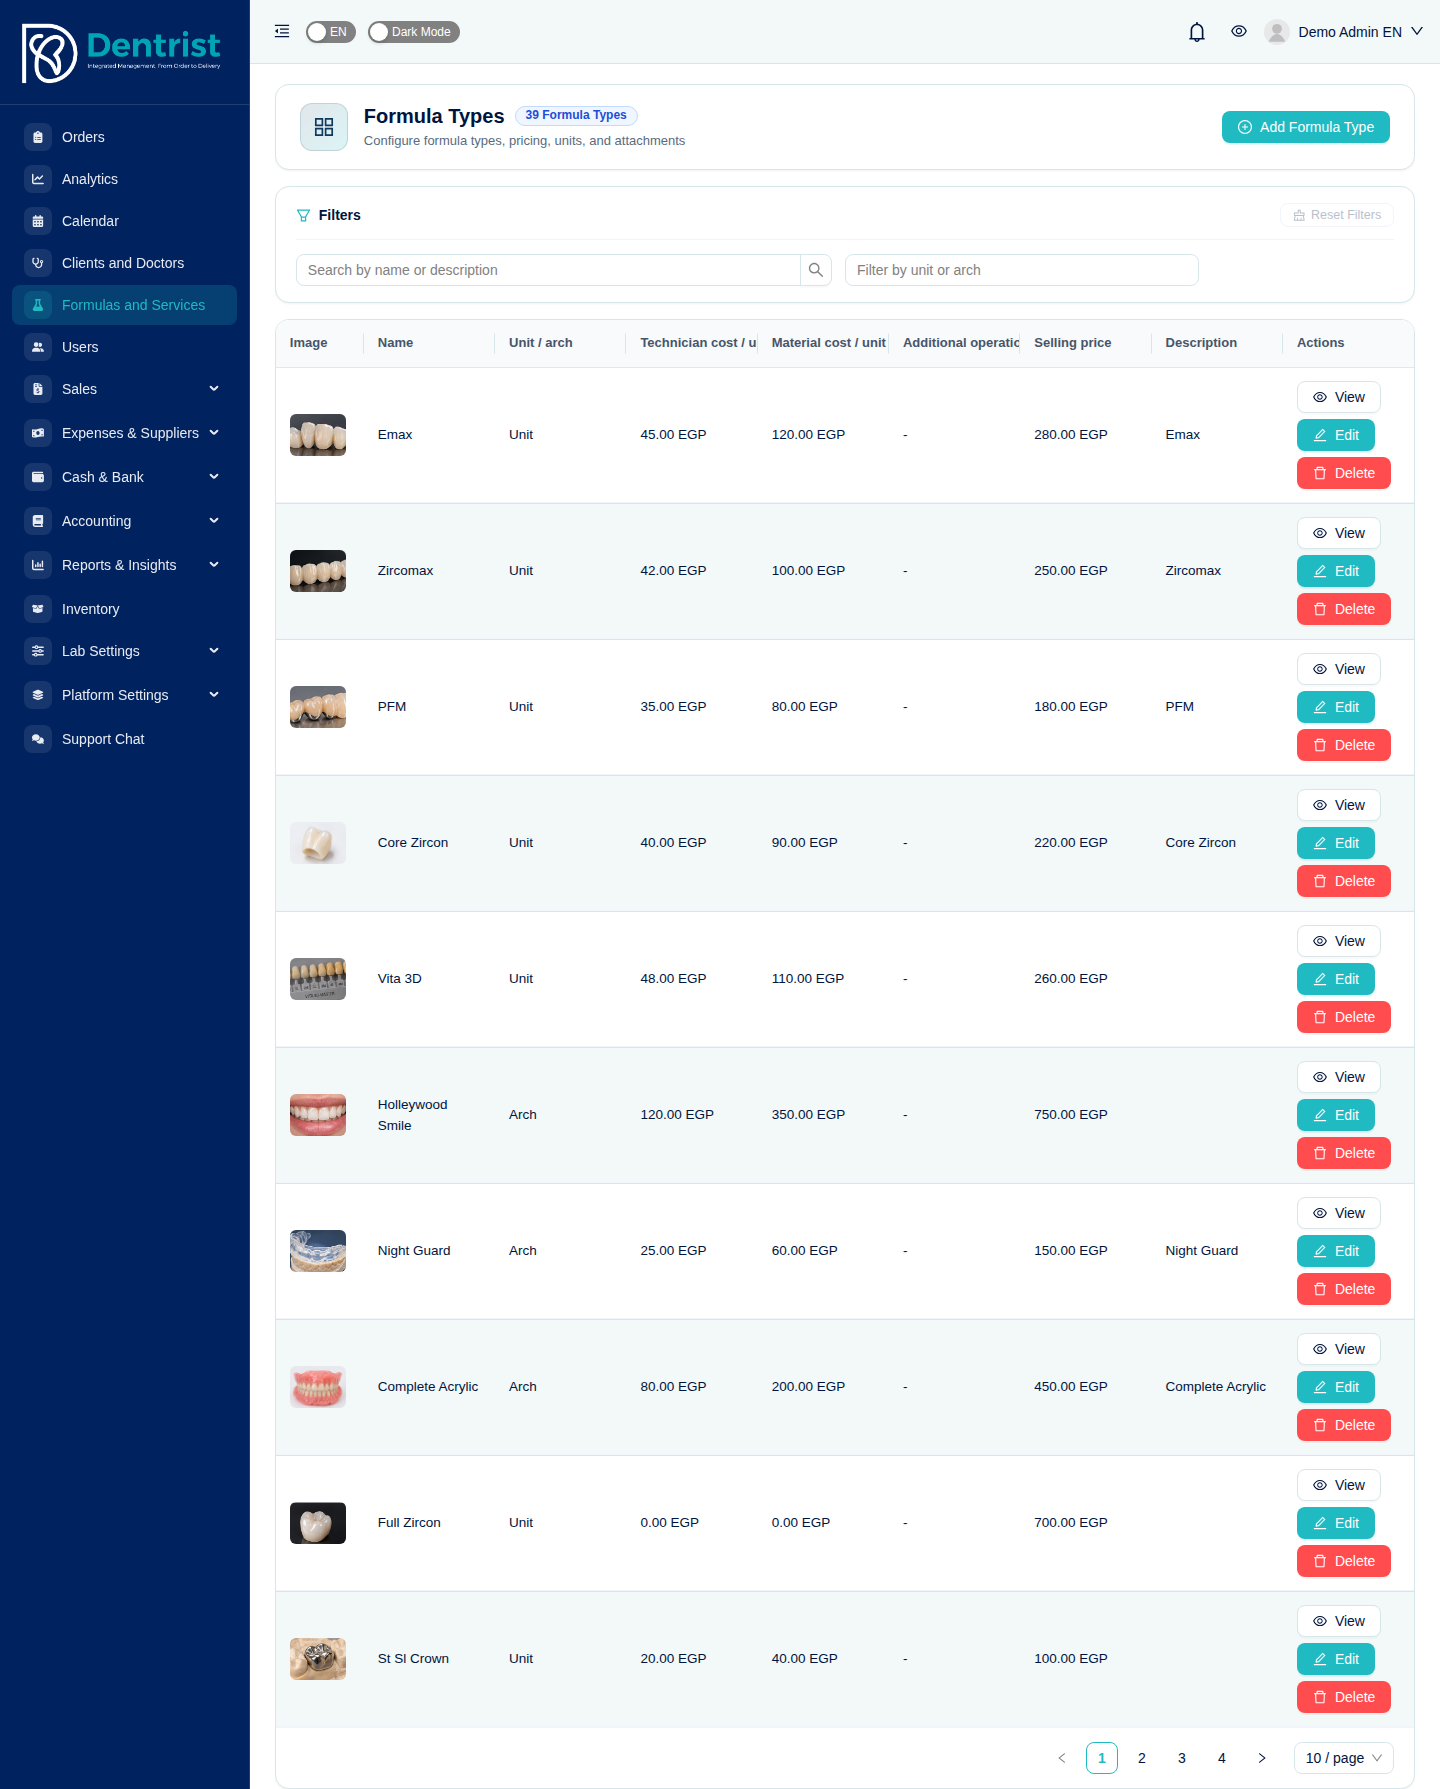
The formula types list with image, unit, costs and selling price.
Each formula type has:
- Name, image and description.
- Unit or arch: whether it is priced per tooth (unit) or per arch.
- Selling price: the default price per unit.
- Technician cost, material cost and additional operation costs per unit (for example milling). Dentrist uses these to calculate the production cost and margin of every order automatically.
Click Add Formula Type to create one, or Edit on a row to change it. Changing a price does not change existing orders.
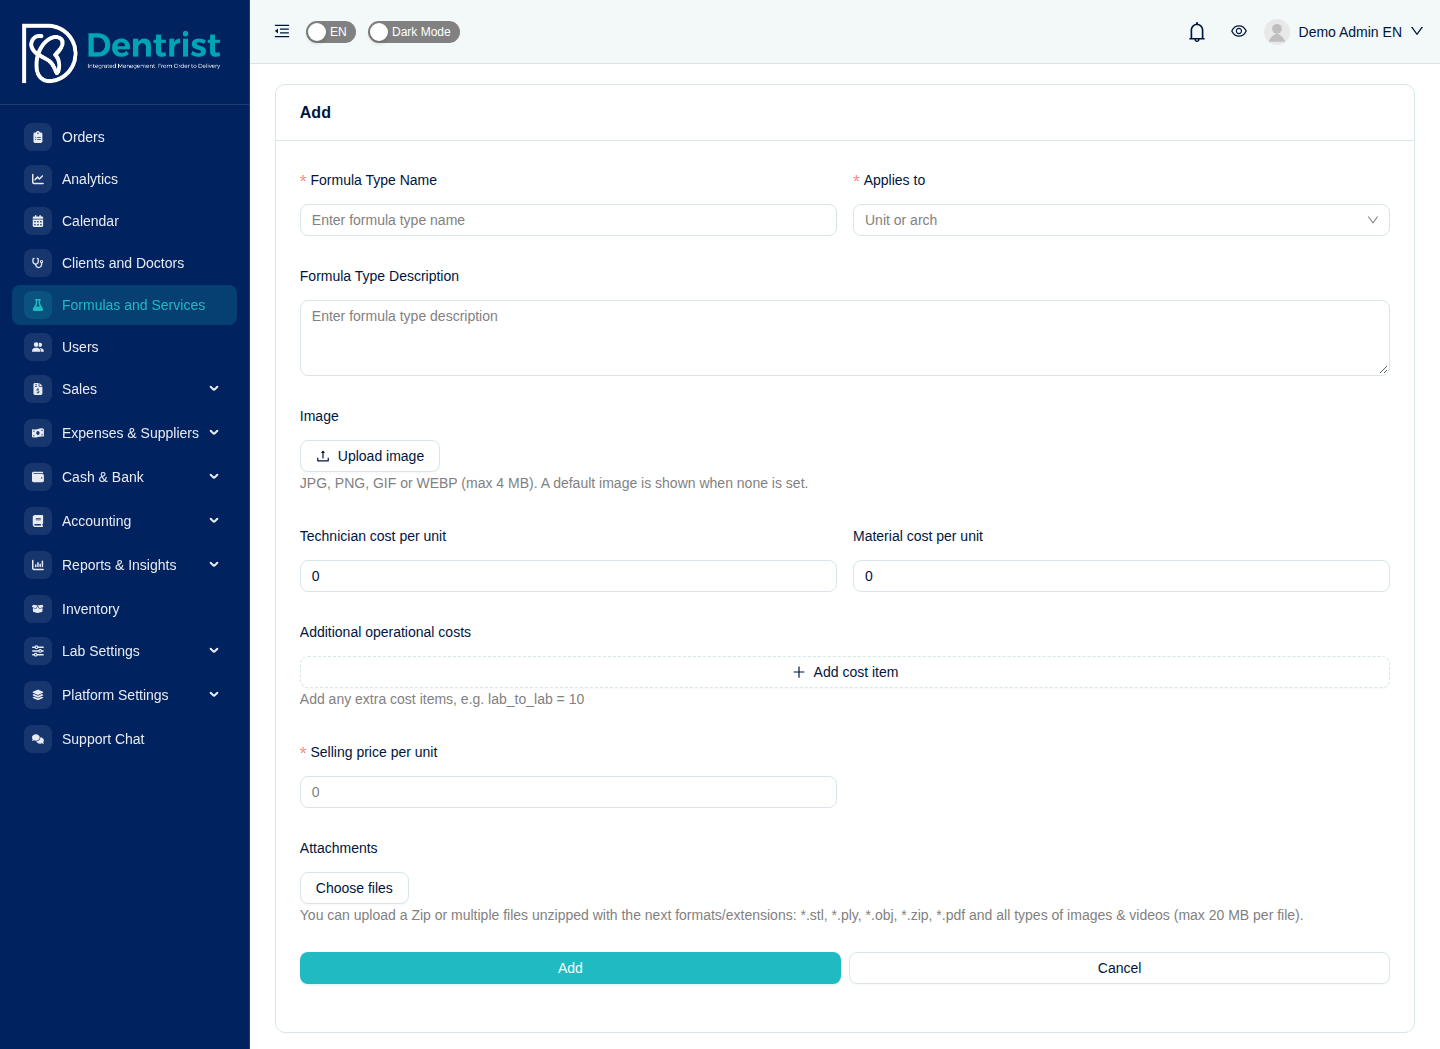
Creating a formula type.
Note: Whether material, technician and additional costs are included in cost calculations is switched on per lab by the Dentrist team.
6.2 Colors (shades)
Menu: Platform Settings → Colors
The shade catalog used when you choose a color for a formula (VITA A1 to D4 and any custom shades). Add, edit or delete colors here.

The shade catalog.
7. Users and roles
Menu: Users
7.1 Users
The Users page lists your lab staff: name, email, user type (Admin, Technician, Courier…), whether the account is active, and contacts.
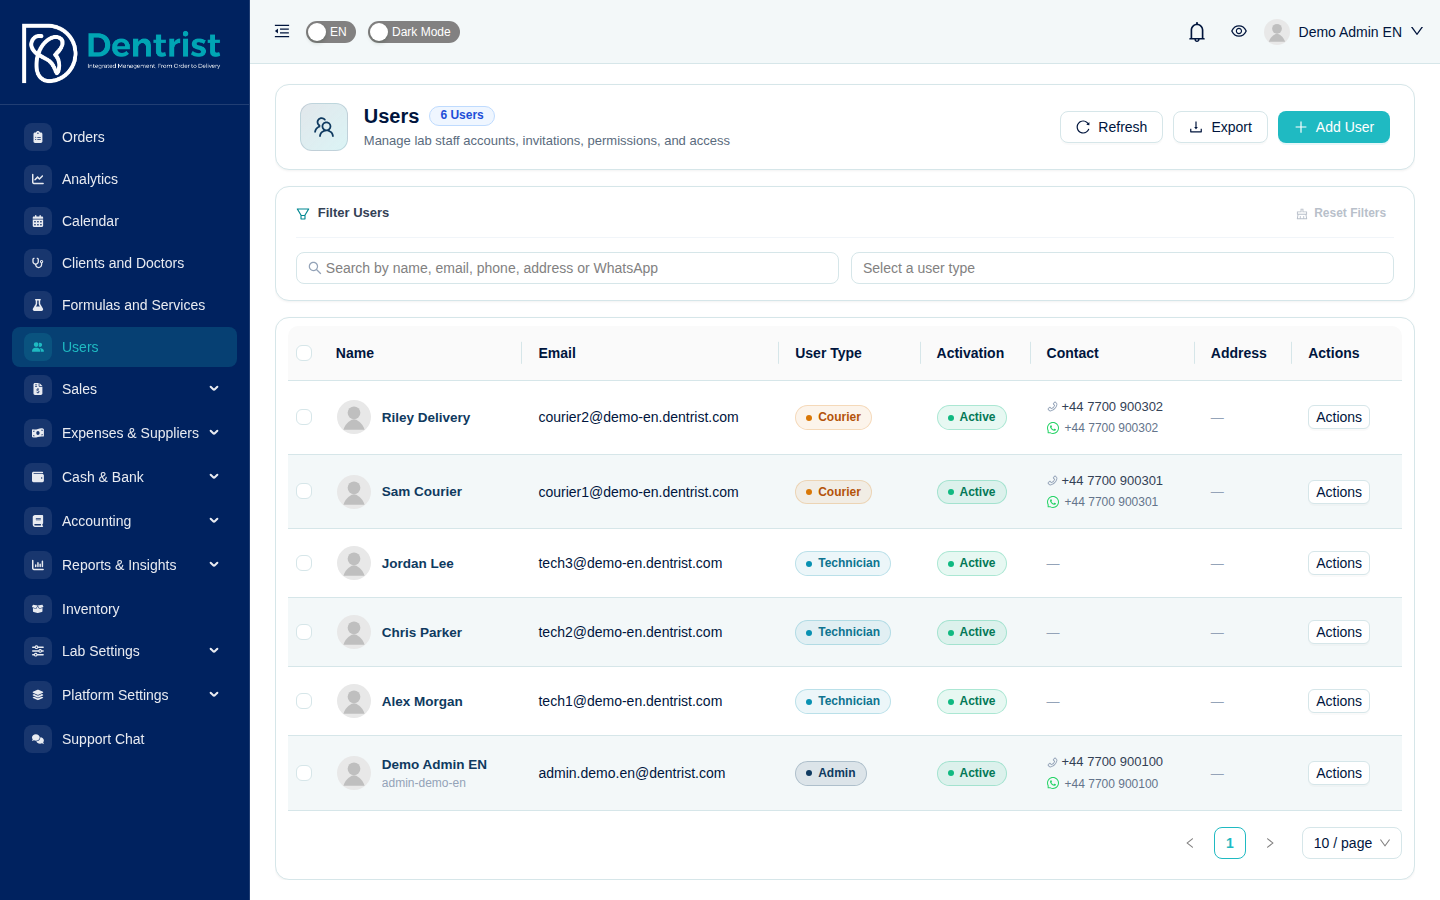
Lab staff accounts.
To add a staff member, click Add User and fill in the name, username, email, phone, WhatsApp, user type (role) and password. Use Actions on a row to view, edit, deactivate, see the change history of, or delete a user.
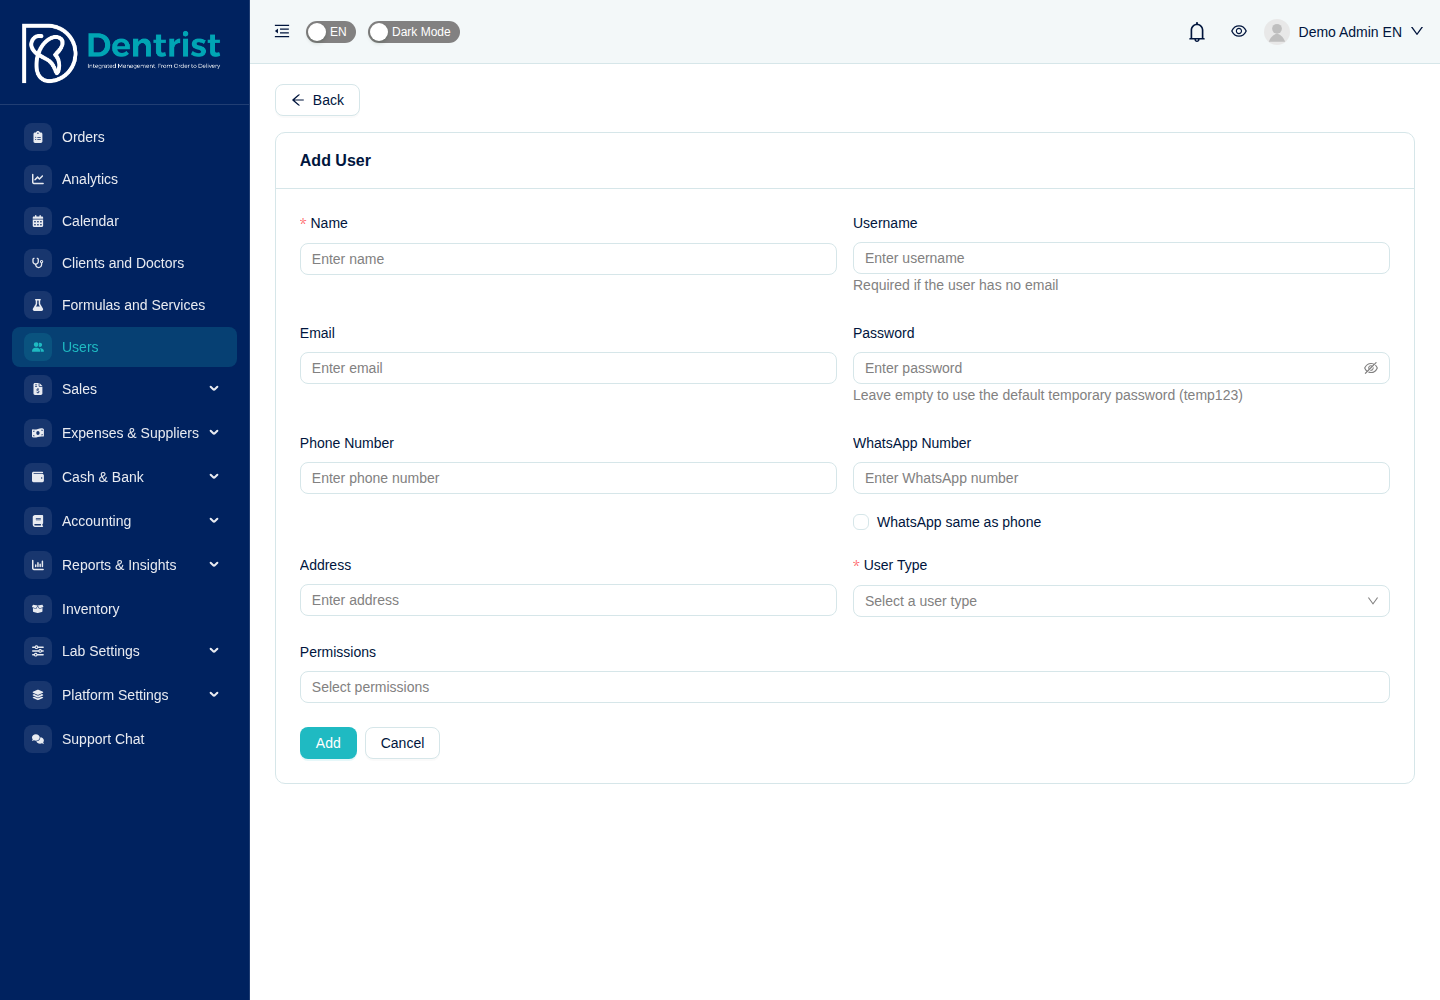
Adding a staff account.
Tip: Deactivate people who leave the lab instead of deleting them. Their history (orders, phases, payments) stays intact and they can no longer sign in.
7.2 Roles and permissions
Click Roles on the Users page to see the roles, how many permissions each has and how many users use it. The default roles (Admin, Technician, Courier, Accountant, Designer, Scanner) come with the system and cannot be changed.

The roles of the lab.
When custom roles are enabled for your lab, click Add role, give it a name and tick exactly the permissions it needs (for example, a receptionist who can create orders and see clients but not finance). If the button is disabled, contact Dentrist support to enable the feature.
8. Sales: invoices and payments
8.1 The invoices list
Menu: Sales → Invoices

Invoices with their status, totals and remaining amounts.
The cards at the top show the number of invoices, total amount, total paid and total unpaid. Filter by invoice number, client, dentist, payment status (Unpaid, Partially Paid, Paid), invoice type, issue date and due date. Unpaid rows are highlighted in red and partially paid ones in orange, with the remaining amount under the total.
8.2 Creating an invoice
There are three ways to invoice orders:
- From an order: on the order page, click Create invoice.
- Add to an existing invoice: on the order page, click Attach to invoice.
- From the invoices list: click Create Invoice, choose the client and tick the unpaid orders to include.
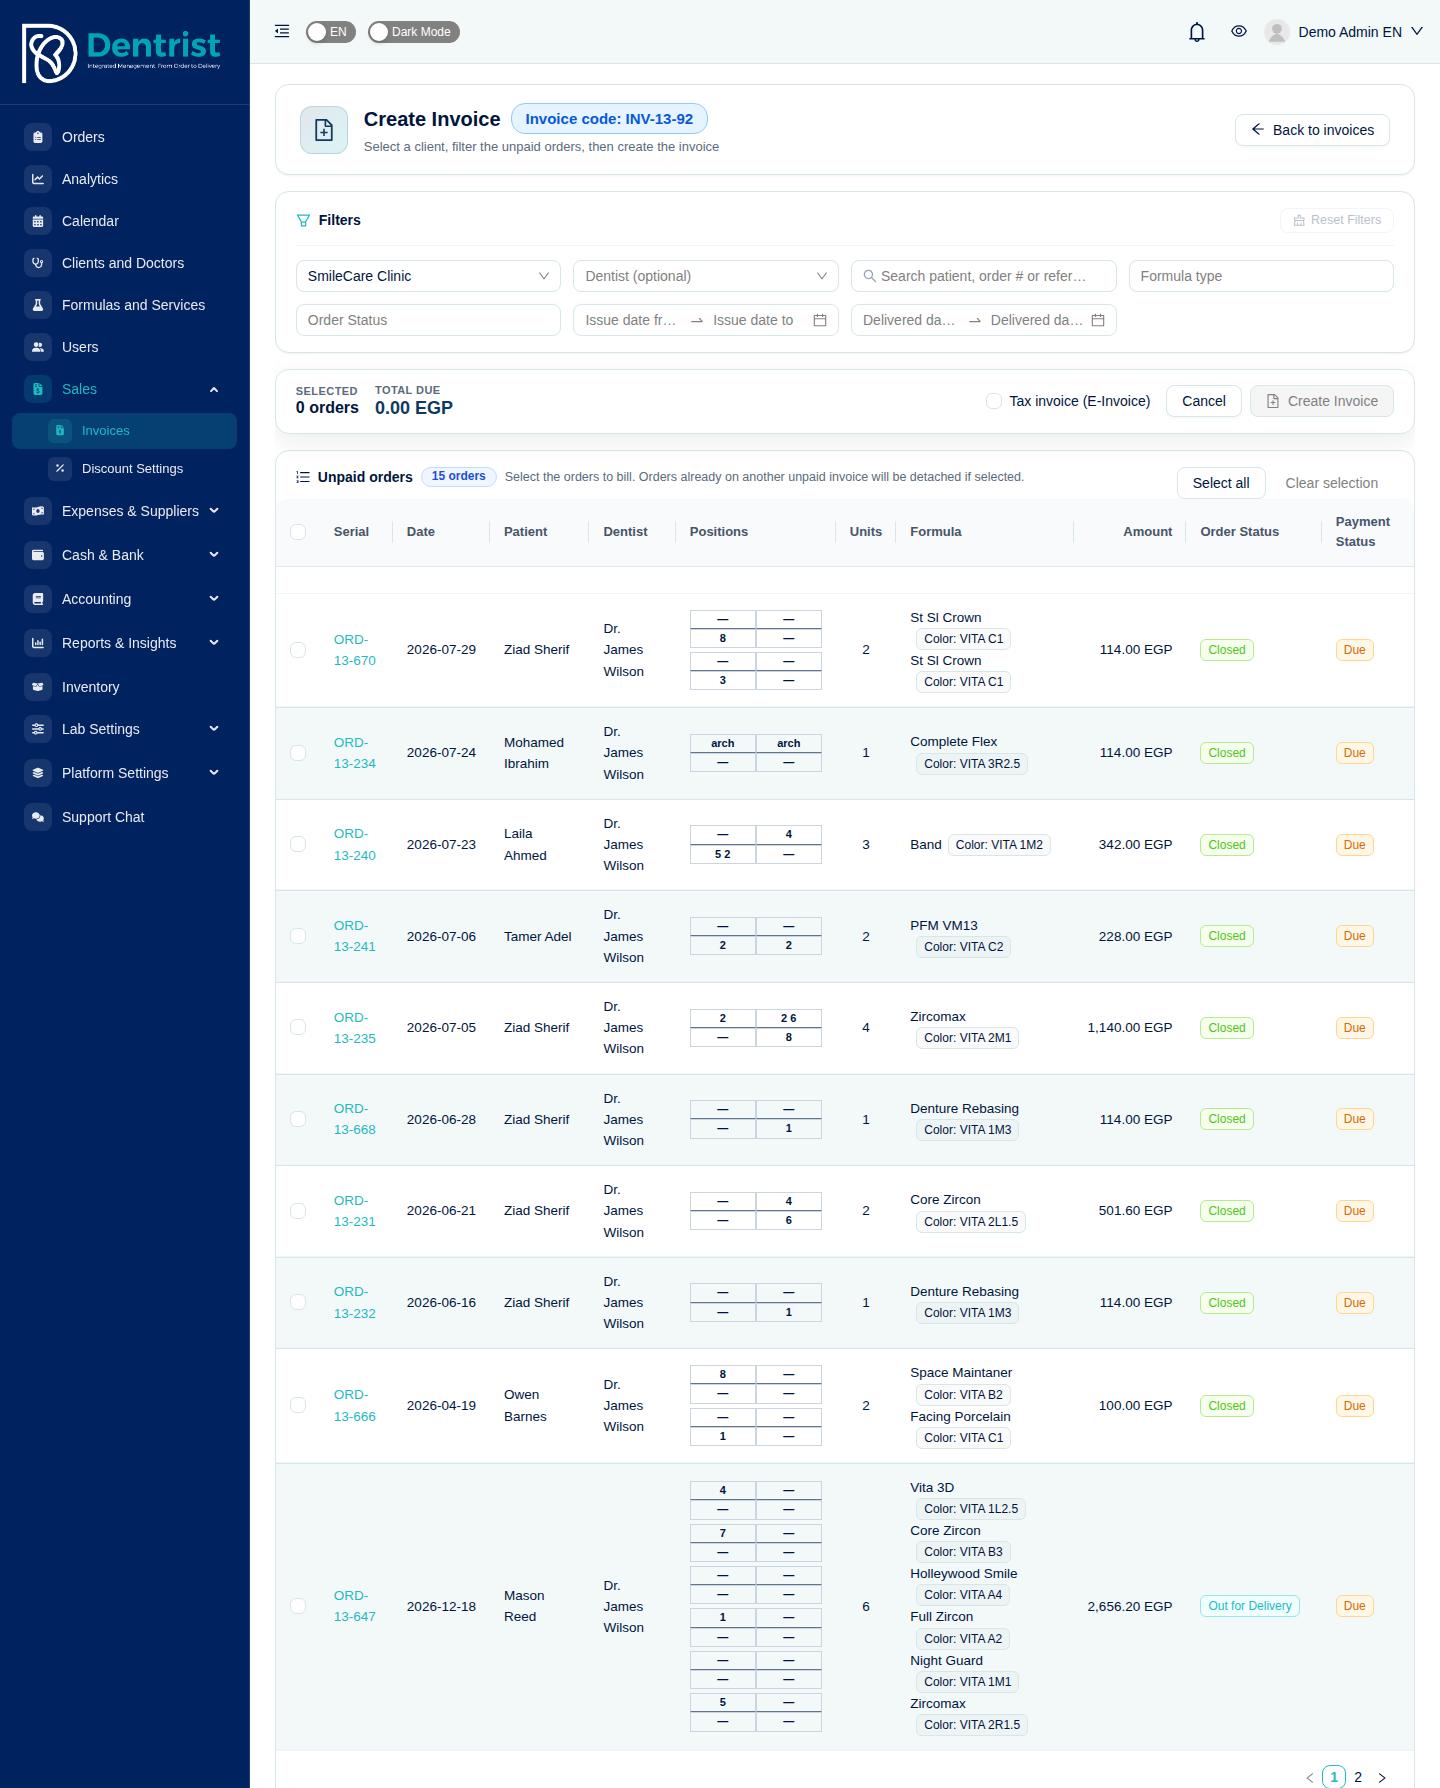
Creating an invoice from the client's unpaid orders.
Only orders that have reached the billable status and are not already on another active invoice can be invoiced. The invoice total is the sum of its orders. The invoice gets its own code (for example INV-13-24), the issue date is today and the due date is set automatically (you can change both).
8.3 The invoice page

An invoice that is partially paid.
The invoice page shows the client, the invoice dates, the Invoice Summary (subtotal, VAT, total, paid and remaining) and the client's total outstanding balance. Below are the orders on the invoice, and at the bottom the lab's bank accounts and money transfer channels so the client knows how to pay.
Actions at the top:
| Button | What it does |
|---|---|
| Mark as Paid | Record full payment of the remaining amount |
| Partial Payment | Record part of the amount, or pay specific orders |
| Undo Payment | Remove the recorded payments |
| Print the invoice | |
| Download | Download as PDF |
| Share | Share the invoice, for example by WhatsApp or a public link |
| More | Change history, refund to wallet, cancel, delete, detach orders, e-invoice |
Add Order adds another unpaid order of the same client to the invoice. The bin icon on an order row removes it from the invoice.
8.4 Recording a payment
Click Mark as Paid or Partial Payment:
- Enter the amount (for a partial payment) or choose the orders being paid.
- Choose the payment method: cash, bank transfer, money transfer channel (for example InstaPay), card or wallet.
- Choose the account the money went into (cash on hand, a bank account…).
- Set the payment date and add a note or attachment if you like, then confirm.
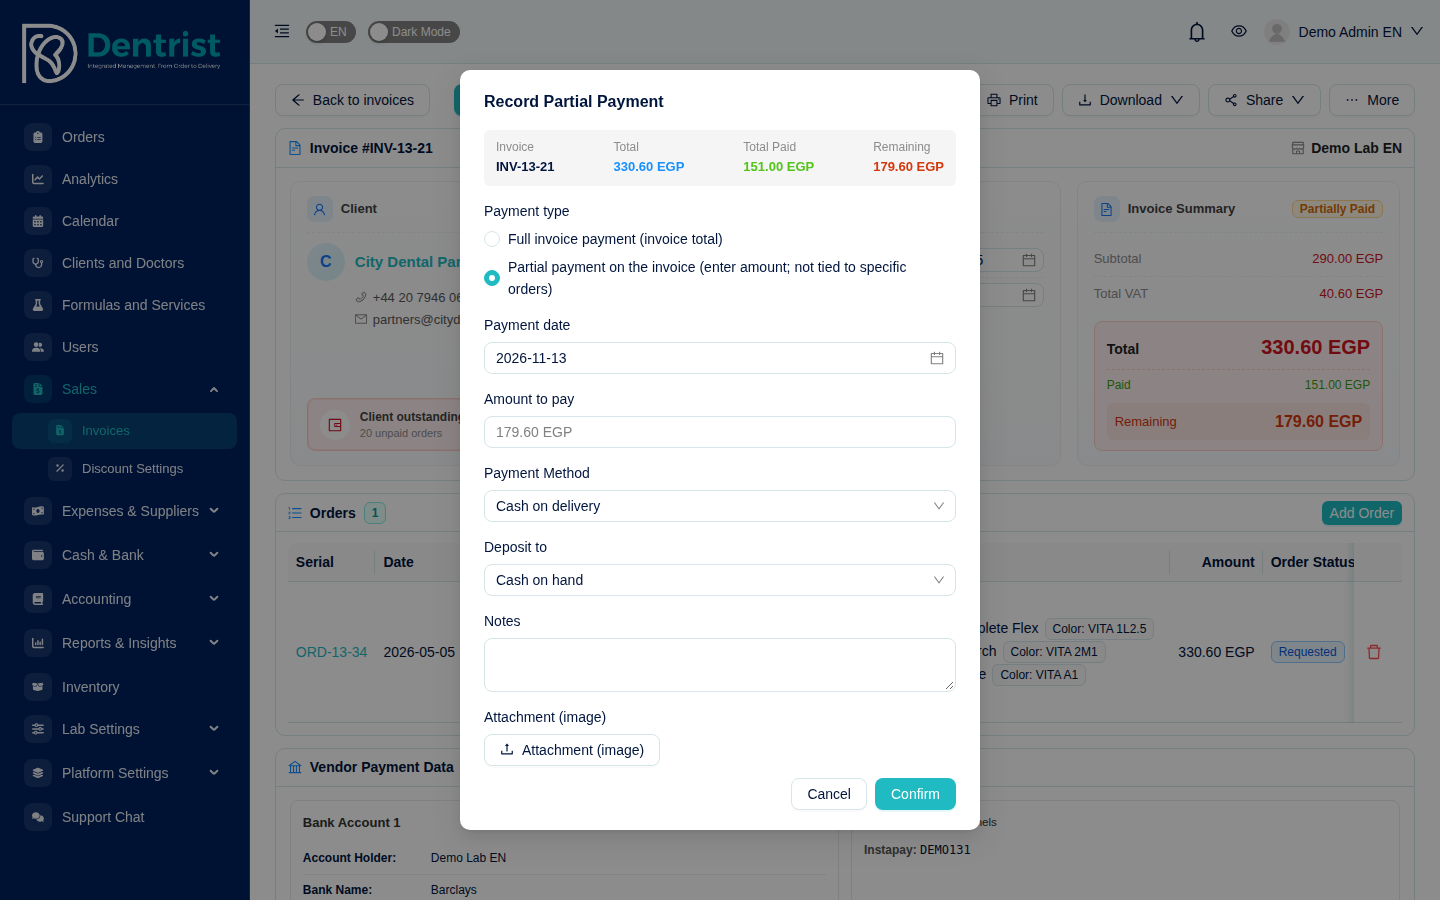
Recording a partial payment.
The invoice status becomes Partially Paid or Paid automatically. When it is fully paid, its orders are marked paid and moved to Closed. The payment appears in Transactions, in the client's account statement and in the ledger.
E-invoicing: If your lab uses the Egyptian Tax Authority e-invoice integration, open More → E-invoice on a non-draft invoice to check readiness, submit it and follow its status.
8.5 Discount settings
Menu: Sales → Discount Settings
Choose whether discount labels and amounts appear on orders, invoices, PDFs and public invoices. When hidden, clients only see the final prices; the charged totals do not change.

Show or hide discounts on documents.
9. Expenses and suppliers
9.1 Expenses
Menu: Expenses and Suppliers → Expenses
Record everything the lab spends that is not a supplier bill: rent, electricity, fuel, marketing, maintenance…

The expenses list with the total at the top.
Click Add Expense and fill in the expense type, cost, date, who it was paid to (a staff member, optional), which cash or bank account it was paid from, notes and attachments (receipts).
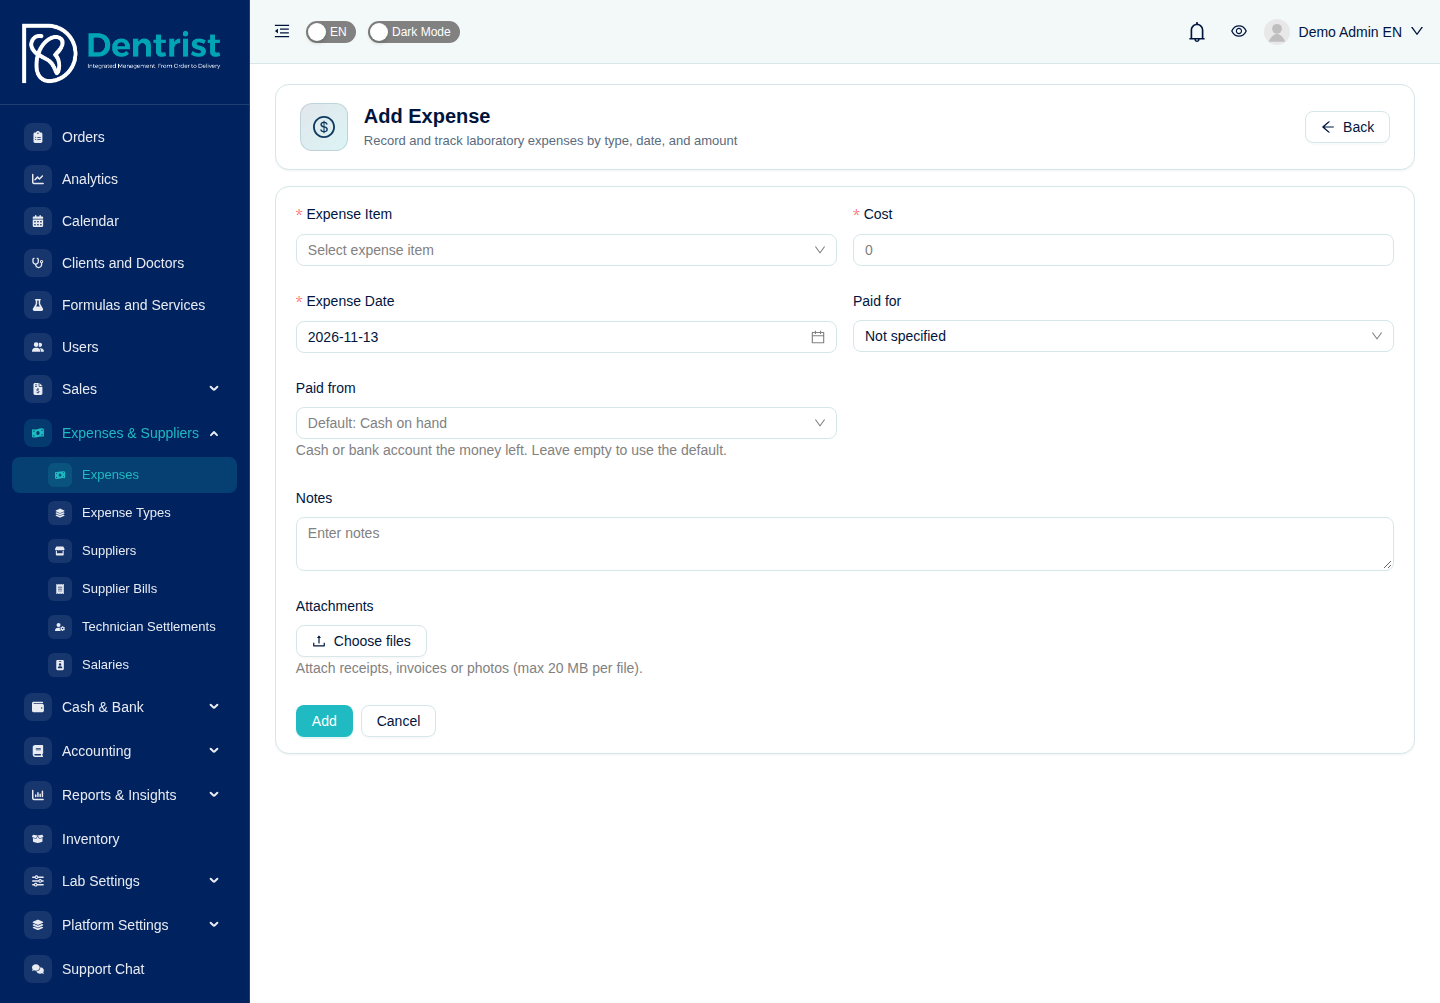
Recording an expense.
Count order formula costs as expenses: by default, the automatic production costs of orders are used for margins and reports only, so they are not counted twice with your actual purchases. Turn this switch on if you want them counted as expenses too.
9.2 Expense types
Menu: Expenses and Suppliers → Expense Types
The categories for expenses. Additional Operation Cost, Dental Technicians and Dental Materials are defaults that cannot be deleted. Add your own (Rent, Marketing, Utilities, Staff Salaries…). Each type posts to its own expense account in the ledger.
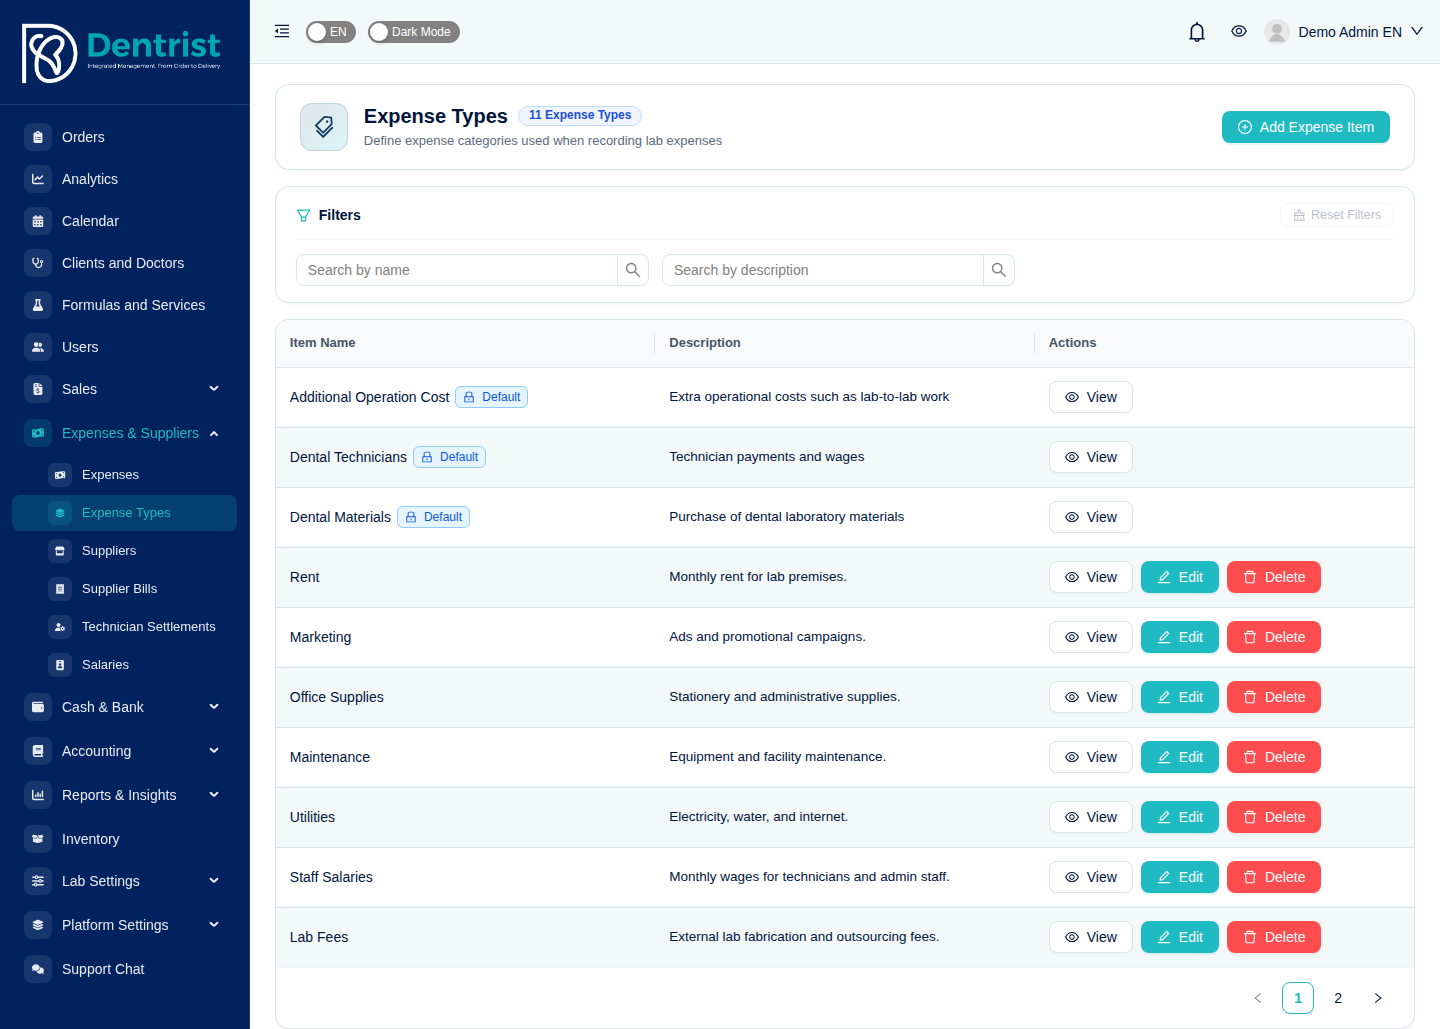
Expense categories.
9.3 Suppliers
Menu: Expenses and Suppliers → Suppliers
The companies you buy from. The cards show the total Outstanding, Overdue and Unapplied credit across suppliers, and the table shows each supplier's payment terms, open bills, total billed, outstanding and overdue amounts. The icons on each row open the supplier's statement, bills and payments.

Suppliers and what you owe them.
Click Add supplier and enter the name, phone, email, tax number and payment terms (for example 30 days).
9.4 Supplier bills
Menu: Expenses and Suppliers → Supplier Bills
A supplier bill records a purchase on credit. It increases what you owe the supplier until you pay it.

Supplier bills with their paid, remaining and overdue amounts.
- New bill: choose the supplier, bill date, due date and the supplier's invoice number, then add lines (expense type or stock item, quantity, price, tax). Lines with stock items add stock to Inventory when the bill is approved.
- Pay supplier: record a payment and allocate it to one or more bills.
- Tabs: Bills, Payments and Purchases vs costs.
- Overdue bills are flagged with the number of days overdue.
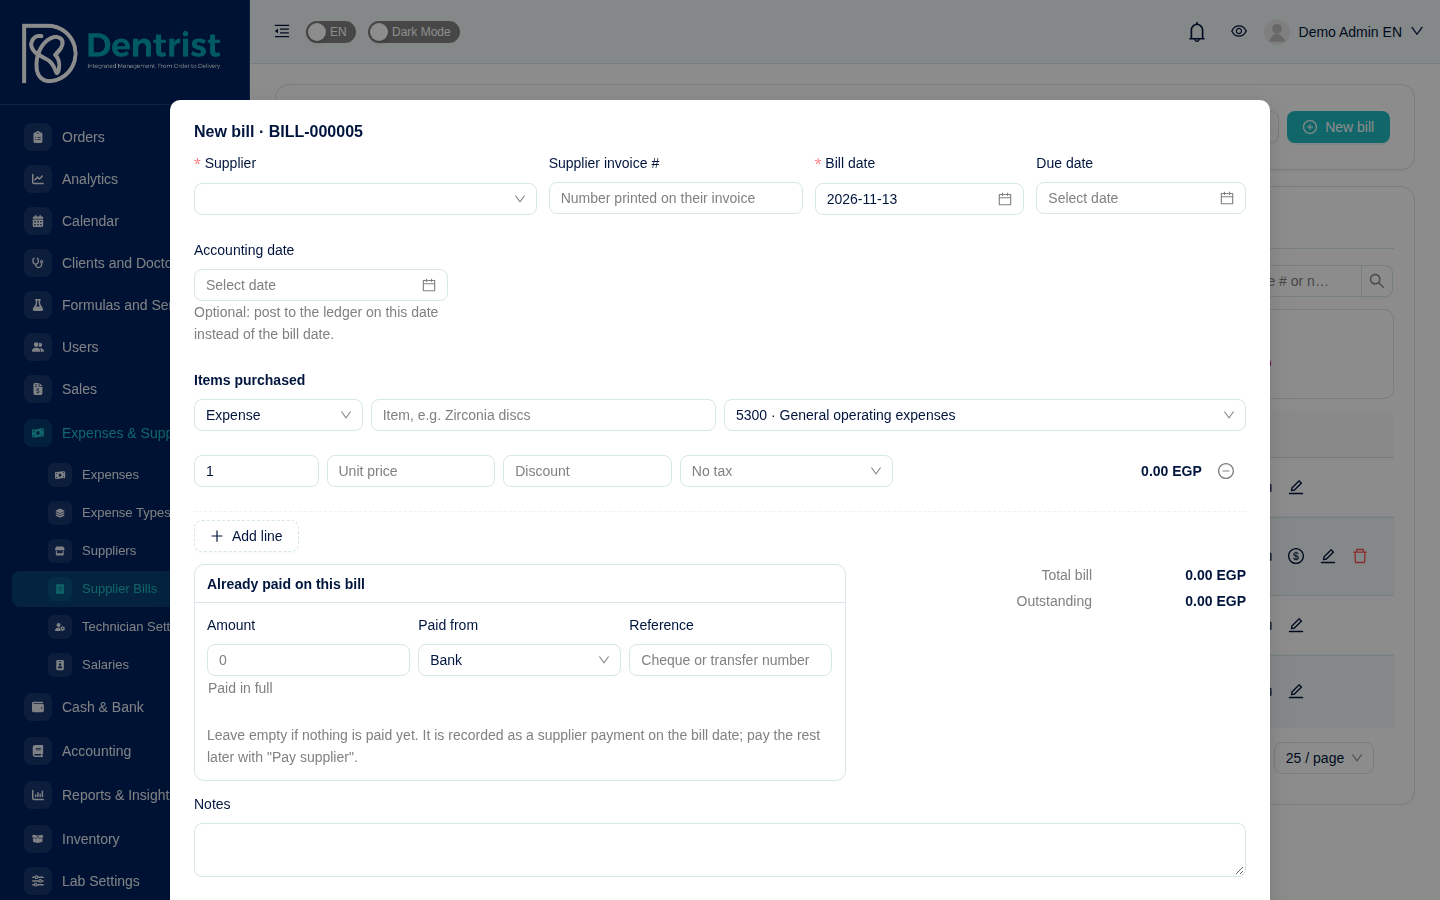
Creating a supplier bill.
9.5 Technician settlements
Menu: Expenses and Suppliers → Technician Settlements
Pay technicians per piece for the orders assigned to them.
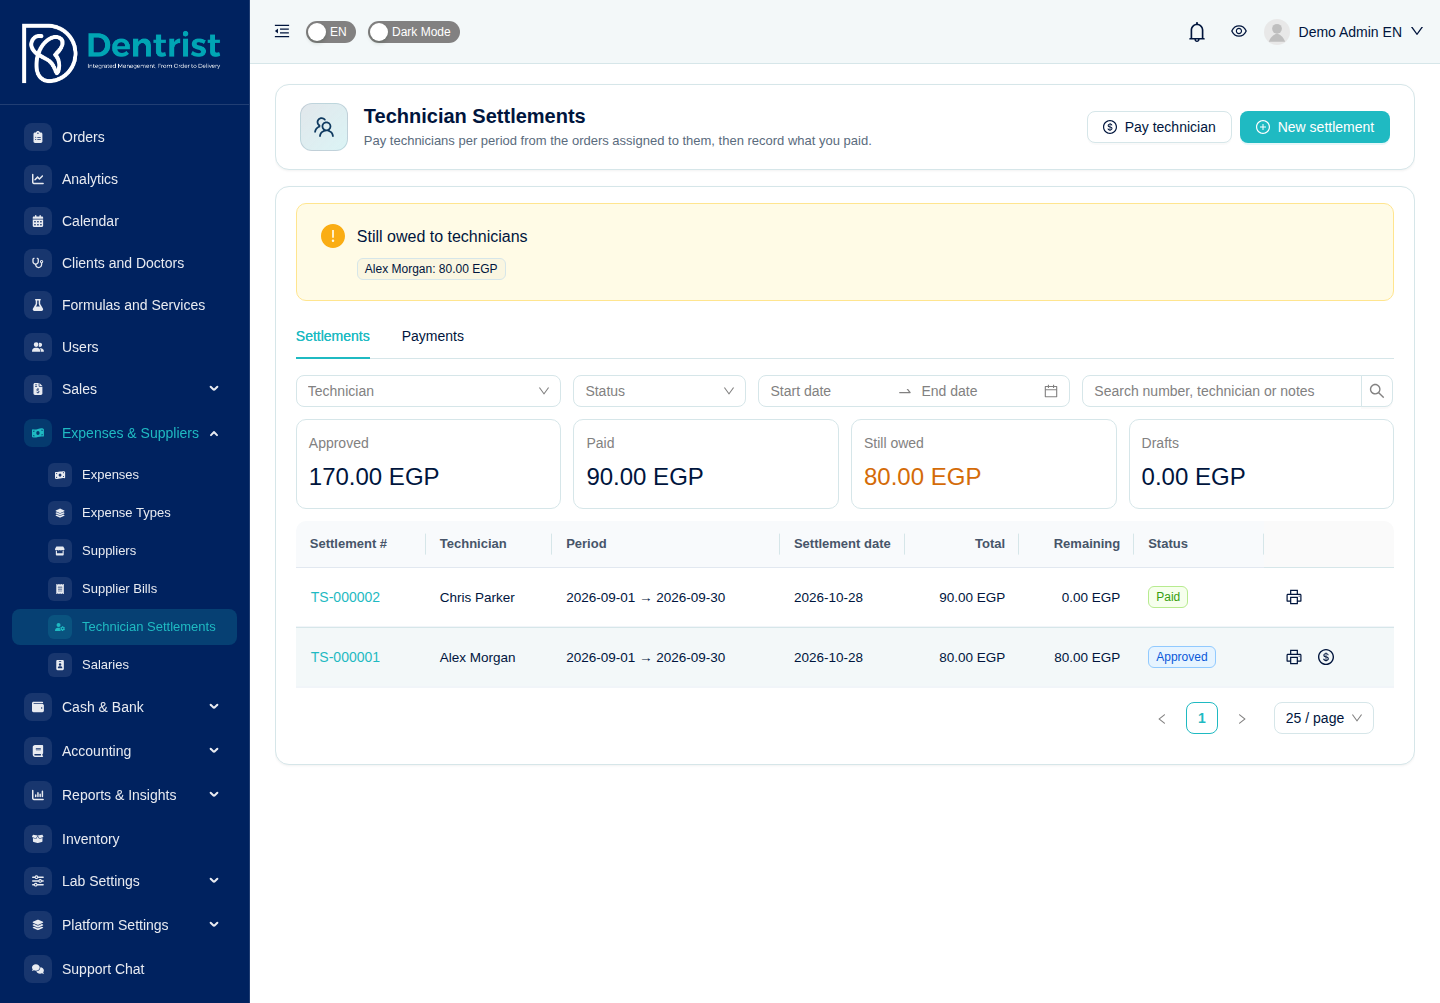
Settlements, with a warning of what is still owed to each technician.
- Click New settlement, choose the technician and the period, and click Load orders. Dentrist lists the technician's orders in that period with the amount due for each.
- Review, adjust if needed, and approve. The amount is now owed to the technician.
- Click Pay technician (or the pay icon on a settlement) to record the payment.
The cards show what is approved, paid, still owed and in draft.
9.6 Salaries
Menu: Expenses and Suppliers → Salaries
Monthly payroll for your staff.

Salary runs, with the employees who have no salary set and the salaries still owed.
- In the Employees tab, set each employee's salary and start date. You can also add employees who do not use the system (for example a cleaner); they have no login.
- Click New salary run, choose the month, review allowances and deductions (partial months are prorated) and approve.
- Click Pay salaries to record the payment.
- In Recurring, let Dentrist create the salary run automatically every month on pay day.
10. Cash and bank
10.1 Cash and bank accounts
Menu: Cash and Bank → Cash and Bank
Your real money accounts: the cash drawer, bank accounts and money transfer wallets, with balances taken from the ledger.
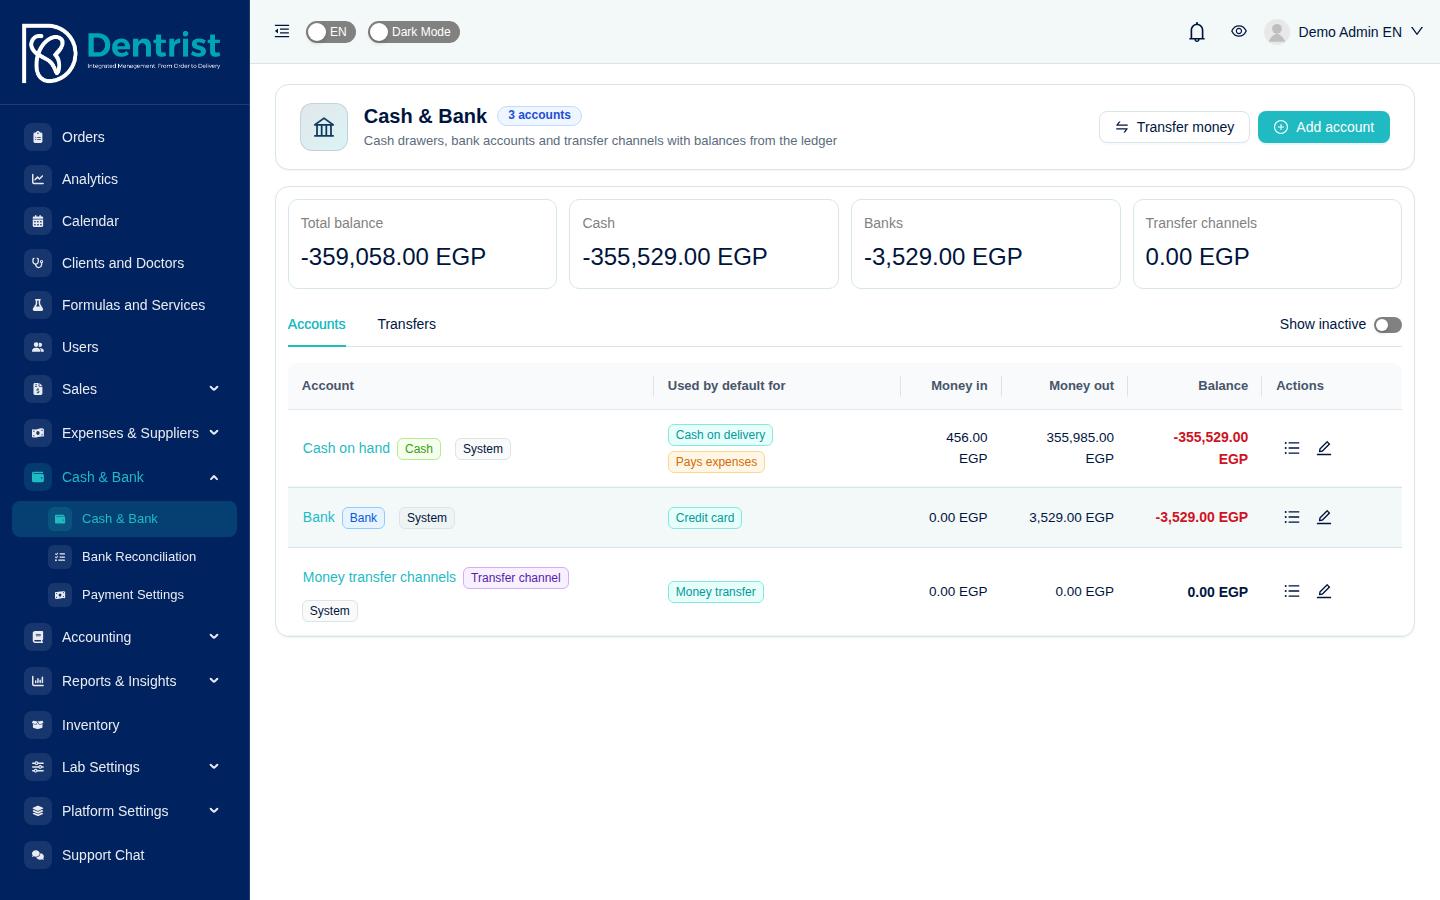
Balances per account and in total.
- Three built-in accounts exist: Cash on hand, Bank and Money transfer channels. Add more with Add account (for example a second bank).
- Used by default for shows which account receives each payment method (cash on delivery, credit card, money transfer) and which one pays expenses.
- Transfer money moves money between accounts (for example depositing cash into the bank).
- The list icon on a row opens the account's movements.
10.2 Bank reconciliation
Menu: Cash and Bank → Bank Reconciliation
Check that your ledger matches your bank statement.

Each account with its ledger balance, last reconciliation and uncleared lines.
- Click Reconcile on an account (or Start reconciliation).
- Enter the statement date and the closing balance shown on the bank statement.
- Tick each ledger line that appears on the statement. Dentrist shows the difference; when it reaches zero, complete the reconciliation.
In the Bank statements tab you can import a CSV or OFX statement file and let Dentrist match its lines to the ledger automatically.
10.3 Payment settings
Menu: Cash and Bank → Payment Settings
The bank accounts and money transfer channels (for example InstaPay or mobile wallets) that are printed on your invoices so clients know where to pay. Add, edit, activate or deactivate each one.

Bank accounts and transfer channels shown to clients.
11. Accounting
Dentrist includes a complete double-entry ledger. You do not need to type journal entries for daily work: orders, payments, expenses, bills, settlements and salaries post automatically. These pages are where you (or your accountant) review and control the books.
11.1 Chart of accounts
Menu: Accounting → Chart of Accounts
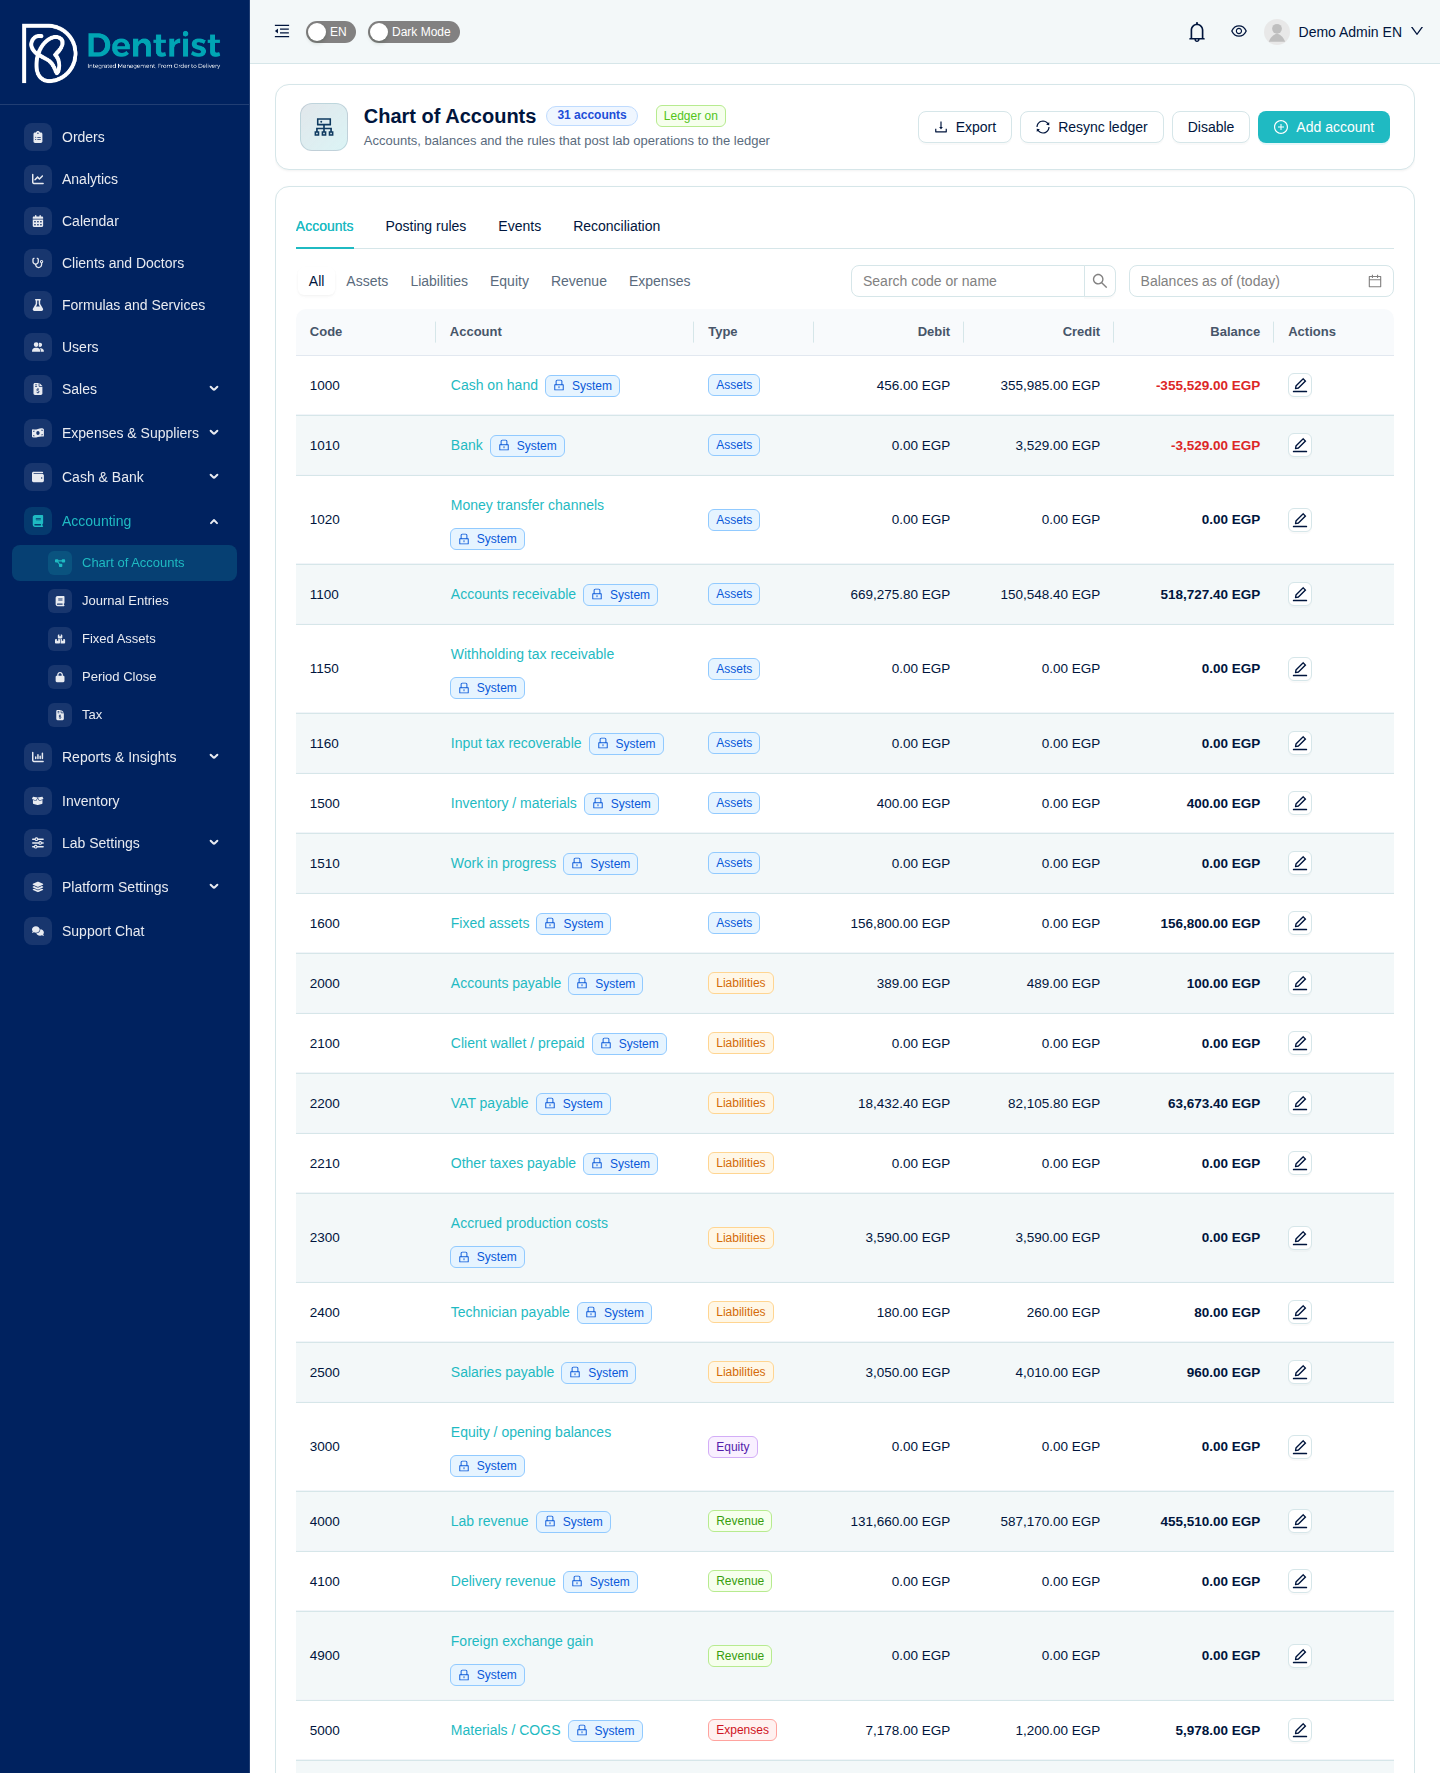
The chart of accounts with debit, credit and balance per account.
- The Accounts tab lists all accounts with their type (assets, liabilities, equity, revenue, expenses) and balances. Filter by type, search, or see balances as of a past date. System accounts are created by Dentrist and cannot be deleted; click Add account to add your own.
- The Posting rules tab shows which account each operation posts to (for example which revenue account an order uses, or which account an expense type uses), and lets you change them.
- The Events tab shows the queue of operations being posted.
- The Reconciliation tab runs a health check that compares the ledger with the operational data (client balances, wallets, supplier balances, technician and salary payables). Click Run checks. If something differs, click Resync ledger in the header and check again.
- Export downloads the chart; Disable turns accounting off for the lab.
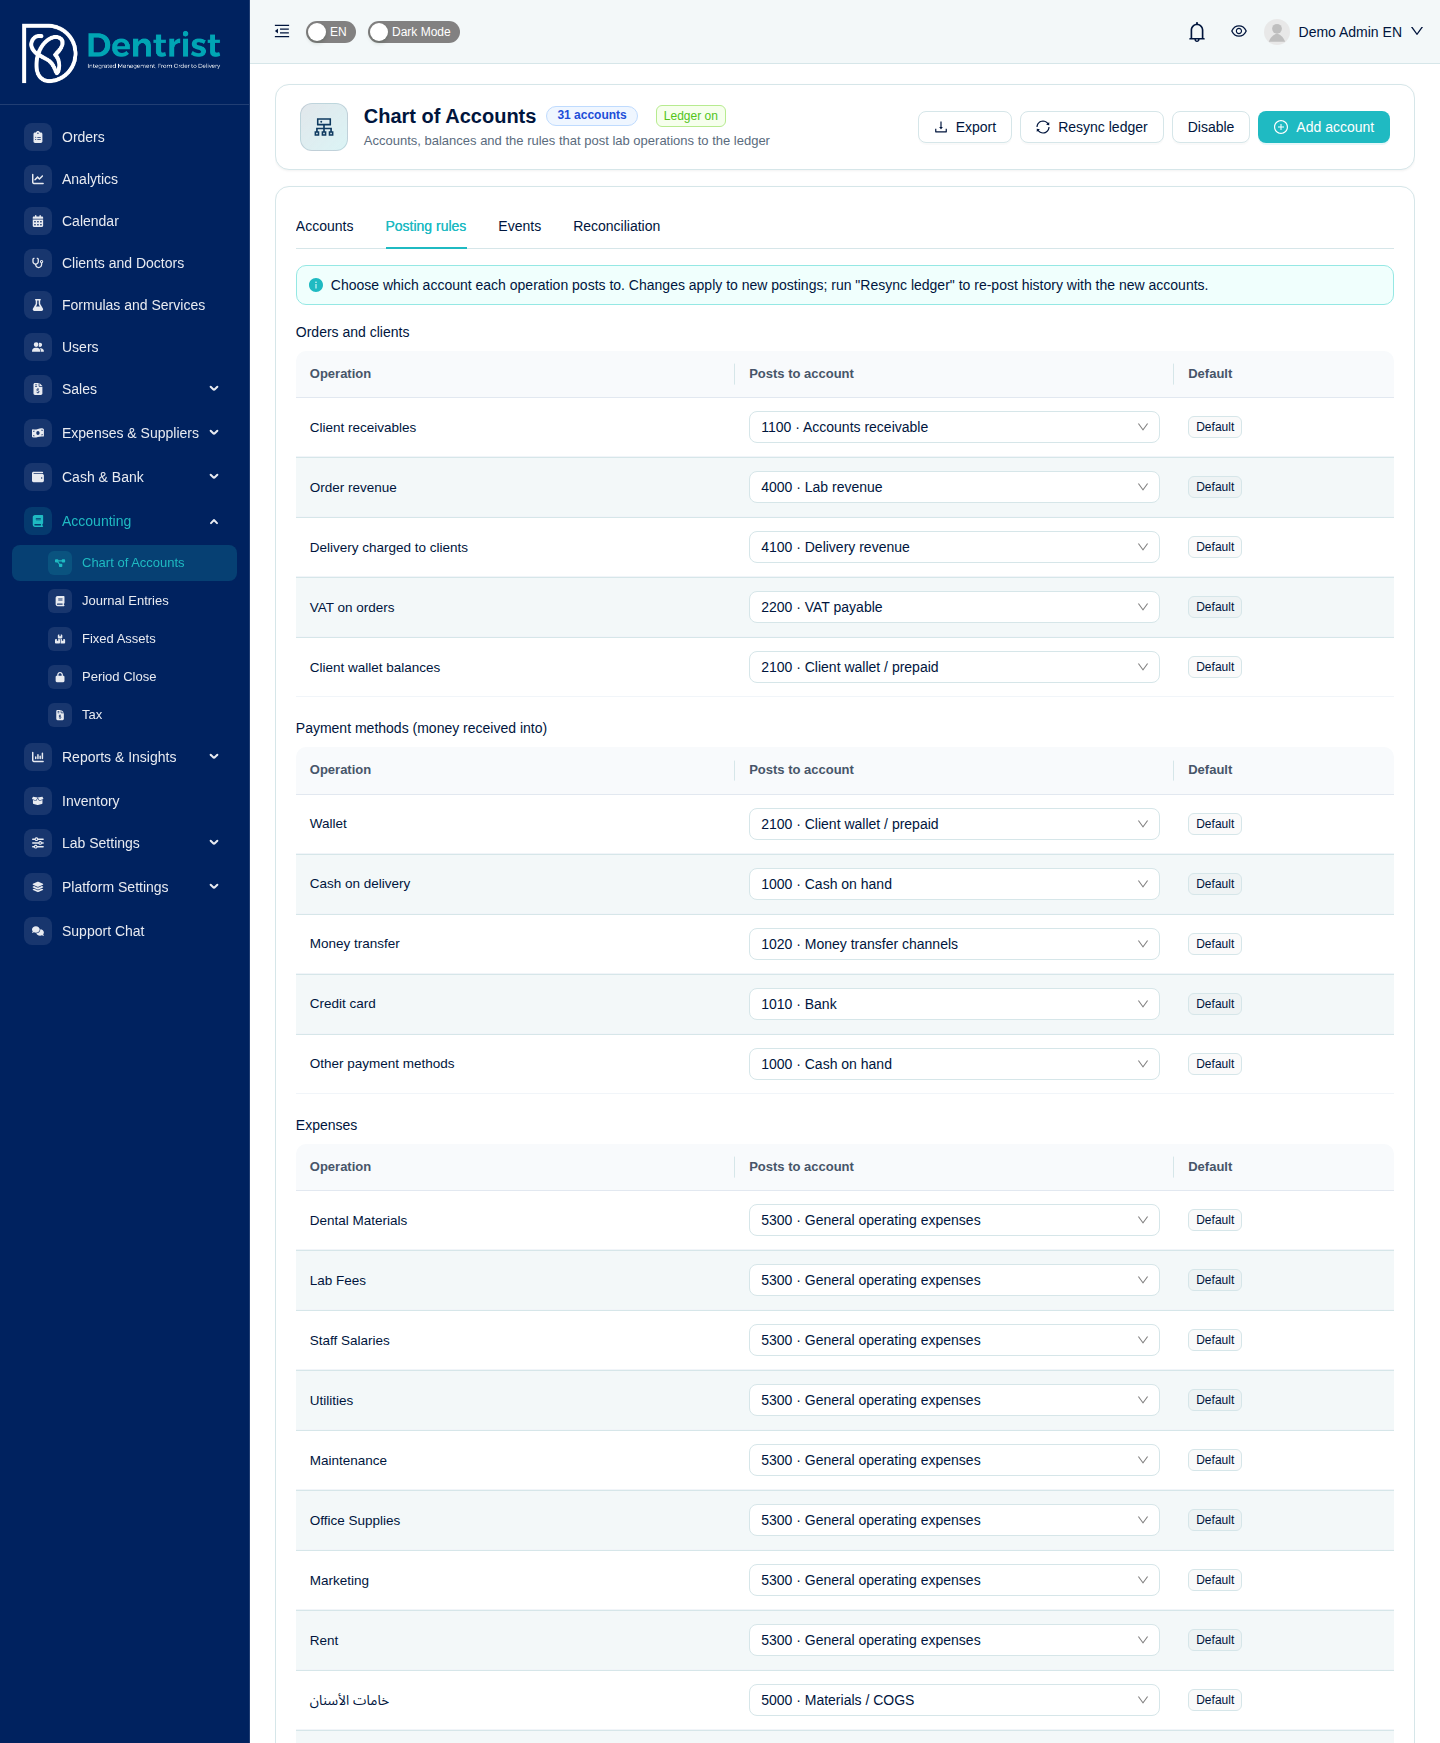
Posting rules: which account each operation uses.
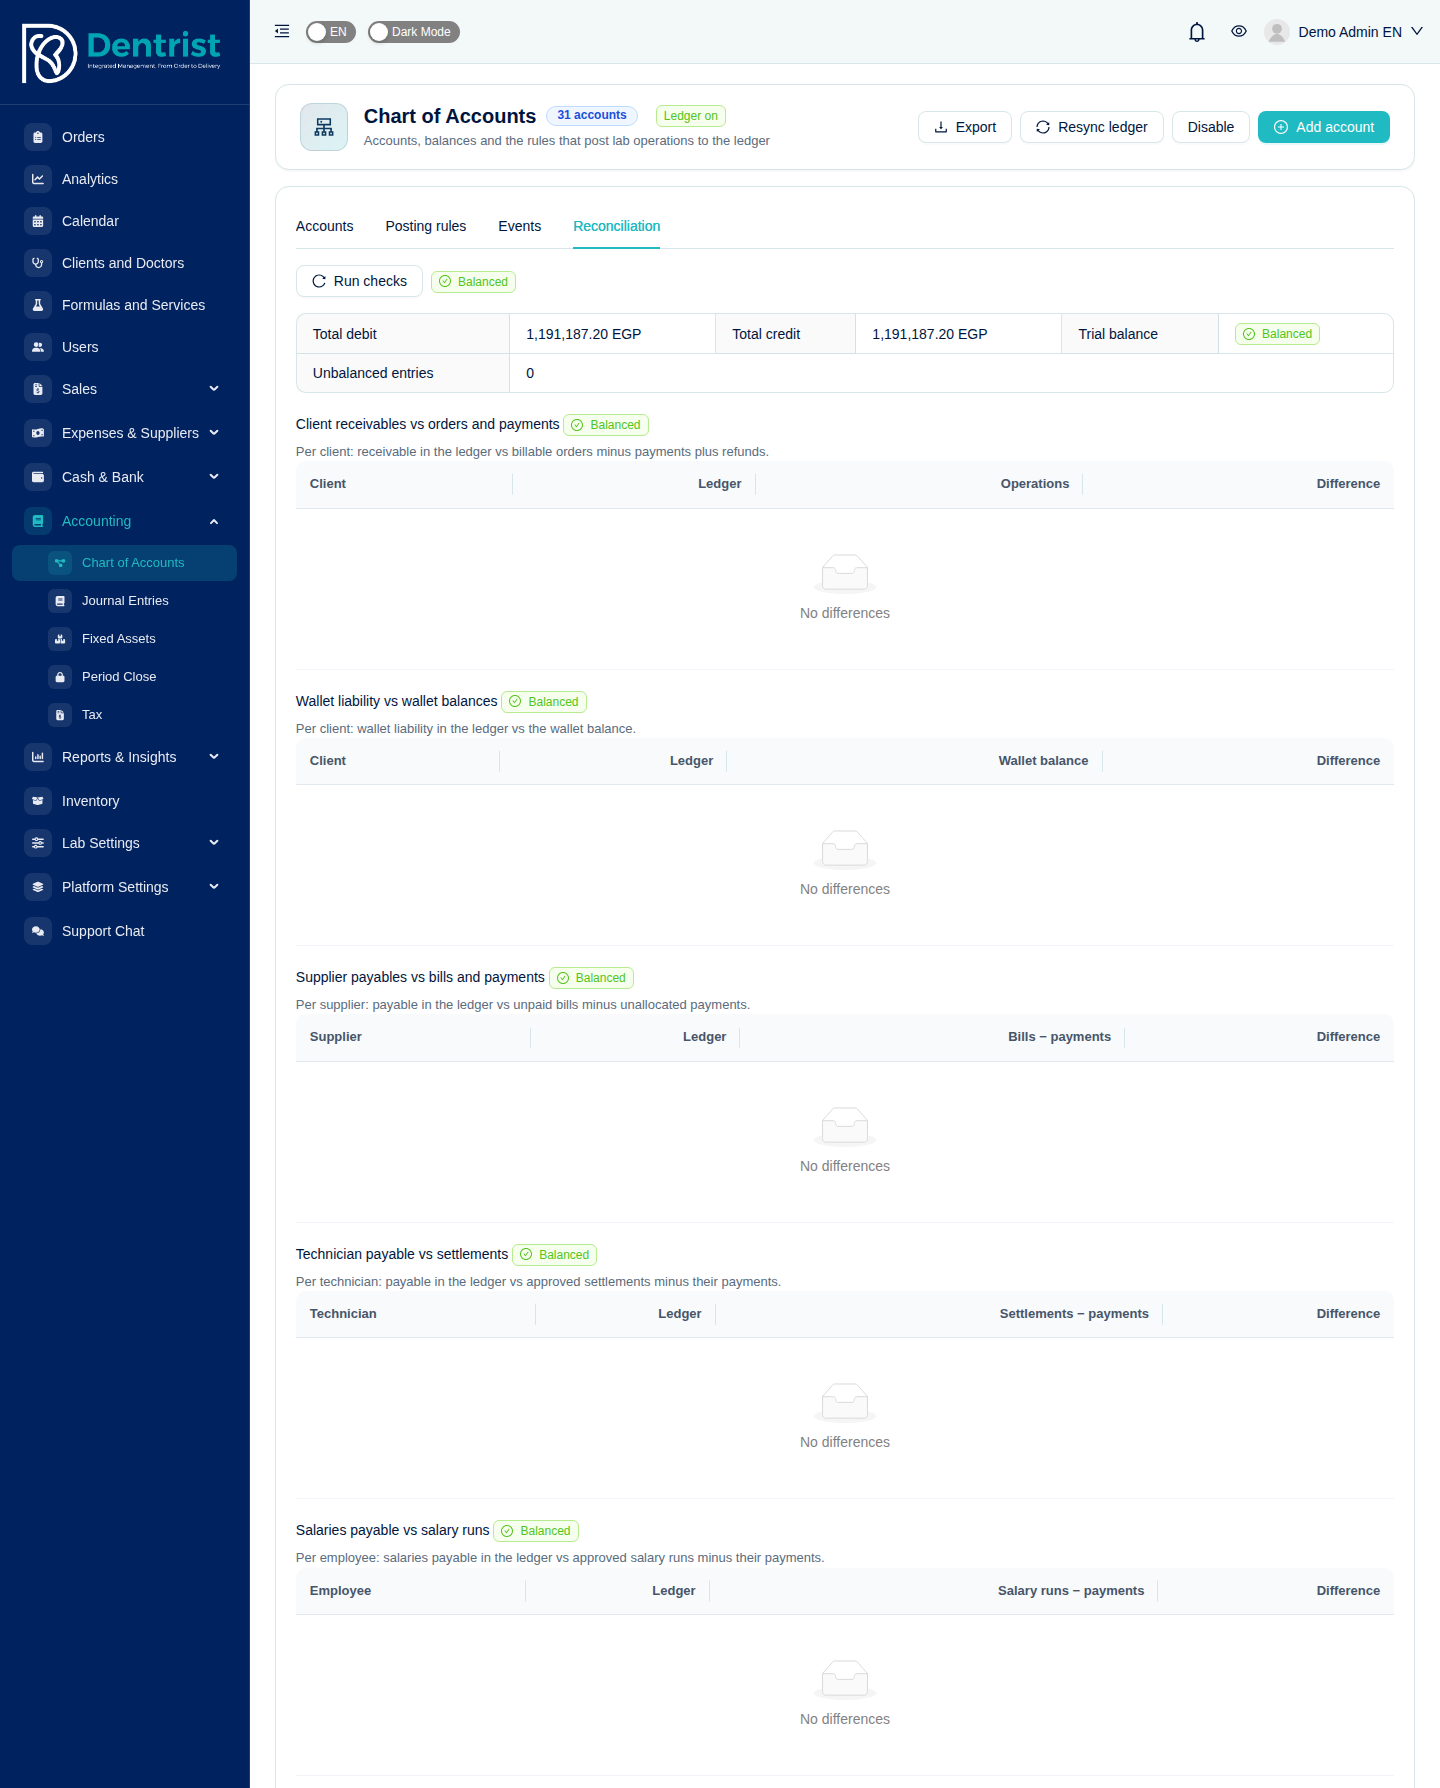
The ledger health check.
11.2 Journal entries
Menu: Accounting → Journal Entries
Every posting to the ledger, from operations and manual entries.

The journal with the operation, reference and amount of each entry.
Filter by date, source (orders, invoices, expenses…), status, account, or search by entry number or reference. Click an entry to see its lines (debits and credits). Click the reference to open the order, invoice or expense behind it.

An entry's debit and credit lines.
- New journal entry records a manual entry (for example opening balances or an adjustment). Debits must equal credits.
- When an operation is edited, Dentrist never changes its old entry; it reverses it and posts a new revision. Tick Hide reversed entries and their reversals to see only the current picture.
11.3 Fixed assets
Menu: Accounting → Fixed Assets
Equipment the lab owns: milling machines, furnaces, scanners, computers… Record each asset with its cost, notes and attachments (invoice, warranty). The total value is shown at the top. Depreciation is used in Lab Costing to spread the equipment cost over orders.

The lab's assets.
11.4 Period close
Menu: Accounting → Period Close
Lock finished periods so the reported numbers cannot change.

Closing the books through a date.
- Choose Close through (for example the last day of last month).
- Review the preview: period, number of entries, net profit and total posted. Dentrist warns you about cash and bank lines that are not reconciled.
- Add notes and click Close the books.
After closing, manual entries into the closed period are refused, and operations dated in it post on the first open day instead. Set the month your fiscal year starts in on the same page.
11.5 Tax
Menu: Accounting → Tax

Tax settings: country, VAT rate, registration and tax types.
- Settings: the country tax system (taken from your currency), Simple VAT % used on new orders, whether the lab is tax registered, the registration number and the address printed on tax invoices. Turn on Use the tax engine for country-specific rules with several tax types (VAT, table tax, withholding tax).
- Install standard rates adds the official rates of your country.
- Recalculate tax re-applies the current rules to unpaid orders from a date.
- Tabs: Rates, Client tax details (clients' tax numbers and exemptions) and Tax report (tax collected and paid for a period).
- Tax history shows every change to the tax settings.
12. Reports and insights
12.1 Revenue report
Menu: Reports and Insights → Revenue Report
Income from orders that became due in the period (when they reached the billable status), paid or not, after discounts, with production costs and net profit per formula type.

The revenue report for one month.
Choose Month or a Date range, tick which costs to include (material, technician, additional), and export to CSV, Excel or PDF. Notes at the top tell you how many orders are not counted yet because they have not reached the billable status, and how many unpaid orders are included.
12.2 Collection report
Menu: Reports and Insights → Collection Report
The cash view: income from orders actually paid in the period (by payment date), and the cash surplus after general expenses.

The collection report.
Revenue or collection? Revenue is what you delivered and billed; collection is what you received. Do not add the two together.
12.3 Transactions
Menu: Reports and Insights → Transactions
Every money movement: invoice payments, expenses, wallet recharges and deductions, and refunds. The cards show the total and count per type. Filter by type, reference, notes and date.

The transactions list.
12.4 Financial reports
Menu: Reports and Insights → Financial Reports
The books of record, built from the posted journal. Choose the date range and use the tabs:
- Trial balance: opening, movement and closing debit and credit per account. It should always show Balanced.
- General ledger: every line of every account.
- Sub-ledger: balances per client, supplier or technician.
- Profit and loss: revenue minus cost of sales and expenses.
- Balance sheet: assets, liabilities and equity.
- Cash flow: where cash came from and went.
Each tab has Refresh, Print and Export.

The trial balance.
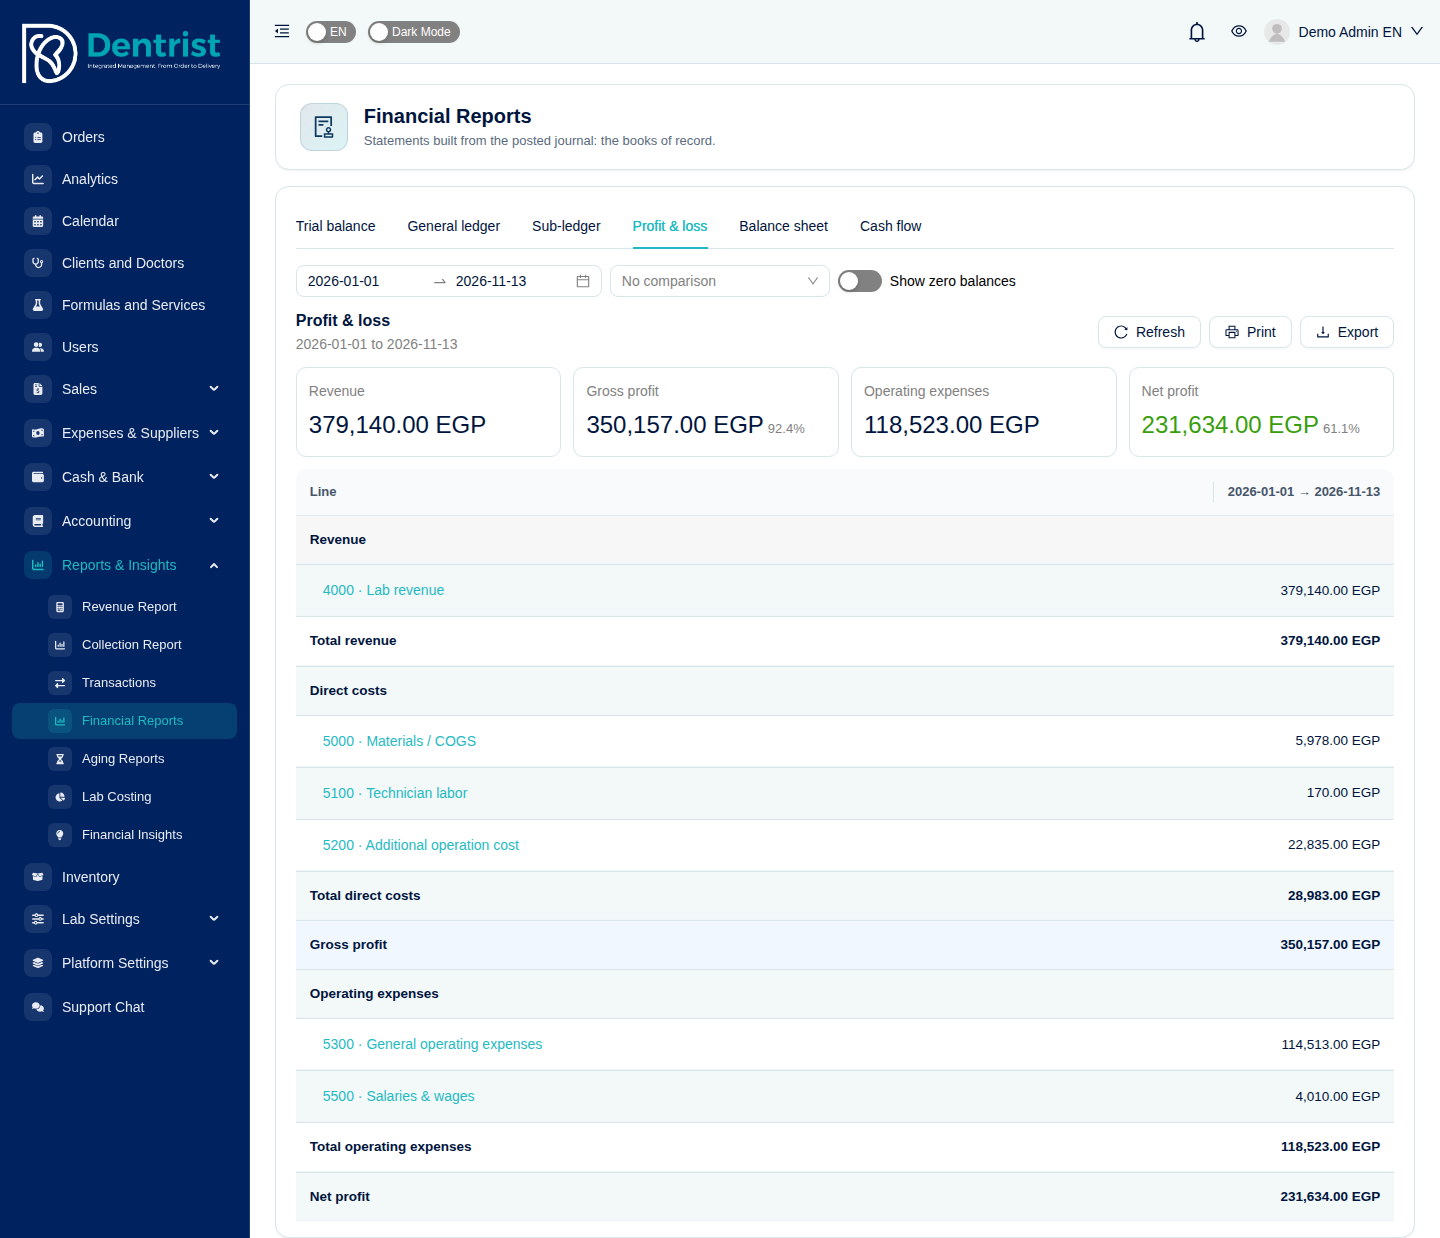
The profit and loss statement.

The balance sheet.
12.5 Aging reports
Menu: Reports and Insights → Aging Reports
How long amounts have been due, in buckets: not yet due, 1–30 days, 31–60, 61–90 and over 90 days.
- Receivables (clients): who owes you, and how late. Click + on a client to see the orders behind the amounts.
- Payables (suppliers): whom you owe.
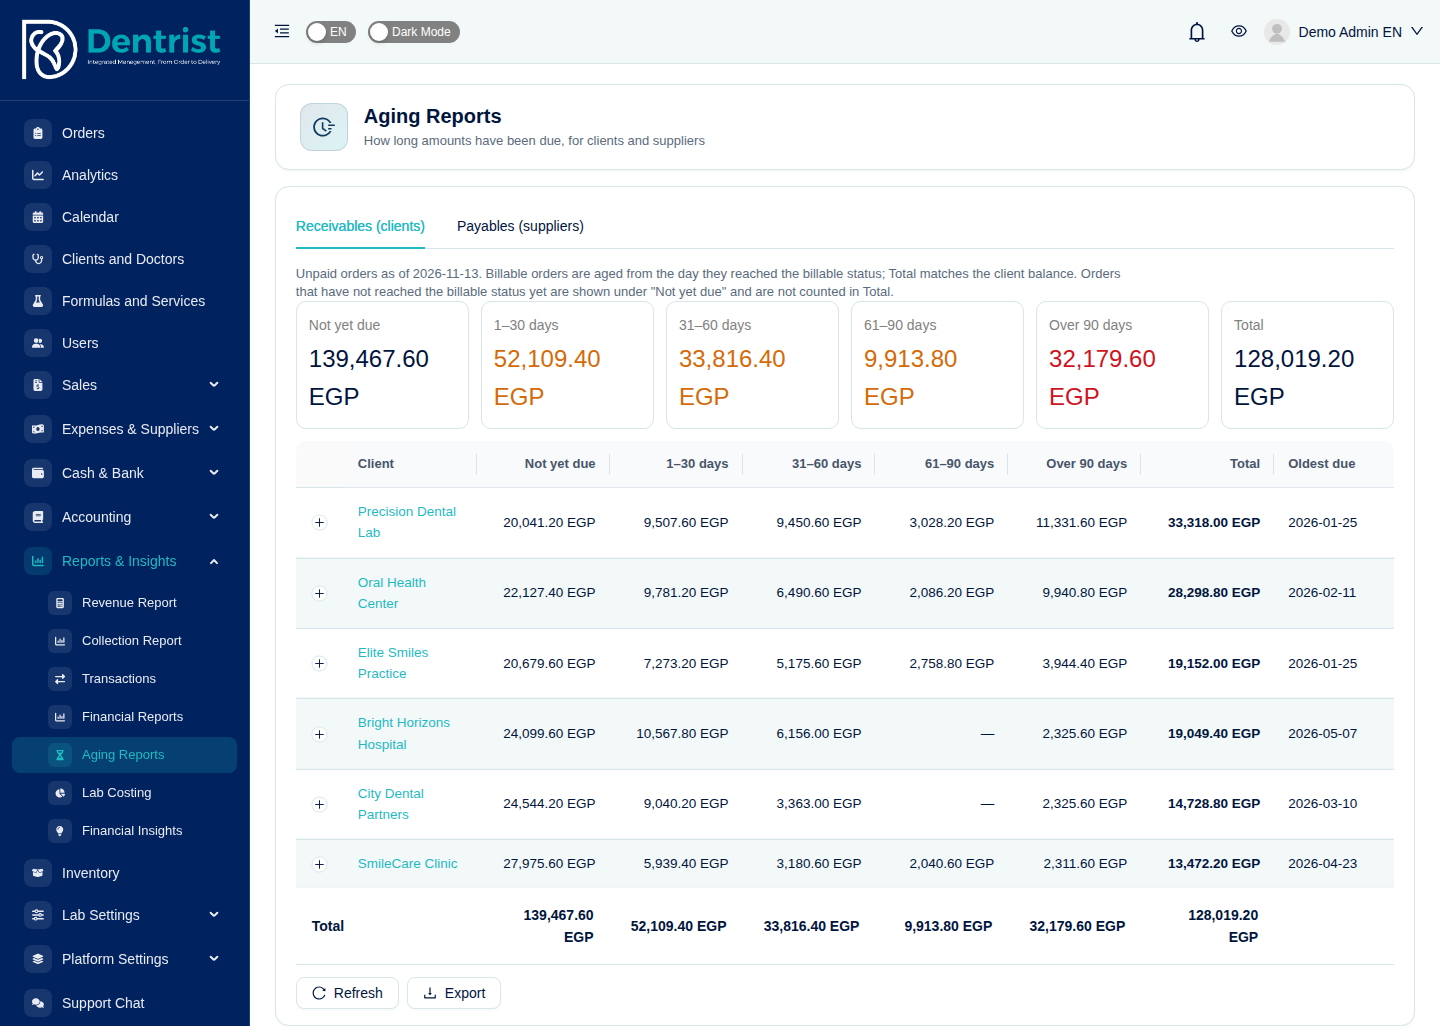
Receivables aging per client.
12.6 Financial insights
Menu: Reports and Insights → Financial Insights
Automatic alerts and KPIs computed from the ledger: low cash runway, negative balances, overdue receivables, past-due supplier bills, low-margin orders and clients, revenue, gross and net profit compared with last month, a 12-month trend and cash runway. Click Alert thresholds to set when each alert appears.

Alerts and key figures.
12.7 Lab costing
Menu: Reports and Insights → Lab Costing
Which orders, clients, technicians and formula types make money.

Margin per order: revenue, materials, technician, additional and delivery costs.
- Order margins: revenue and direct costs per order (or grouped by client, technician or formula type), with the margin. Use Overhead to spread general expenses and equipment depreciation over orders.
- Remakes: how many remakes you had, why, and what they cost.
- Settings: how materials are costed (as stock or as direct expense).
12.8 Inventory
Menu: Inventory
Stock of materials (zirconia blocks, porcelain, implants parts…) at moving average cost.
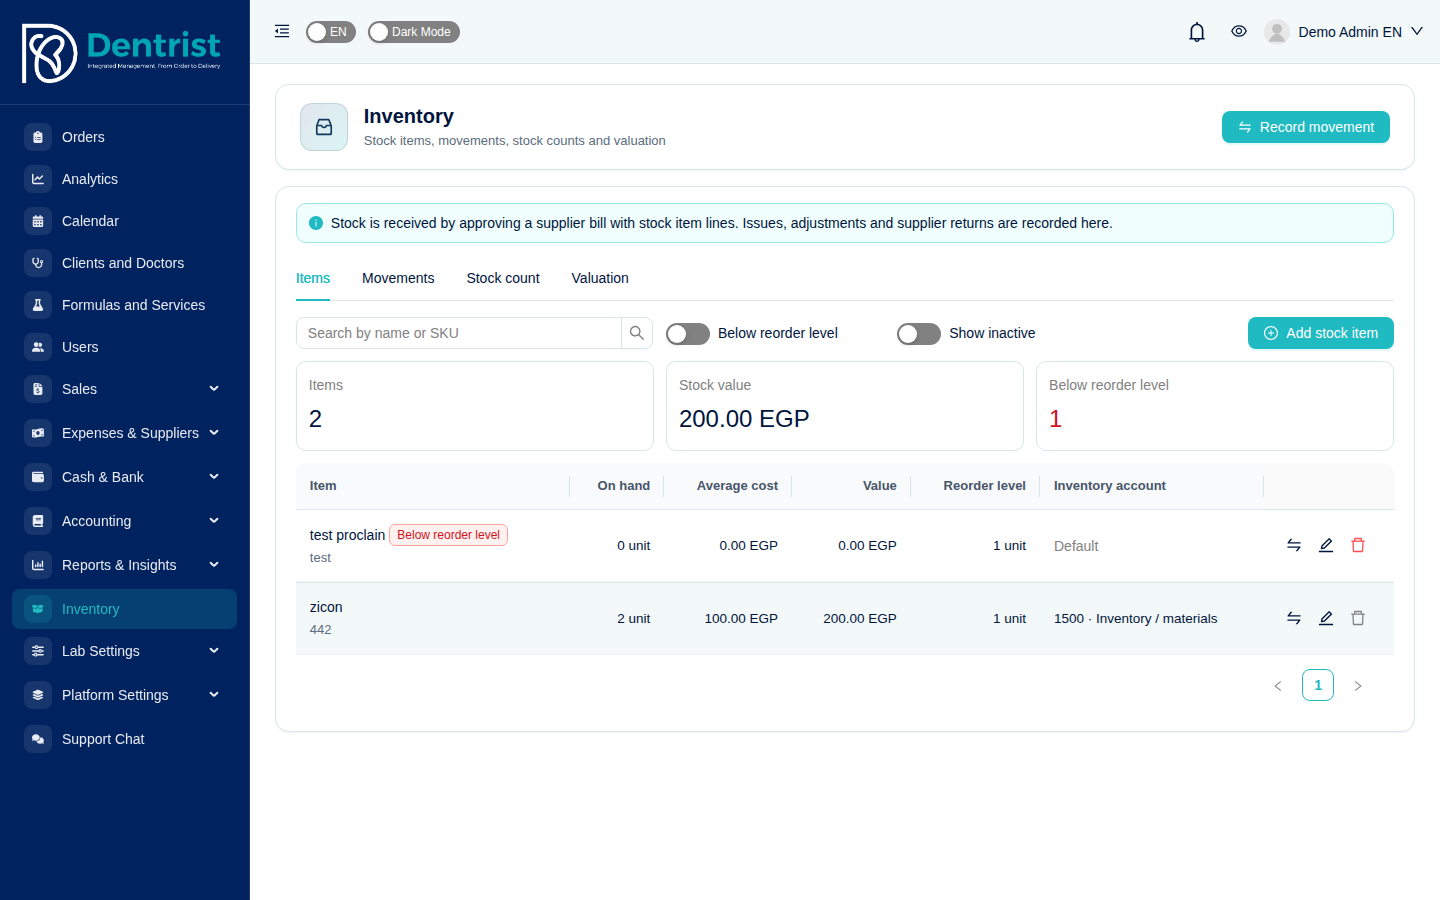
Stock items with quantity on hand, average cost, value and reorder level.
- Items: add stock items with SKU, unit, reorder level and inventory account. Items below their reorder level are flagged.
- Stock comes in when you approve a supplier bill with stock item lines.
- Record movement issues material to an order (its cost goes to that order's margin), adjusts stock, or returns it to a supplier.
- Movements, Stock count (count and correct stock) and Valuation (value of stock on a date) tabs.
13. Lab and platform settings
13.1 Lab information
Menu: Lab Settings → Lab
Your lab's name, logo, phones, WhatsApp, currency and description. Turn on Share contacts with clients to show your contacts in the dentist portal. Click Edit to change them. The logo appears in the top bar and on invoices.

The lab profile.
13.2 Delivery settings
Menu: Lab Settings → Delivery Settings
Delivery types and their price (for example Standard Delivery 50, Free Delivery). The Default type is used on new orders. Use Change value, Set as default and Change history on each type. Turn off Show delivery to hide delivery from orders, invoices and PDFs (totals still include it).

Delivery types.
13.3 Vacations
Menu: Lab Settings → Vacations
Tick your weekend days and add vacations (date ranges when the lab is closed). They are highlighted on the calendar and taken into account when suggesting delivery dates.

Weekend days and lab closures.
13.4 Branches
Menu: Lab Settings → Branches
The lab's branches with address, phone, WhatsApp, email and notes.
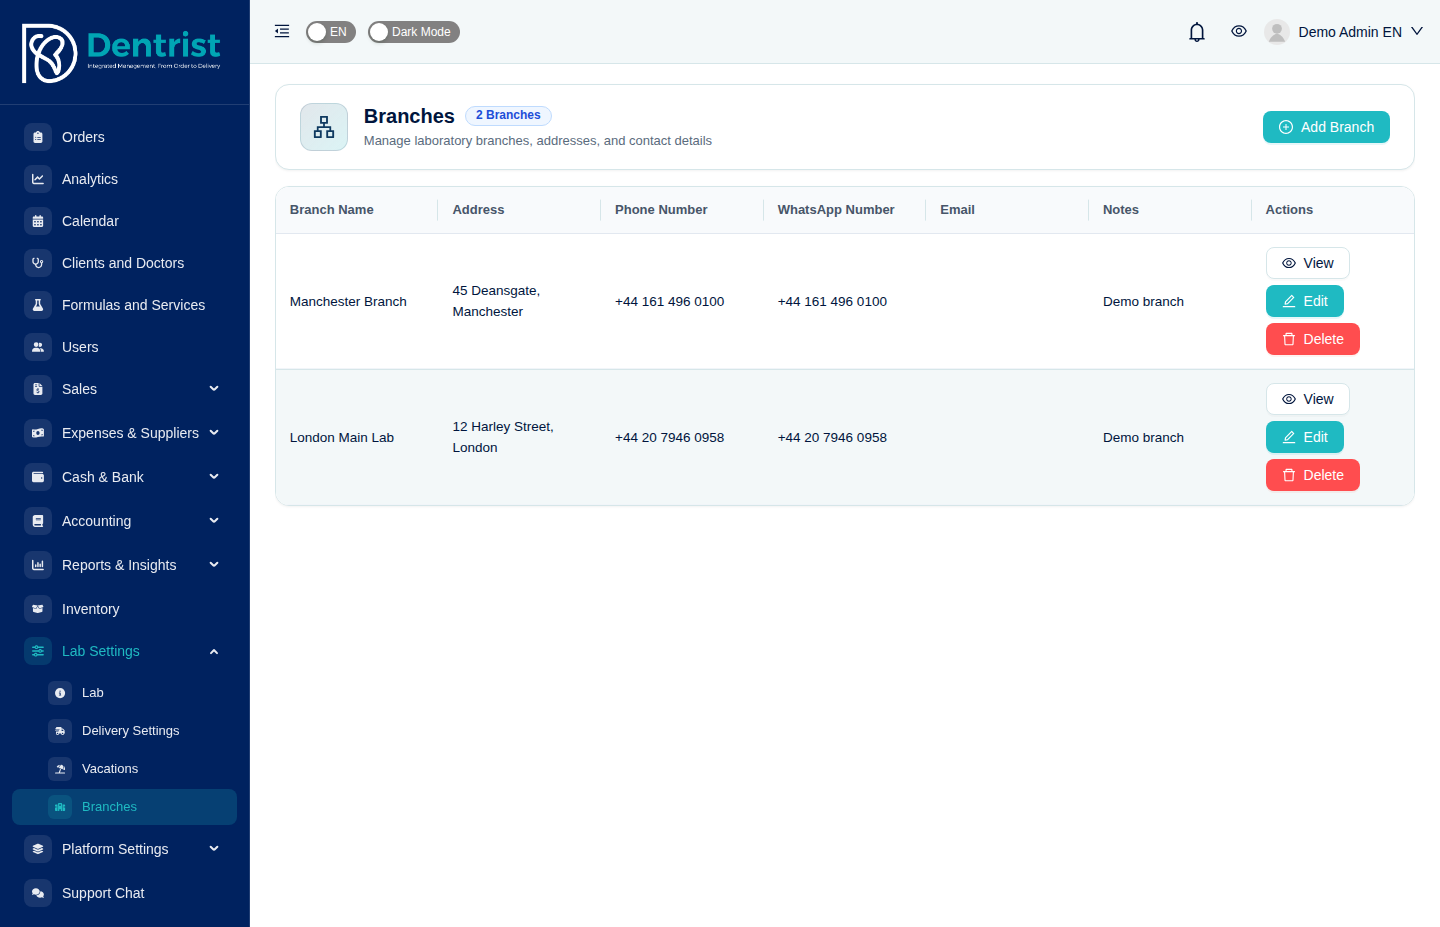
Lab branches.
13.5 Notification settings
Menu: Platform Settings → Notification Settings
Choose which emails you receive: when an order moves to each status, when an order is modified, when there is a new chat message in an order, and when an order is assigned to you. Turn on Receive only notifications related to my assigned orders to limit them to your own orders.
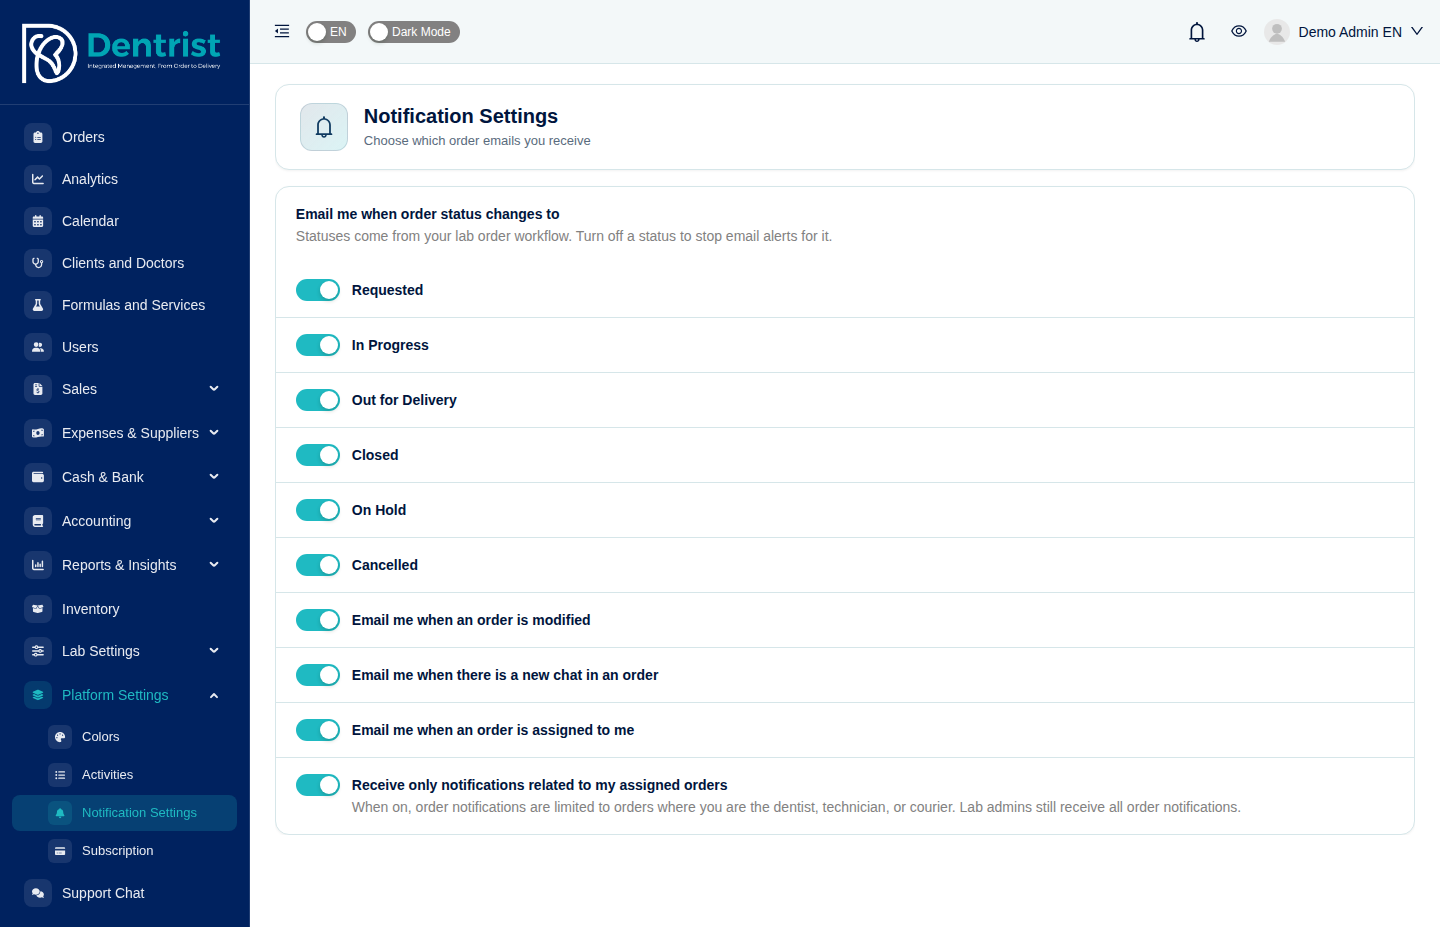
Personal email notification preferences.
13.6 Notifications
Click the bell in the top bar to see your latest notifications, or open the full Notifications page. Click a notification to open the order or invoice it is about. Mark all as read clears the counter.
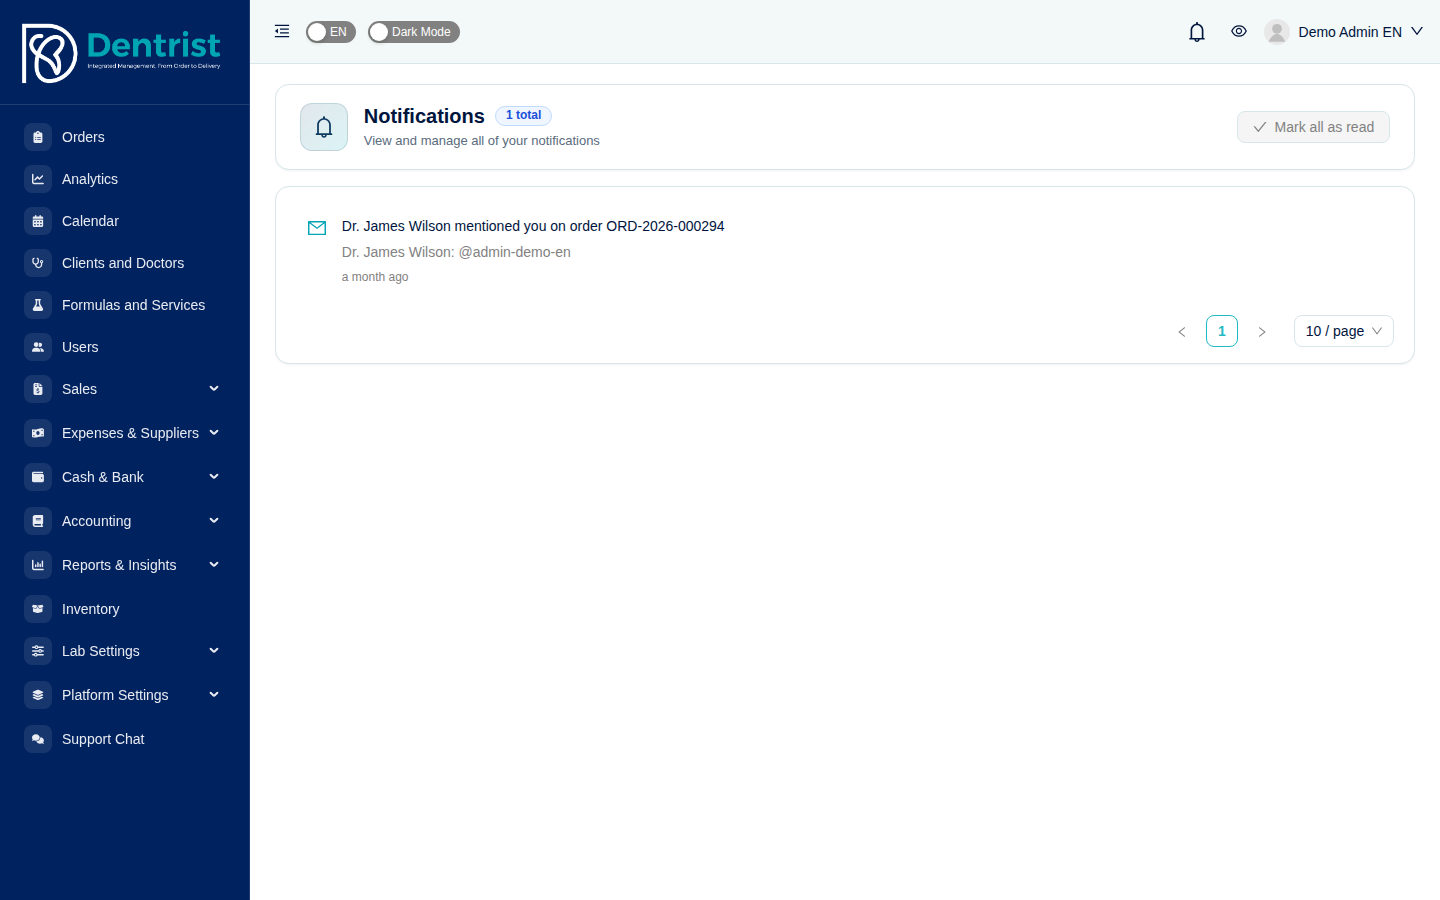
The notifications page.
13.7 Activities (audit log)
Menu: Platform Settings → Activities
The audit trail of who did what and when: every create, update, delete, login and logout, with the user, entity, device IP and date. Click Properties to see exactly what changed. Filter by user name, entity, operation and date.
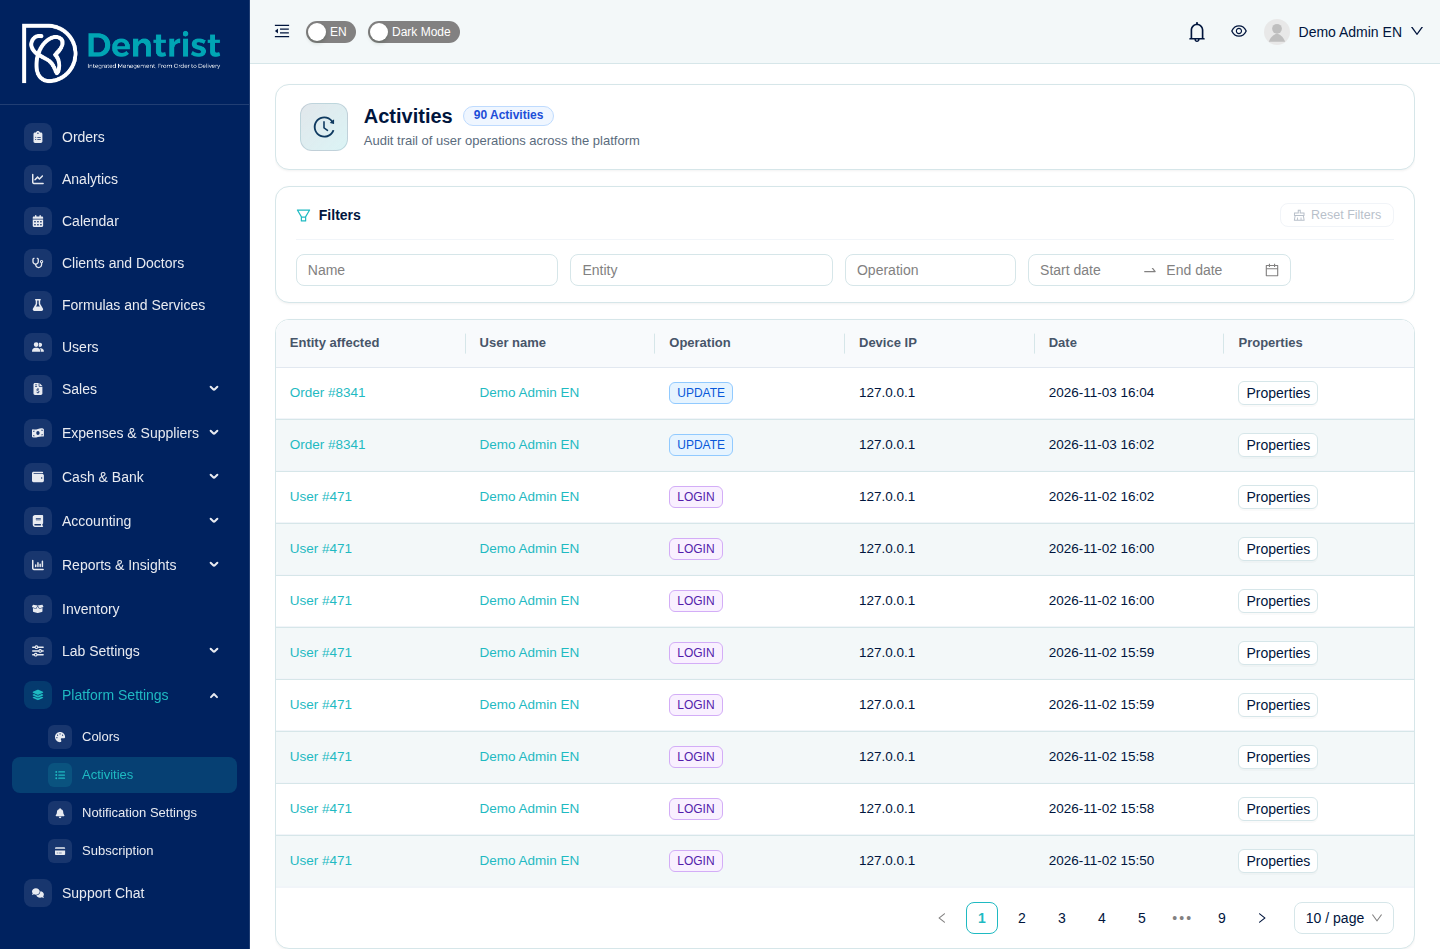
The audit log.
13.8 Subscription
Menu: Platform Settings → Subscription
Your current plan and its status, and the available plans with their prices and features. Click Request plan to ask for an upgrade; the Dentrist team reviews the request and activates the new plan.
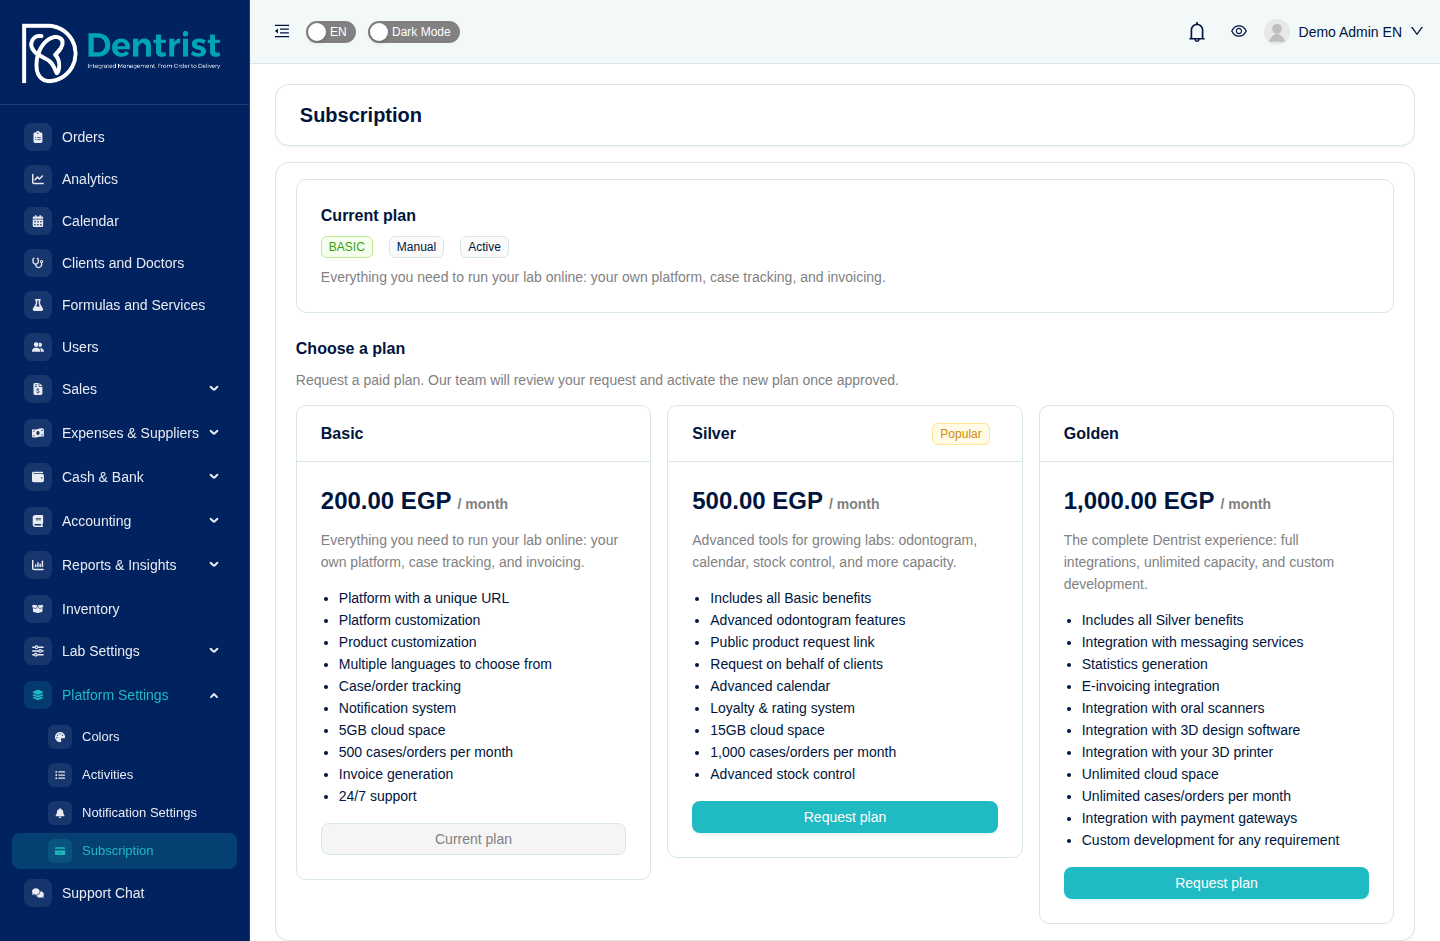
The current plan and the available plans.
13.9 Support chat
Menu: Support Chat
Chat directly with the Dentrist support team. Type your question, attach a screenshot if helpful, and click Send. Replies arrive in the same conversation, usually within a few hours.
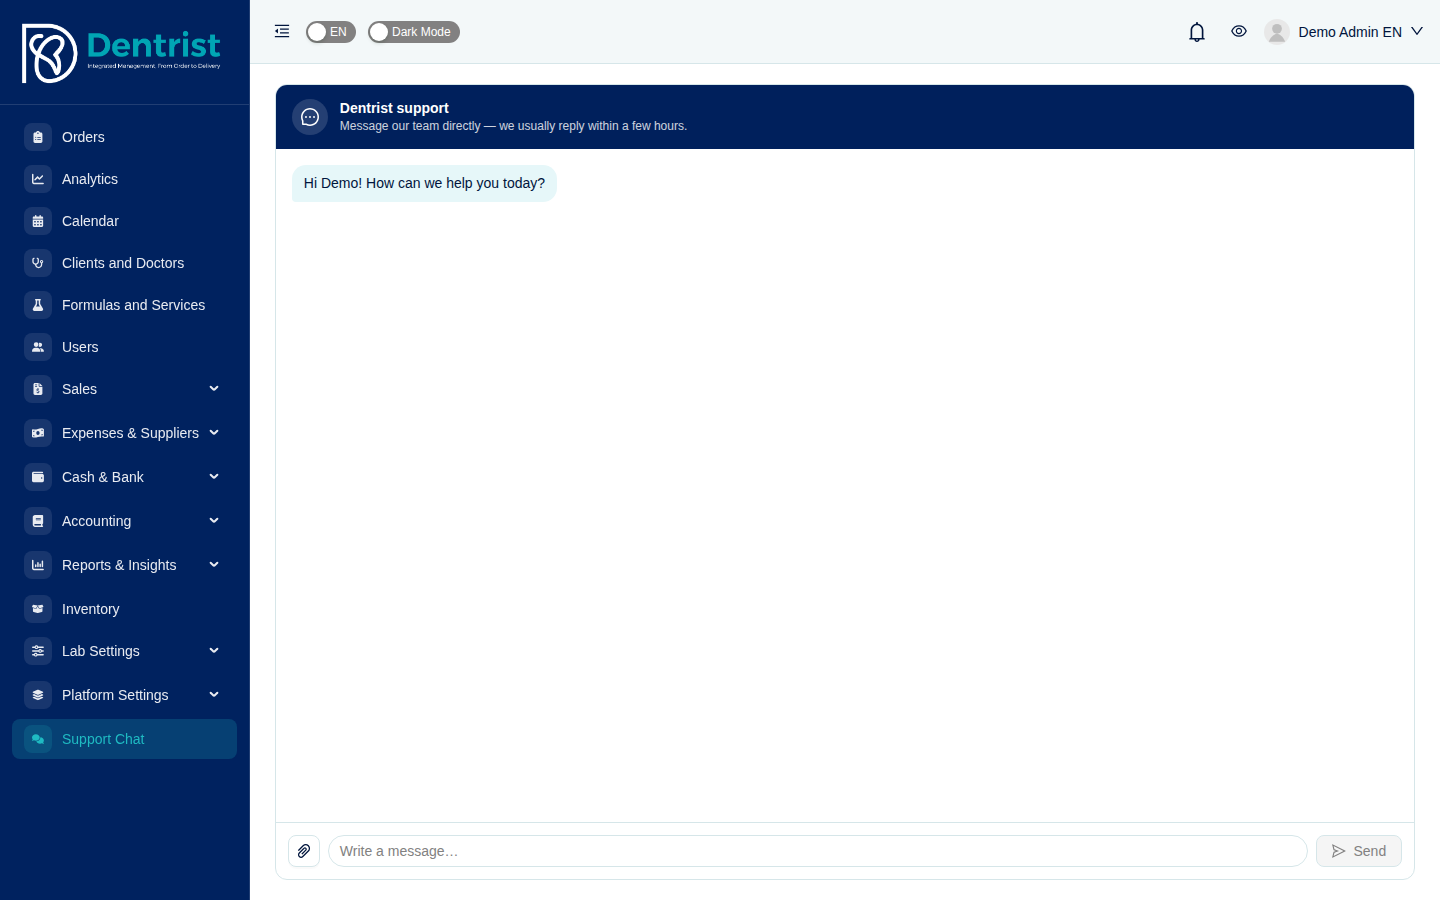
Chatting with Dentrist support.
14. The dentist portal
Dentists sign in on the same page as the lab staff. Dentrist recognizes them and shows the dentist portal, with a shorter menu focused on their own cases and account: Orders, Analytics, Calendar, Invoices, Account Statement, Settings, Wallet and Support Chat.
14.1 Orders
The dentist sees only their own (or their clinic's) orders, with the statuses the lab chooses to share.

The orders list in the dentist portal.
To send a new case, the dentist clicks Create Order. The dentist portal keeps a simpler form than the lab's: the Client and Dentist are already filled in and locked, there is no financial panel, and Submit Order sits at the top of the page. The dentist enters the patient name and delivery date, picks the delivery center, chooses the formula, shade and teeth on the tooth chart, attaches the scans or photos and clicks Submit Order. The order arrives at the lab as Requested, and the lab is notified.

A dentist sending a new order to the lab.
On each order, the dentist can follow the status and, when the lab shares them, the production phases. They can talk with the lab in the Client conversation and download the lab's files.
14.2 Dashboard
The dentist's Analytics page summarizes the clinic's orders (clinic orders, finished, in progress, upcoming deliveries and cases this month), the amounts ordered, paid and unpaid, the number of clinic invoices, the latest orders and invoices, the orders progress and the invoice payments. A Create Order shortcut sits at the top.

The dentist dashboard.
14.3 Invoices, statement and wallet
- Invoices: the invoices the lab issued to the clinic, with their status and remaining amounts. They can be viewed, printed and downloaded.
- Account Statement: the same statement the lab sees, with every billable order, what is paid and what is due.
- Wallet: the clinic's prepaid balance and its history.
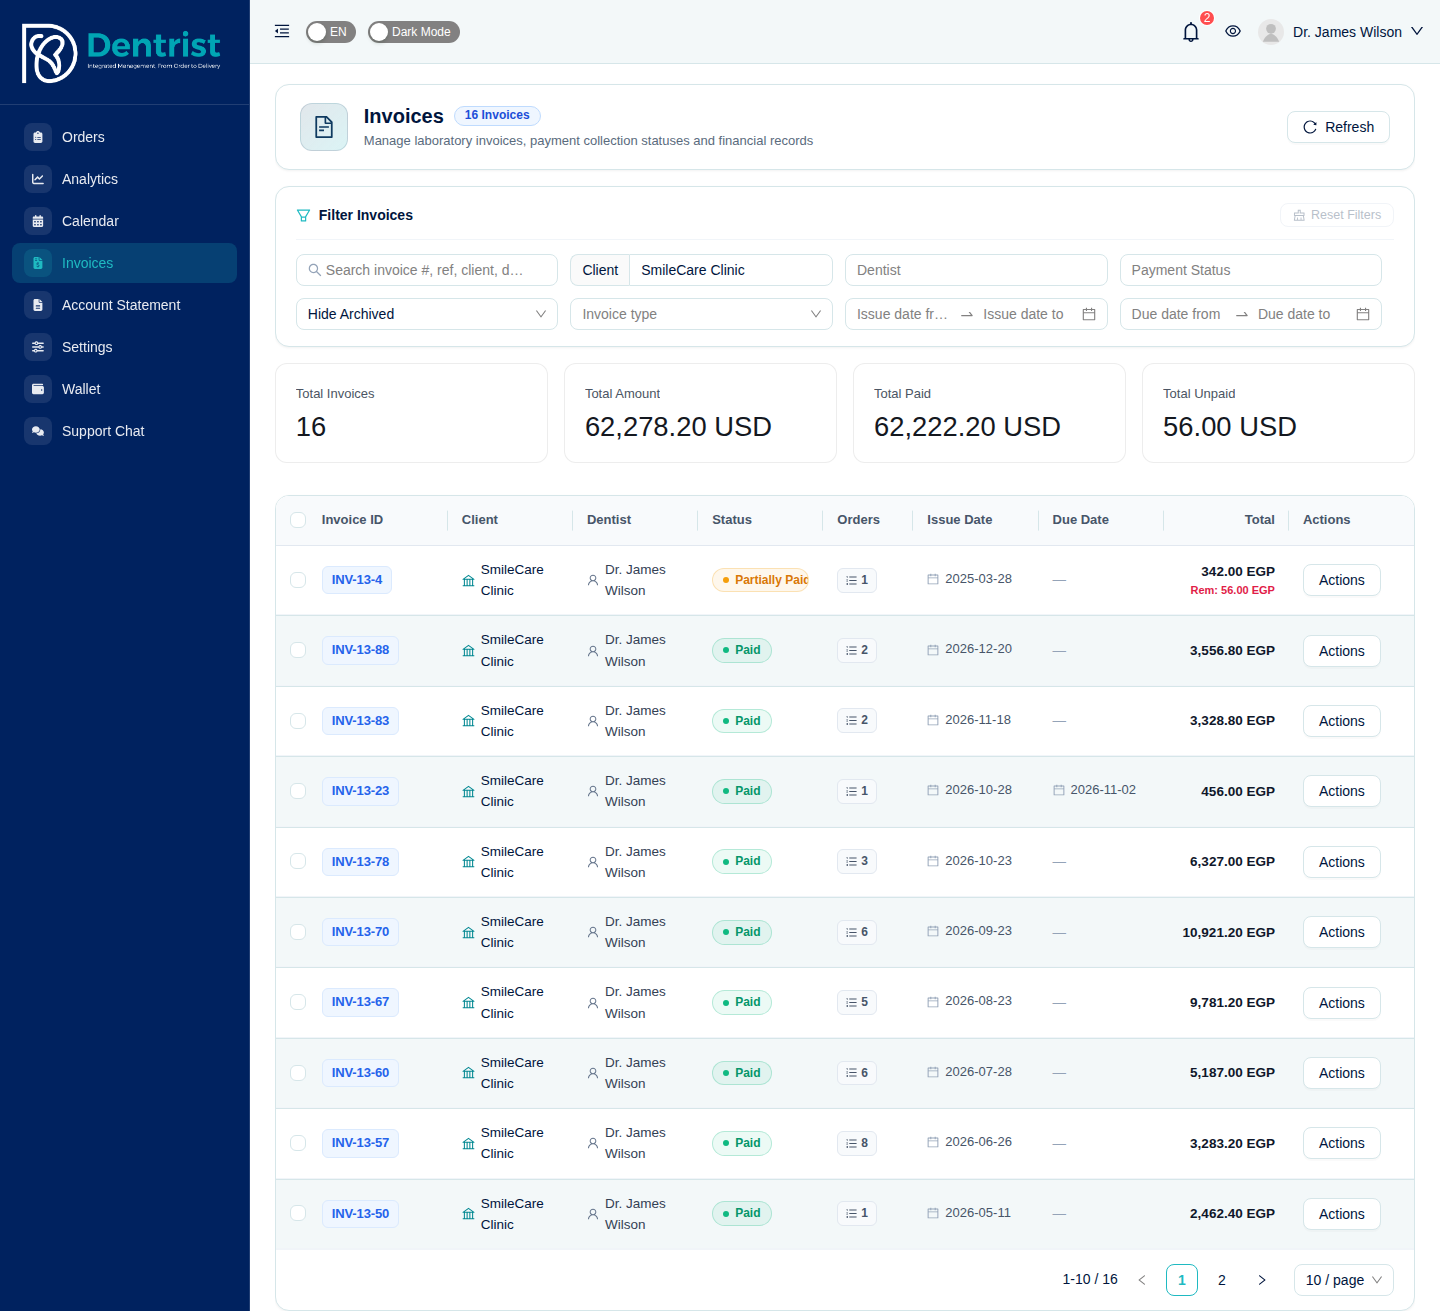
Invoices in the dentist portal.
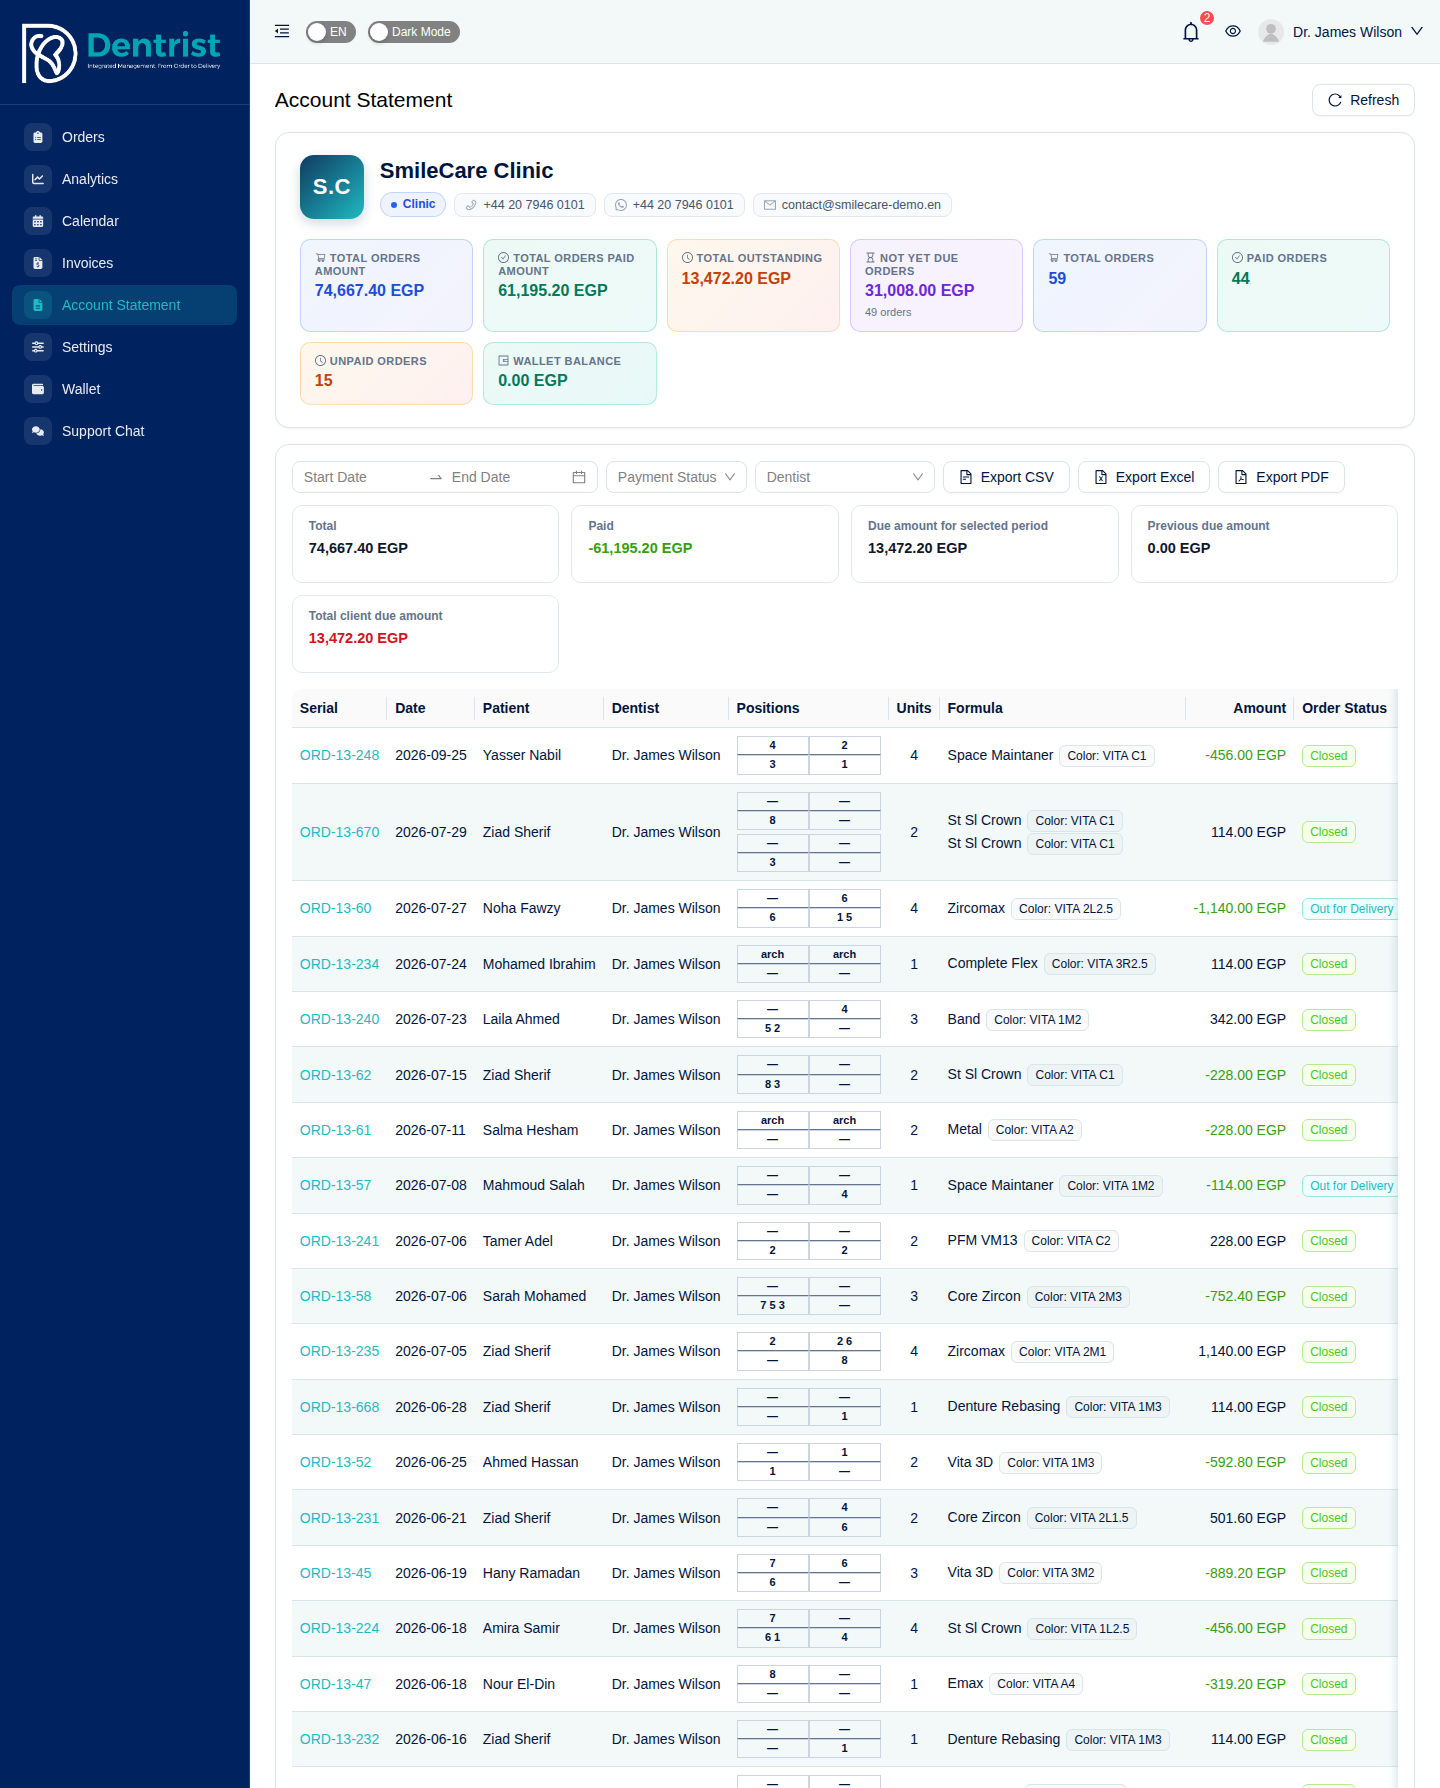
The clinic's account statement.

The clinic's wallet.
14.4 Settings and client accounts
Settings shows the clinic's details as the lab recorded them: name, type, phone, WhatsApp, email and delivery centers. Below them, Client accounts lists every dentist account linked to the clinic, with its username, email, phone, whether it is the main account and its status. Only the main account can see this list. The lab creates and edits these accounts from the client's Dentists tab.

Clinic settings in the dentist portal.
Why it matters: dentists stop calling to ask "where is my case?" because they can see it live, and the lab gets complete, readable orders with scans attached.
15. The technician view
Technicians see a reduced menu: Orders, Analytics, Calendar, a few Platform Settings and Support Chat. The orders list is already filtered to the technician and shows no prices. A Remakes only filter shows the cases sent back for rework.
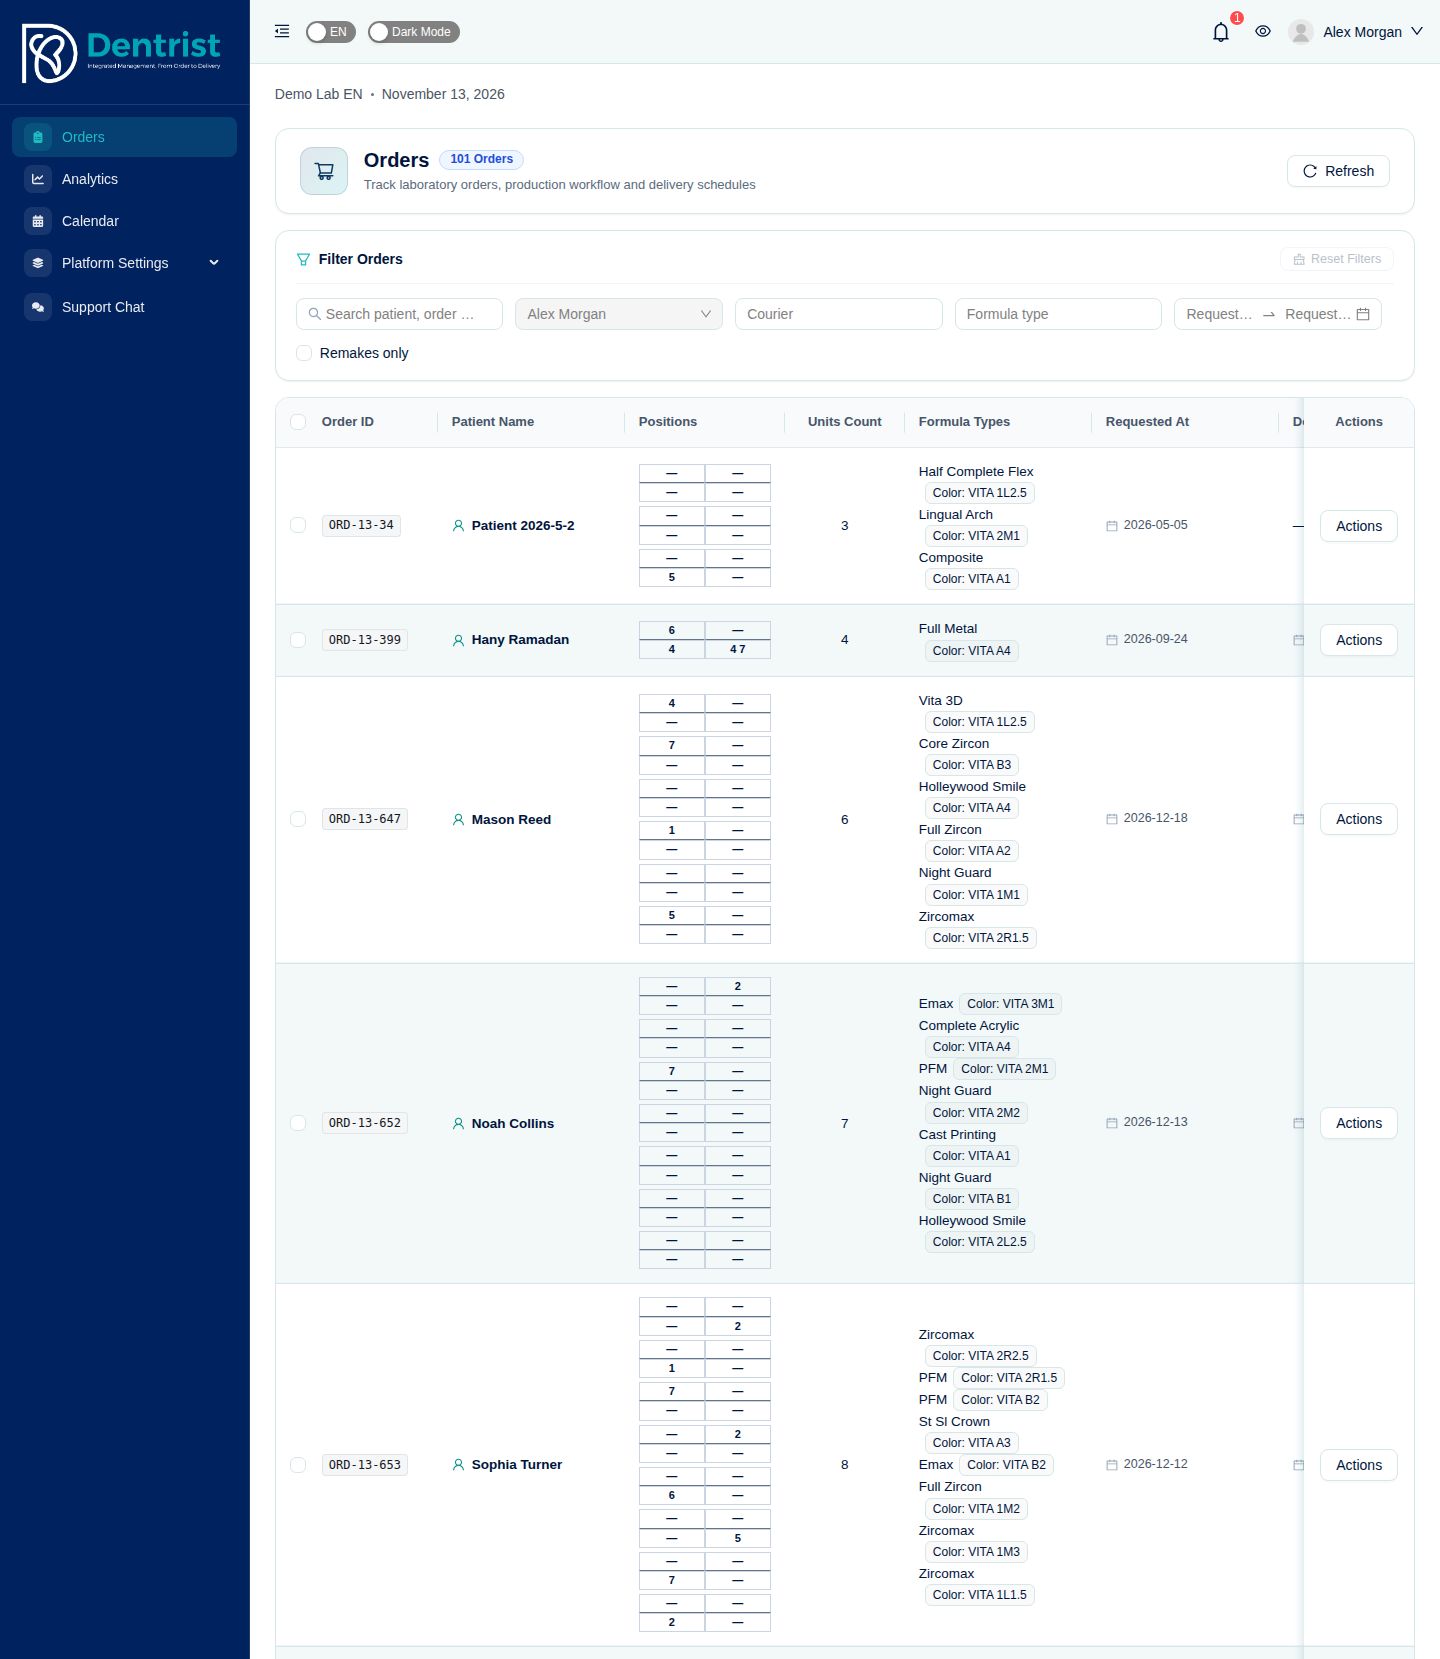
The orders list of a technician.
From the order page, a technician can update the production phases they work on, upload files (for example the design), chat with the team, and move the order status when their role allows it.

The technician's dashboard: assigned orders, expenses paid to them and the latest assigned orders.
Appendix A. Quick reference
A.1 Common tasks
| I want to… | Go to |
|---|---|
| Register a new case | Orders → Create Order |
| Take an order from a dentist who is not in the system yet | Orders → Create Order → New Dentist |
| Move a case to the next step | Order page → Jump to status |
| Assign a technician or courier | Order page → Workflow and Operations |
| Upload or view a scan | Order page → File Management → eye icon |
| Print the job ticket | Order page → Work Card |
| Send the dentist a link to the order | Order page → Copy link |
| Invoice a delivered case | Order page → Create invoice |
| Record a payment | Invoice → Mark as Paid / Partial Payment |
| Take a prepaid amount from a clinic | Clients → client → Wallet → Recharge |
| Send a clinic its statement | Clients → client → Account statement → Export |
| Give a clinic a special price | Clients → client → Custom prices |
| Record rent or a utility bill | Expenses and Suppliers → Expenses → Add Expense |
| Record a purchase on credit | Expenses and Suppliers → Supplier Bills → New bill |
| Pay technicians for the month | Expenses and Suppliers → Technician Settlements |
| Run payroll | Expenses and Suppliers → Salaries → New salary run |
| See who owes me money | Reports and Insights → Aging Reports |
| See my profit | Reports and Insights → Financial Reports → Profit and loss |
| Close last month | Accounting → Period Close |
| Add a staff member | Users → Add User |
| Change the VAT rate | Accounting → Tax → Settings |
| Add a lab holiday | Lab Settings → Vacations |
| Ask Dentrist for help | Support Chat |
A.2 Order statuses
Each lab can have its own workflow. The default statuses are:
| Status | Meaning |
|---|---|
| Requested | The order was received and is waiting to start. No production cost yet |
| In Progress | The case is on the bench. Production costs are recorded |
| Out for Delivery | The case left the lab. Usually the billable status: the amount is now owed |
| Delivered | The case reached the clinic |
| Closed | Delivered and paid |
| On Hold | Paused (for example waiting for the dentist). Keeps its billable state |
| Cancelled | Cancelled. Revenue and production costs are reversed |
Labs may add their own statuses, such as Under Review, Pending Design Approval, Design Approved, Design Revision Requested, Final Manufacturing in Progress or Disputed.
A.3 Default chart of accounts
| Code | Account | Code | Account |
|---|---|---|---|
| 1000 | Cash on hand | 2300 | Accrued production costs |
| 1010 | Bank | 2400 | Technician payable |
| 1020 | Money transfer channels | 2500 | Salaries payable |
| 1100 | Accounts receivable | 3000 | Equity / opening balances |
| 1150 | Withholding tax receivable | 4000 | Lab revenue |
| 1160 | Input tax recoverable | 4100 | Delivery revenue |
| 1500 | Inventory / materials | 4900 | Foreign exchange gain |
| 1600 | Fixed assets | 5000 | Materials / cost of sales |
| 2000 | Accounts payable | 5100 | Technician labor |
| 2100 | Client wallet / prepaid | 5200 | Additional operation cost |
| 2200 | VAT payable | 5300 | General operating expenses |
| 2210 | Other taxes payable | 5400 | Delivery cost |
| 5500 | Salaries and wages | ||
| 5900 | Foreign exchange loss |
A.4 Glossary
| Term | Meaning |
|---|---|
| Vendor | A lab using Dentrist |
| Client | A clinic, hospital or partner lab that orders from the lab |
| Formula type | A product or service the lab sells (crown, bridge unit, denture…) |
| Unit | One tooth (or one arch) of a formula on an order |
| FDI chart | The international tooth numbering chart used to select teeth |
| Phase | A production step of an order (Model, Design, Waxing…) |
| Billable status | The order status from which the client owes the order amount |
| Remake | A new order that redoes a previous one, linked to it with a reason |
| Wallet | A client's prepaid balance with the lab |
| Delivery center | An address of a client where cases are delivered |
| Settlement | A piece-rate pay statement for a technician |
| Journal entry | A balanced accounting record (debits equal credits) |
| Period close | Locking the books up to a date |
A.5 Troubleshooting
| Problem | What to do |
|---|---|
| An order cannot be invoiced | It has not reached the billable status yet, is on hold or cancelled, or is already on another invoice |
| An order cannot be edited | It reached the billable status. Move it back to an earlier status to edit it |
| An order is missing from revenue or the client statement | It has not reached the billable status. Check the yellow note on the order page |
| Totals on the dashboard and the reports differ | The dashboard is operational; the financial reports come from the ledger. Use the financial reports for the books |
| The ledger health check shows differences | Click Resync ledger on the Chart of Accounts page and run the checks again |
| A wallet recharge cannot be reverted | The wallet balance is lower than the recharge amount, or it was already reverted |
| A menu page is missing | Your role does not include it, or the feature is not enabled for your lab. Ask your admin or Dentrist support |
| Prices are not visible | Click the eye icon in the top bar |